- Mark as New
- Bookmark
- Subscribe
- Mute
- Subscribe to RSS Feed
- Permalink
- Report Inappropriate Content
I just installed vtune 2019, but it appears that vtune amplifier still can not give me line-by-line timing information for an OpenCL code like it did in 2016 version.
this issue was previously reported in this thread for vtune2018
https://software.intel.com/en-us/forums/intel-vtune-amplifier/topic/746813
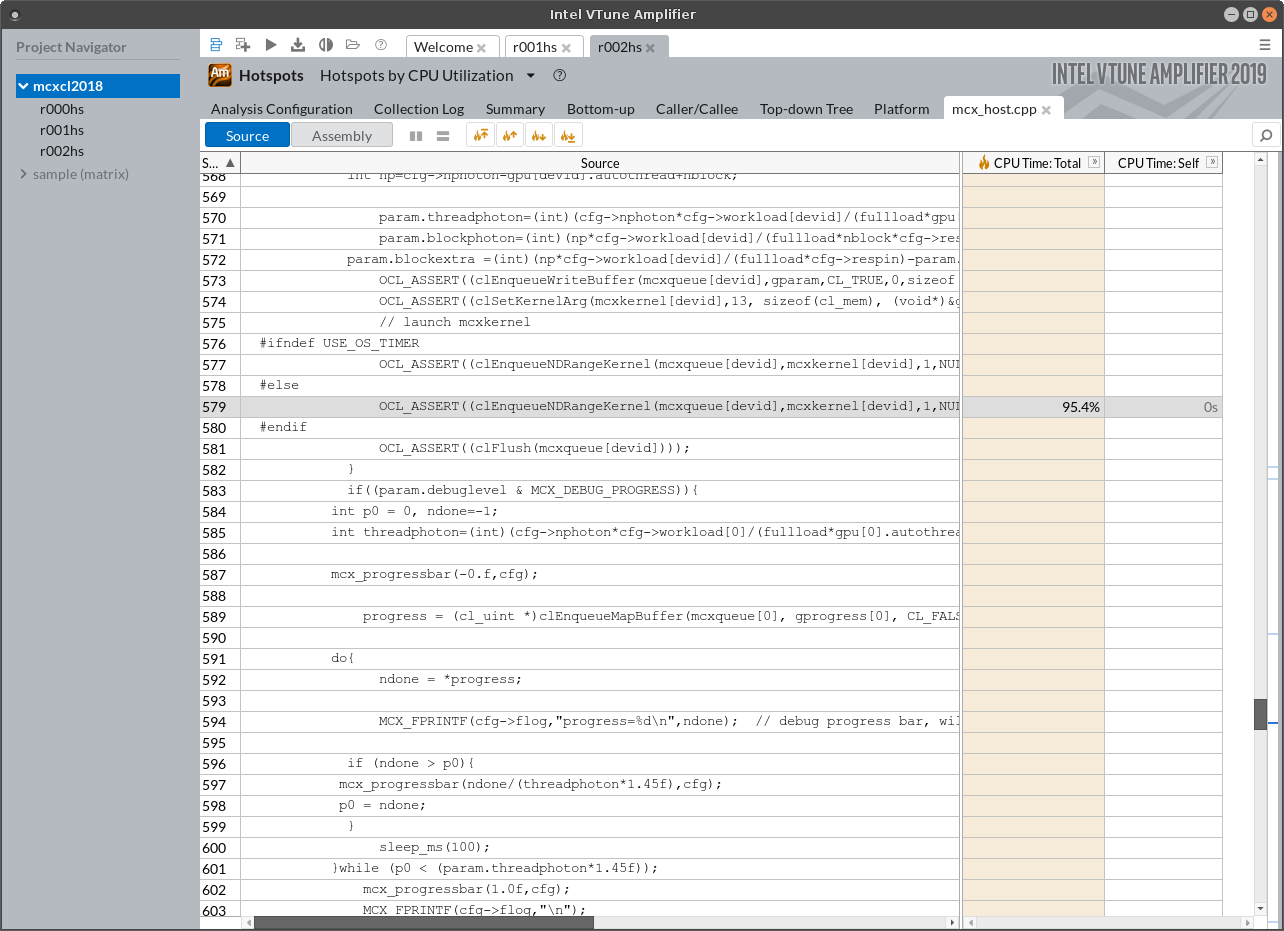
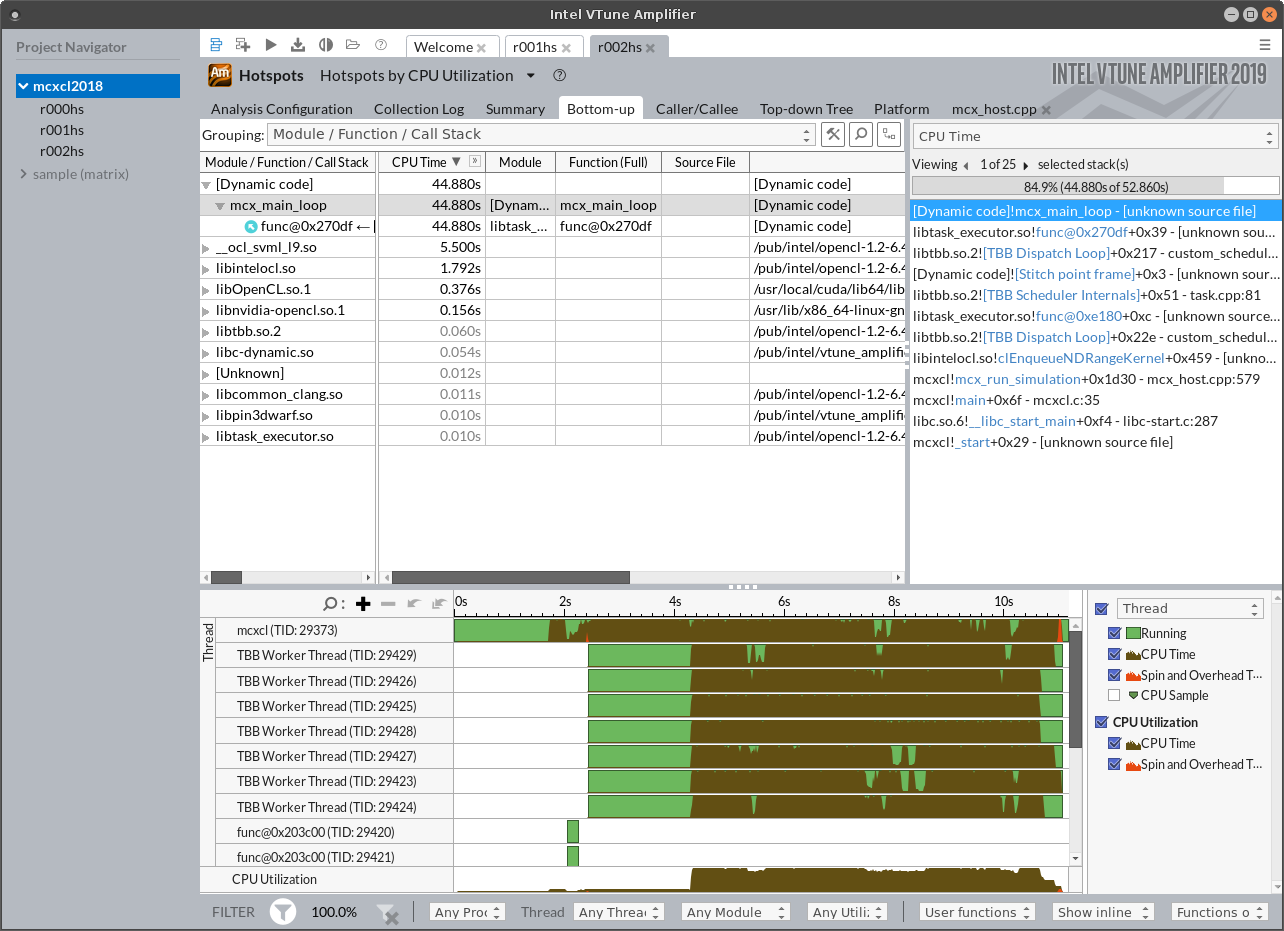
now, if I run my code and view the bottom-up view, I can see my kernel, but it hows "Dynamic code" and "unknown source file". see attachment 1. Double clicking on this kernel name gives me the assembly, which is not very helpful to optimize the code (in vtune2016, it shows the timing for each source code in the .cl file).
if I go to Caller/Callee tab, double clicking on the kernel, it does open a tab with the host code (but not the .cl kernel source code). see the 2nd attachment.
can anyone tell me how I can tell vtune my kernel source code (mcx_core.cl) so that it can show me the timing info for each source code line?
thanks
Link Copied
- Mark as New
- Bookmark
- Subscribe
- Mute
- Subscribe to RSS Feed
- Permalink
- Report Inappropriate Content
Hi fang,
If you run an OpenCL kernel on CPU, you can specify a path to source file using the compiler option "-s {source file path}". You can pass it to clBuildProgram().
Thanks.
- Mark as New
- Bookmark
- Subscribe
- Mute
- Subscribe to RSS Feed
- Permalink
- Report Inappropriate Content
hi Egor, thanks for the reply, I attached the -s flag to my kernel compilation parameters but there is no change - the kernel still shows as dynamic code, and clicking on it only gives me the assembly.
I am attaching the vtune window after running the command and the command line output of the profiling, showing the -s was used.
is there something else missing? thanks
(by the way, the issue regrading -g flag that I reported previously still gives me a segfault in vtune2019, is this flag needed? see
https://software.intel.com/en-us/forums/intel-vtune-amplifier/topic/746813#comment-1913797
)
- Mark as New
- Bookmark
- Subscribe
- Mute
- Subscribe to RSS Feed
- Permalink
- Report Inappropriate Content
Hi fang,
So in this case the additional investigation is required. Previously you mentioned https://github.com/fangq/mcxcl project and provide information on how to build/run it. Can I use it to reproduce your problem?
Thanks.
- Mark as New
- Bookmark
- Subscribe
- Mute
- Subscribe to RSS Feed
- Permalink
- Report Inappropriate Content
hi Egor, here are the commands to reproduce the issue, first, you need to download and compile mcxcl (should work for most Linux systems)
git clone http://github.com/fangq/mcxcl.git
cd mcxcl/src
make clean all
cd ../bin
./mcxcl -L
if the "make" command does not print any error, you should see the compiled binary in mcxcl/bin folder, the last command abvoe (mcxcl -L) should list the compute devices on yoru system (you should see your Intel CPU/GPU if the driver is installed properly).
Then, you open vtune amplifier, and in the Launch Application dialog, type the below information:
Application: select the bin/mcxcl binary
Application parameters: -A -f benchmark1.json -b 0 -G 1 -n 3e6 -J '-s /path/to/mcxcl/src'
Working directory: /path/to/mcxcl/example/benchmark
Please replace the /path/to/mcxcl to the actual downloaded mcxcl folder on your computer. A screenshot of the dialog is attached below. The "-G 1" assumes the Intel CPU is the 1st device in the above mcxcl -L output list. If it is 2nd in the list, use -G 2, and so on.
The main cl kernel file is at mcxcl/bin/mcx_core.cl, and by default is compiled statically in the binary, but if you want to explicitly tell mcxcl to use an external .cl kernel file, you need to append "-k /path/to/mcxcl/src/mcx_core.cl" in the Application parameters section above.
Once you set up the configuration, click the run button, you should see the profiling analysis results. On my system, the main kernel, mcx_main_loop() in mcx_core.cl can not be linked with its source file.
Please let me know if you can help me diagnose this issue. thanks
- Mark as New
- Bookmark
- Subscribe
- Mute
- Subscribe to RSS Feed
- Permalink
- Report Inappropriate Content
Hi fang,
Thank you for the detailed instruction!
Firstly, please install Intel® CPU Runtime for OpenCL™ Applications 18.1 for Linux* OS, it contains the fix for this issue.
Secondly, you need to specify search directories for source files. Click on button "Search Sources/Binaries" on "Collection Log" tab for collected result and add search directory for source files: /<path_to>/mcxcl/src
Next, run analysis with following application parameters: -A -f benchmark1.json -b 0 -G 1 -n 3e6 -J '-s mcx_core.cl'
Finally, asm-to-source line mapping for OpenCL kernels should work.
Thanks.
- Mark as New
- Bookmark
- Subscribe
- Mute
- Subscribe to RSS Feed
- Permalink
- Report Inappropriate Content
- Mark as New
- Bookmark
- Subscribe
- Mute
- Subscribe to RSS Feed
- Permalink
- Report Inappropriate Content
Hi fang,
Do you try to install lsb-core package from repository? For example:
sudo apt-get install lsb-core
Also please run lsb_release command and post the output.
Thanks.
- Mark as New
- Bookmark
- Subscribe
- Mute
- Subscribe to RSS Feed
- Permalink
- Report Inappropriate Content
hi Egor, the previous issue was actually not due to missing lsb-core, but the digital signature. I was able to get around it by using
sudo ./install.sh --ignore-signature
however, after successful installation, setting the library path to the new library, and adding the search path and the -s flag, I am still getting the same result - that the main kernel is shown as dynamic code and can not be mapped to the source code.
I have another confusion - on my system, /opt/intel/opencl-1.2-6.4.0.25 stores the previous intel OpenCL library, and /etc/alternatives/opencl-libOpenCL.so also points to /opt/intel/opencl-1.2-6.4.0.25/lib64/libOpenCL.so. After installing the new library 18.1, I the link in /etc/alternatives still points to the old path, and the new installation in /opt/intel/opencl_compilers_and_libraries_18.1.0.013 has a quite different folder structure.
my question is, after installing 18.1, how am I supposed to use it?
I've already tried to add it (/pub/intel/opencl_compilers_and_libraries_18.1.0.013/linux/compiler/lib/intel64_lin) to $LD_LIBRARY_PATH, as well as to redirect /opt/intel/opencl-1.2-6.4.0.25/lib64 to the new intel64_lin path using a link, but neither of these seems to make a difference in vtune output.
- Mark as New
- Bookmark
- Subscribe
- Mute
- Subscribe to RSS Feed
- Permalink
- Report Inappropriate Content
Hi fang,
I've already tried to add it (/pub/intel/opencl_compilers_and_libraries_18.1.0.013/linux/compiler/lib/intel64_lin) to $LD_LIBRARY_PATH, as well as to redirect /opt/intel/opencl-1.2-6.4.0.25/lib64 to the new intel64_lin path using a link, but neither of these seems to make a difference in vtune output.
Please revert it to initial state because these changes can lead to problems with Intel OpenCL runtimes. Intel OpenCL runtime supports OpenCL ICD extension. It means that when you install Intel OpenCL runtime the installer creates vendor ICDs files in /etc/OpenCL/vendors. You can use these files to specify which Intel OpenCL runtime will be available through libOpenCL.so. So I suggest you following:
1. Check that /etc/OpenCL/vendors contain the intel*.icd file with absolute path to Intel OpenCL 18.1 runtime, for example:
cat /etc/OpenCL/vendors/intel64.icd
/opt/intel/opencl_compilers_and_libraries_18.1.0.013/linux/compiler/lib/intel64_lin/libintelocl.so
If there is no such file you need to create it.
2. Rename all other intel*.icd files that contain path to previous runtime version or contains just the name of the library "libintelocl.so", for example:
cat /etc/OpenCL/vendors/intelocl64.icd
libintelocl.so
mv /etc/OpenCL/vendors/intelocl64.icd /etc/OpenCL/vendors/intelocl64.bak
After that mcxcl -L should show only one Intel OpenCL CPU device and Intel OpenCL 18.1 runtime should be used.
Thanks.
- Mark as New
- Bookmark
- Subscribe
- Mute
- Subscribe to RSS Feed
- Permalink
- Report Inappropriate Content
thanks again. I think I am getting close, but still not there yet.
after editing intel64.icd and update with the new libintelocl.so path, clinfo now prints the 18.01 OpenCL version for the CPU device.
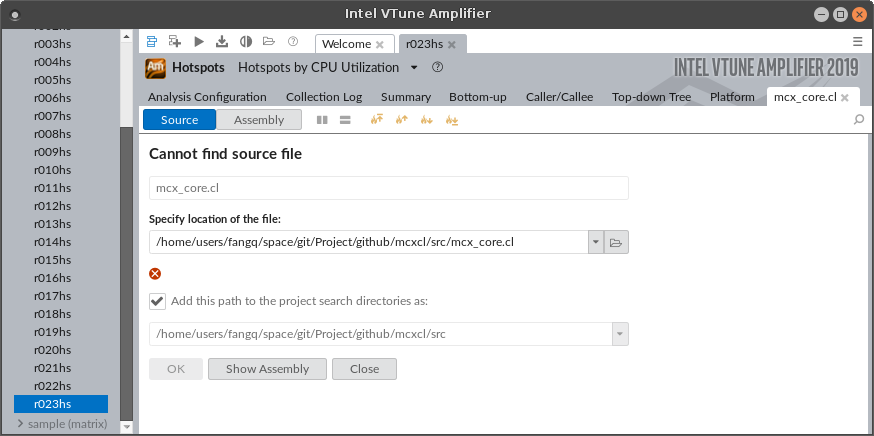
When profiling mcxcl in vtune, however, the mcx_main_loop kernel still shows as "[Dynamic code]!mcx_main_loop - mcx_core.cl", however, clicking on it, it gives me a dialogue says "Can not find source file". Use the browse button, I can point to the mcx_core.cl file location, however, there is a red cross below it, and the OK button was still gray, apparently something is still not right. Please checkout the attached screenshot.
Any other things I should check?
the clinfo output snippet for the CPU device is attached below
 Platform Name                                   Intel(R) CPU Runtime for OpenCL(TM) Applications
Number of devices                                 1
  Device Name                                     Intel(R) Core(TM) i7-7700K CPU @ 4.20GHz
  Device Vendor                                   Intel(R) Corporation
  Device Vendor ID                                0x8086
  Device Version                                  OpenCL 2.1 (Build 0)
  Driver Version                                  18.1.0.0920
  Device OpenCL C Version                         OpenCL C 2.0
  Device Type                                     CPU
  Device Profile                                  FULL_PROFILE
  Max compute units                               8
  Max clock frequency                             4200MHz
- Mark as New
- Bookmark
- Subscribe
- Mute
- Subscribe to RSS Feed
- Permalink
- Report Inappropriate Content
Hi fang,
You need to specify search directories for source files to workaround this problem with "red cross". Click on button "Search Sources/Binaries" on "Collection Log" tab for collected result and add search directory for source files: /<path_to>/mcxcl/src
Thanks.
- Mark as New
- Bookmark
- Subscribe
- Mute
- Subscribe to RSS Feed
- Permalink
- Report Inappropriate Content
Thank you so much Egor, you were right! I only specified the path for the binaries & symbols, but not for source. After adding that path, now I am able to see the line-by-line profiling again!
Right now, it looks like 23% of my run-time is to do an atomicadd for floating point number - opencl does not support atomic add for floats (at least in the old specifications). I am currently using a popular hack using atomic_xchg, do you know if there is a more efficient way on Intel processors?
see screenshot below.
- Mark as New
- Bookmark
- Subscribe
- Mute
- Subscribe to RSS Feed
- Permalink
- Report Inappropriate Content
Hi fang,
I've forwarded your question to my colleagues. Maybe they will suggest a solution.
Thanks.
- Mark as New
- Bookmark
- Subscribe
- Mute
- Subscribe to RSS Feed
- Permalink
- Report Inappropriate Content
- Subscribe to RSS Feed
- Mark Topic as New
- Mark Topic as Read
- Float this Topic for Current User
- Bookmark
- Subscribe
- Printer Friendly Page