How to use a jam file to run the KEY_VERIFY JTAG command on Arria 10 and Cyclone 10 GX
Success! Subscription added.
Success! Subscription removed.
Sorry, you must verify to complete this action. Please click the verification link in your email. You may re-send via your profile.
- Intel Community
- Intel Community Knowledge Base
- Product Support Forums Knowledge Base
- FPGA Knowledge Base
- FPGA Wiki
- How to use a jam file to run the KEY_VERIFY JTAG command on Arria 10 and Cyclone 10 GX
How to use a jam file to run the KEY_VERIFY JTAG command on Arria 10 and Cyclone 10 GX
- Subscribe to RSS Feed
- Mark as New
- Mark as Read
- Bookmark
- Subscribe
- Printer Friendly Page
- Report Inappropriate Content
How to use a jam file to run the KEY_VERIFY JTAG command on Arria 10 and Cyclone 10 GX
Description
This article is dedicated to users that are struggling to understand the process to run the JTAG KEY_VERIFY command on an Arria 10 and Cyclone 10 GX FPGA.
Documentation Links
The following applications notes have information about the KEY_VERIFY command and about running JAM files via the command line.
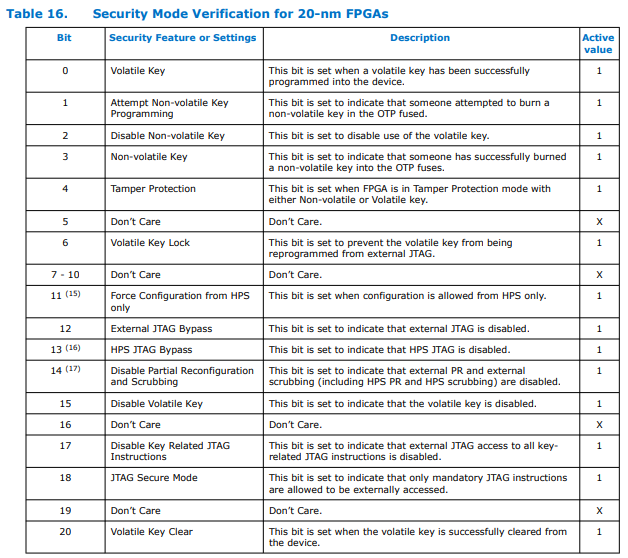
AN 556: Using the Design Security Features in Intel FPGAs


Arria 10 and Cyclone 10 GX are 20-nm FPGAs.
AN 425: Using the Command-Line Jam STAPL Solution for Device Programming

How to run KEY_VERIFY on Arria 10 and Cyclone 10 GX
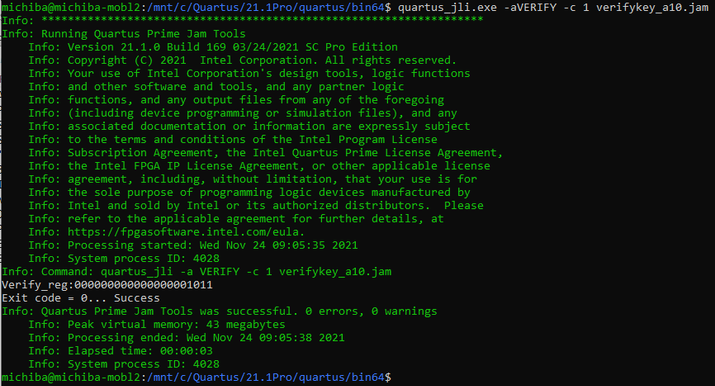
Although the links in the documentation section can be helpful, putting it all together and using the example JAM file in AN556 does not work for Arria 10 and Cyclone 10 GX when running quartus_jli from the command line. Here is the correct procedure to execute the KEY_VERIFY command using Quartus Prime Pro version 21.1:
- Open up a NIOSII command line shell
- Change directory to the Quartus installation bin64 directory

- Download the file verifykey_a10.txt at the bottom of the article and then move it to the same bin64 directory where Quartus was installed.
- Rename the verifykey_a10.txt to verifykey_a10.jam
- Run the Quartus Prime Jam Tools
quartus_jli.exe -aVERIFY -c 1 verifykey_a10.jam

- Refer to table 16 in AN 556: Using the Design Security Features in Intel FPGAs to decode the bits set in the verify_reg readback.

Community support is provided during standard business hours (Monday to Friday 7AM - 5PM PST). Other contact methods are available here.
Intel does not verify all solutions, including but not limited to any file transfers that may appear in this community. Accordingly, Intel disclaims all express and implied warranties, including without limitation, the implied warranties of merchantability, fitness for a particular purpose, and non-infringement, as well as any warranty arising from course of performance, course of dealing, or usage in trade.
For more complete information about compiler optimizations, see our Optimization Notice.