Intel® DevCloud
Help for those needing help starting or connecting to the Intel® DevCloud
1640 Discussions

How to return image data file from a submitted Python job?

pihx
Employee
1,149 Views

Hello, 

I run a python program from my DevCloudEdge terminal that perform neural style transfer training and inference and it return the styled image. When I submit my python script to run on a node using this command:

qsub runMyst2.sh -l nodes=1:idc018 -F "results/INT8 CPU async INT8"


runMyst2.sh:

VENV_PATH=". ./test-vir"

echo "Activating a Python virtual environment from ${VENV_PATH}..."
source ${VENV_PATH}/bin/activate

python3 myst2.py


In end myst2.py I use matplotlib to save the StyledImage.jpg in my home directory:

plt.imsave('styled_image_starrynight.jpeg', scale_img(final_img))


When I submit my myst2.py to the Edge Compute Nodes queue it runs, but I am not getting the styled image to my home directory. How can I get the result data/image from a Node job?

Thanks

0 Kudos
6 Replies
Hari_B_Intel
Moderator
1,118 Views

Hi pihx


Thank you for contacting us, based on the issue you are facing, I can suggest using cv2.imwrite() will be better since you can specify the path you want to save the file.


For example;

cv2.imwrite('/home/u70000/Test_gray.jpg', image_gray)


Hope this information helps


Thank you


0 Kudos
pihx
Employee
1,096 Views

Hi Hari,

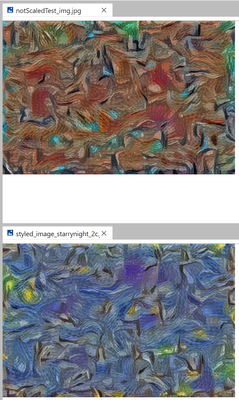
Thank you for your suggestion, and it works if I run my python script from a local terminal(python myst2.py) it works.  It just changes the colors a bit see attachment.


pihx_0-1657085338128.png


The tail of myst2.py

pihx_0-1657071693698.png


But the same code doesn't work when I submit the script to a compute node.


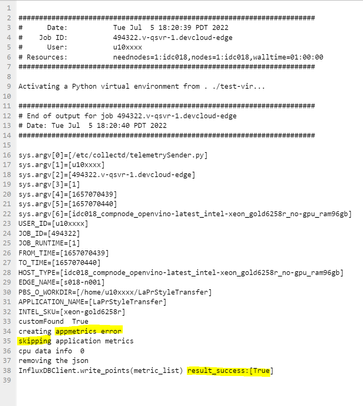
pihx_2-1657072268772.png


pihx_4-1657072582047.png

I looks to me like it ran into an error, but could deal with it and finished the entire script! 

How can I debug the execution to find the reason why it doesn't return the styled image to my folder?

How can I see the stage a submitted job is in. Still in queue, executing, finished. Is there a log file I can check?


Appreciate your suggestions!

0 Kudos
Hari_B_Intel
Moderator
1,080 Views

Hi Pihx,

Sorry for taking some time to get the error message you received.

From the issue you mention, it seems like the job did not complete and push the error message. I can suggest you test only the python file (myst2.py) without submitting it to the job queue.


!python myst2.py <arguiment> or in the terminal, run python myst2.py <arguiment>


From there we can debug the issue in the python code.


Thank you


0 Kudos
pihx
Employee
1,070 Views


Hi Hari,

Thanks for your advise


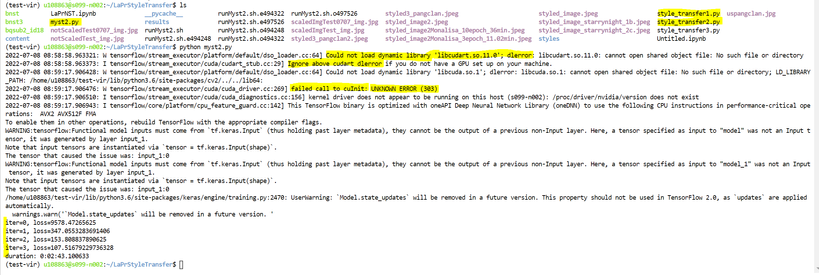
I am able to run "python myst2.py" in my DevCloud terminal, despite some CUDA warning/errors that was ignored.

But the script ran, and trained and returned the styled Image.

I have the code from a Lazy Programmer Udemy course, myst2.py is a slightly modified version of style_transfer2.py see attachment. 

Is using pdb the best way to debug a python app in my DevCloudEdge terminal? 


pihx_0-1657298127329.png

//////////////////////

myst2.py:


from __future__ import print_function, division
from builtins import range, input
# Note: you may need to update your version of future
# sudo pip install -U future

from keras.models import Model, Sequential
from keras.applications.vgg16 import preprocess_input
from keras.preprocessing import image
from keras.applications.vgg16 import VGG16

from style_transfer1 import VGG16_AvgPool, unpreprocess, scale_img
# from skimage.transform import resize
from scipy.optimize import fmin_l_bfgs_b
from datetime import datetime

import numpy as np
import matplotlib.pyplot as plt
import keras.backend as K
import cv2

def gram_matrix(img
  # input is (H, W, C) (C = # feature maps)
  # we first need to convert it to (C, H*W)
  X = K.batch_flatten(K.permute_dimensions(img, (2, 0, 1)))
 
  # now, calculate the gram matrix
  # gram = XX^T / N
  # the constant is not important since we'll be weighting these
  G = K.dot(X, K.transpose(X)) / img.get_shape().num_elements()
  return G


def style_loss(y, t
  return K.mean(K.square(gram_matrix(y) - gram_matrix(t)))


# let's generalize this and put it into a function
def minimize(fn, epochs, batch_shape
  t0 = datetime.now()
  losses = []
  x = np.random.randn(np.prod(batch_shape))
  for i in range(epochs
    x, l, _ = fmin_l_bfgs_b(
      func=fn,
      x0=x,
      maxfun=20
    )
    x = np.clip(x, -127, 127)
    print("iter=%s, loss=%s" % (i, l))
    losses.append(l)

  print("duration:", datetime.now() - t0)
  plt.plot(losses)
  plt.show()

  newimg = x.reshape(*batch_shape)
  final_img = unpreprocess(newimg)
  return final_img[0]


if __name__ == '__main__':
  # try these, or pick your own!
  path = 'styles/starrynight.jpg'
  # path = 'styles/flowercarrier.jpg'
  # path = 'styles/monalisa.jpg'
  # path = 'styles/lesdemoisellesdavignon.jpg'


  # load the data
  img = image.load_img(path)

  # convert image to array and preprocess for vgg
  x = image.img_to_array(img)

  # look at the image
  # plt.imshow(x)
  # plt.show()

  # make it (1, H, W, C)
  x = np.expand_dims(x, axis=0)

  # preprocess into VGG expected format
  x = preprocess_input(x)

  # we'll use this throughout the rest of the script
  batch_shape = x.shape
  shape = x.shape[1:]

  # let's take the first convolution at each block of convolutions
  # to be our target outputs
  # remember that you can print out the model summary if you want
  vgg = VGG16_AvgPool(shape)

  # Note: need to select output at index 1, since outputs at
  # index 0 correspond to the original vgg with maxpool
  symbolic_conv_outputs = [
    layer.get_output_at(1) for layer in vgg.layers \
    if layer.name.endswith('conv1')
  ]

  # pick the earlier layers for
  # a more "localized" representation
  # this is opposed to the content model
  # where the later layers represent a more "global" structure
  # symbolic_conv_outputs = symbolic_conv_outputs[:2]

  # make a big model that outputs multiple layers' outputs
  multi_output_model = Model(vgg.input, symbolic_conv_outputs)

  # calculate the targets that are output at each layer
  style_layers_outputs = [K.variable(y) for y in multi_output_model.predict(x)]

  # calculate the total style loss
  loss = 0
  for symbolic, actual in zip(symbolic_conv_outputs, style_layers_outputs
    # gram_matrix() expects a (H, W, C) as input
    loss += style_loss(symbolic[0], actual[0])

  grads = K.gradients(loss, multi_output_model.input)

  # just like theano.function
  get_loss_and_grads = K.function(
    inputs=[multi_output_model.input],
    outputs=[loss] + grads
  )


  def get_loss_and_grads_wrapper(x_vec
    l, g = get_loss_and_grads([x_vec.reshape(*batch_shape)])
    return l.astype(np.float64), g.flatten().astype(np.float64)


  #final_img = minimize(get_loss_and_grads_wrapper, 2, batch_shape)
  final_img = minimize(get_loss_and_grads_wrapper, 4, batch_shape)
  #final_img = minimize(get_loss_and_grads_wrapper, 10, batch_shape)
  plt.imshow(scale_img(final_img))
  plt.imsave('styled_image_starrynight_2c.jpeg', scale_img(final_img))
  scaledImgTest = scale_img(final_img)
  cv2.imwrite('/home/u108863/LaPrStyleTransfer/scaledImgTest0707_img.jpg', scaledImgTest)
  cv2.imwrite('/home/u108863/LaPrStyleTransfer/notScaledTest0707_img.jpg', final_img)


//////////////////////

style_transfer1.py:


from __future__ import print_function, division
from builtins import range, input
# Note: you may need to update your version of future
# sudo pip install -U future

# In this script, we will focus on generating the content
# E.g. given an image, can we recreate the same image

from keras.layers import Input, Lambda, Dense, Flatten
from keras.layers import AveragePooling2D, MaxPooling2D
from keras.layers.convolutional import Conv2D
from keras.models import Model, Sequential
from keras.applications.vgg16 import VGG16
from keras.applications.vgg16 import preprocess_input
from keras.preprocessing import image

import keras.backend as K
import numpy as np
import matplotlib.pyplot as plt

from scipy.optimize import fmin_l_bfgs_b


import tensorflow as tf
if tf.__version__.startswith('2'
  tf.compat.v1.disable_eager_execution()


def VGG16_AvgPool(shape
  # we want to account for features across the entire image
  # so get rid of the maxpool which throws away information
  vgg = VGG16(input_shape=shape, weights='imagenet', include_top=False)

  # new_model = Sequential()
  # for layer in vgg.layers:
  #   if layer.__class__ == MaxPooling2D:
  #     # replace it with average pooling
  #     new_model.add(AveragePooling2D())
  #   else:
  #     new_model.add(layer)

  i = vgg.input
  x = i
  for layer in vgg.layers:
    if layer.__class__ == MaxPooling2D:
      # replace it with average pooling
      x = AveragePooling2D()(x)
    else:
      x = layer(x)

  return Model(i, x)

def VGG16_AvgPool_CutOff(shape, num_convs
  # there are 13 convolutions in total
  # we can pick any of them as the "output"
  # of our content model

  if num_convs < 1 or num_convs > 13:
    print("num_convs must be in the range [1, 13]")
    return None

  model = VGG16_AvgPool(shape)
  # new_model = Sequential()
  # n = 0
  # for layer in model.layers:
  #   if layer.__class__ == Conv2D:
  #     n += 1
  #   new_model.add(layer)
  #   if n >= num_convs:
  #     break

  n = 0
  output = None
  for layer in model.layers:
    if layer.__class__ == Conv2D:
      n += 1
    if n >= num_convs:
      output = layer.output
      break

  return Model(model.input, output)


def unpreprocess(img
  img[..., 0] += 103.939
  img[..., 1] += 116.779
  img[..., 2] += 126.68
  img = img[..., ::-1]
  return img


def scale_img(x
  x = x - x.min()
  x = x / x.max()
  return x


if __name__ == '__main__':

  # open an image
  # feel free to try your own
  # path = '../large_files/caltech101/101_ObjectCategories/elephant/image_0002.jpg'
  path = 'content/elephant.jpg'
  #path = 'content/sydney.jpg'
  img = image.load_img(path)

  # convert image to array and preprocess for vgg
  x = image.img_to_array(img)
  x = np.expand_dims(x, axis=0)
  x = preprocess_input(x)

  # we'll use this throughout the rest of the script
  batch_shape = x.shape
  shape = x.shape[1:]

  # see the image
  # plt.imshow(img)
  # plt.show()


  # make a content model
  # try different cutoffs to see the images that result
  content_model = VGG16_AvgPool_CutOff(shape, 11)

  # make the target
  target = K.variable(content_model.predict(x))


  # try to match the image

  # define our loss in keras
  loss = K.mean(K.square(target - content_model.output))

  # gradients which are needed by the optimizer
  grads = K.gradients(loss, content_model.input)

  # just like theano.function
  get_loss_and_grads = K.function(
    inputs=[content_model.input],
    outputs=[loss] + grads
  )


  def get_loss_and_grads_wrapper(x_vec
    # scipy's minimizer allows us to pass back
    # function value f(x) and its gradient f'(x)
    # simultaneously, rather than using the fprime arg
    #
    # we cannot use get_loss_and_grads() directly
    # input to minimizer func must be a 1-D array
    # input to get_loss_and_grads must be [batch_of_images]
    #
    # gradient must also be a 1-D array
    # and both loss and gradient must be np.float64
    # will get an error otherwise

    l, g = get_loss_and_grads([x_vec.reshape(*batch_shape)])
    return l.astype(np.float64), g.flatten().astype(np.float64)


  from datetime import datetime
  t0 = datetime.now()
  losses = []
  x = np.random.randn(np.prod(batch_shape))
  for i in range(10
    x, l, _ = fmin_l_bfgs_b(
      func=get_loss_and_grads_wrapper,
      x0=x,
      # bounds=[[-127, 127]]*len(x.flatten()),
      maxfun=20
    )
    x = np.clip(x, -127, 127)
    # print("min:", x.min(), "max:", x.max())
    print("iter=%s, loss=%s" % (i, l))
    losses.append(l)

  print("duration:", datetime.now() - t0)
  plt.plot(losses)
  plt.show()

  newimg = x.reshape(*batch_shape)
  final_img = unpreprocess(newimg)


  plt.imshow(scale_img(final_img[0]))
  plt.imsave('styled_image1.jpeg', scale_img(final_img[0]))
  plt.show()


///////////.

bqsub2_id18 script:

#!/bin/bash

echo "Build Neural Style Transfer model"


qsub runMyst2.sh -l nodes=1:idc018 -F "results/INT8 CPU async INT8"


///////////
runMyst2.sh:

VENV_PATH=". ./test-vir"

echo "Activating a Python virtual environment from ${VENV_PATH}..."
source ${VENV_PATH}/bin/activate
python myst2.py


0 Kudos
Hari_B_Intel
Moderator
1,018 Views

Hi Pihx,


From the error message you received and the code you share, it seems that some library is required, and Intel® DevCloud for the edge does not provide superuser access to install that.

So, Intel® DevCloud for the edge might not be suitable for your application since it requires some additional library, and for your information, Intel® DevCloud for the edge is designed to simulate and test the performance of your AI models on Intel processors or devices and not fully support for model training.


My suggestion, after you train and generate the model and would like to test it on Intel® DevCloud for the edge, you can port it to the OpenVINO library and test it on Intel® DevCloud for the edge


Next is on pdb debugging tool, yes, the Jupyter notebook still supports pdb or you can use the available UI way to debug.


Hope this information help


Thank you


Hari_B_Intel
Moderator
974 Views

Hi Pihx,


This thread will no longer be monitored since we have provided a solution. Please submit a new question if you need any additional information from Intel.


Thank you


0 Kudos
Reply