- Mark as New
- Bookmark
- Subscribe
- Mute
- Subscribe to RSS Feed
- Permalink
- Report Inappropriate Content
It seems PROSet would need an update for windows 11. Where it was working on windows 10 for me, it no longer works after the upgrade to 11.
Removed the drivers and utility, reinstalled both, still not working. The VLAN Adapters that are created will stay in a disabled state. Manually enabling them shows a "enabling.., enabled" message, but they will stay in their disabled state. Removing all VLANs and recreating them does nothing to resolve the issue either.
Running on a Dell Precision 7540, all latest windows & PROSet updates are installed.
- Mark as New
- Bookmark
- Subscribe
- Mute
- Subscribe to RSS Feed
- Permalink
- Report Inappropriate Content
The solution by @Jayman was pretty close, but the powershell commands failed for me when trying to set the VLAN ID.
Eventually stumbled upon this blog post which worked for me. Big advantage of this solution is that it's not limited to Intel network adapters, but works for other brands too (realtek for example).
It also requires you to enable the hyper-v module in windows, have a look at Jayman's post for the screenshot. In my case I just enabled Hyper-V completely.
Relevant bits from the blogpost:
Step 2: Setting up the vSwitch
Hyper-V automatically creates a “Default vSwitch” that you can not delete and unfortunately it is not VLAN-Aware. We will have to keep this one as it is and go ahead creating a second vSwitch. For this, we need to open up powershell as an administrator and enter the following commands.
Your host will lose it’s network connection – Do not do that remotely or with apps running.
# This will return a list of network adapters, find your physical NIC and note its "Name" - In most cases "Ethernet"
Get-NetAdapter

# This creates a new vSwitch named VLAN-vSwitch and bridging our physical NIC called "Ethernet". Also we allow to add virtual Host-NICs to this switch.
New-VMSwitch -name VLAN-vSwitch -NetAdapterName Ethernet -AllowManagementOS $true

# Hyper-V automatically creates a virtual NIC without a VLAN tag to keep the host online - Remove it, except you are using a Untagged/Tagged combination.
Remove-VMNetworkAdapter -ManagementOS -Name VLAN-vSwitch
We do now have a clean new VLAN-Aware vSwitch
Step 3: Setting up VLAN interfaces
# Now we create a new virtual Host-NIC and assign a VLAN tag 123 to it. Please note, that the interface name can be chosen freely. One might want to name them by purpose.
Add-VMNetworkAdapter -ManagementOS -Name "VLAN123" -SwitchName "VLAN-vSwitch" -Passthru | Set-VMNetworkAdapterVlan -Access -VlanId 123

# You can now add as many virtual NICs as you need
Add-VMNetworkAdapter -ManagementOS -Name "VLAN456" -SwitchName "VLAN-vSwitch" -Passthru | Set-VMNetworkAdapterVlan -Access -VlanId 456

# Finally, verify that all adapter are in place
Get-NetAdapter
Link Copied
- « Previous
-
- 1
- 2
- Next »
- Mark as New
- Bookmark
- Subscribe
- Mute
- Subscribe to RSS Feed
- Permalink
- Report Inappropriate Content
Hello All,
Good day!
Sharing with you the below link for Support Information for Intel® PROSet and Intel® Advanced Network Services (Intel® ANS) on Microsoft Windows* 11
https://www.intel.com/content/www/us/en/support/articles/000087483/ethernet-products.html
Again, we sincerely apologize for the inconvenience that this has caused.
Feel free to let us know should you have questions or clarifications on this matter.
Best regards,
Crisselle C.
Intel® Customer Support
- Mark as New
- Bookmark
- Subscribe
- Mute
- Subscribe to RSS Feed
- Permalink
- Report Inappropriate Content
So to be clear you are or are not going to support windows 11 for making VLAN's?
- Mark as New
- Bookmark
- Subscribe
- Mute
- Subscribe to RSS Feed
- Permalink
- Report Inappropriate Content
Hello All,
How are you doing?
Please be informed that we will now close this request since we haven't received any response from our previous follow ups. Just feel free to post a new question if you may have any other inquiry in the future as this thread will no longer be monitored.
Thank you for the kind understanding and stay safe!
Best regards,
Crisselle C.
Intel Customer Support
- Mark as New
- Bookmark
- Subscribe
- Mute
- Subscribe to RSS Feed
- Permalink
- Report Inappropriate Content
I was in the same boat but found an alternative. You have to enable HyperV services and its Powershell module.

Then use Powershell to create a VMSwitch with the adapters.
New-VMSwitch -Name "External_network" -NetAdapterName "Ethernet"

Add-VMNetworkAdapter -ManagementOS -Name VLAN10 -SwitchName External_network

Set-VMNetworkAdapterVlan -ManagementOS -VMNetworkAdapterName VLAN10 -Access -VlanID 10
Then you will have the adapters and can configure the IPs accordingly.

- Mark as New
- Bookmark
- Subscribe
- Mute
- Subscribe to RSS Feed
- Permalink
- Report Inappropriate Content
@Jayman wrote:
I was in the same boat but found an alternative. You have to enable HyperV services and its Powershell module.
Thanks Jayman setup and running fine on win 11 with HyperV
I do have to wonder what did MS break that stopped Intel way...maybe MS made allowances for Intel way and said we will not support you any more for win 11?
- Mark as New
- Bookmark
- Subscribe
- Mute
- Subscribe to RSS Feed
- Permalink
- Report Inappropriate Content
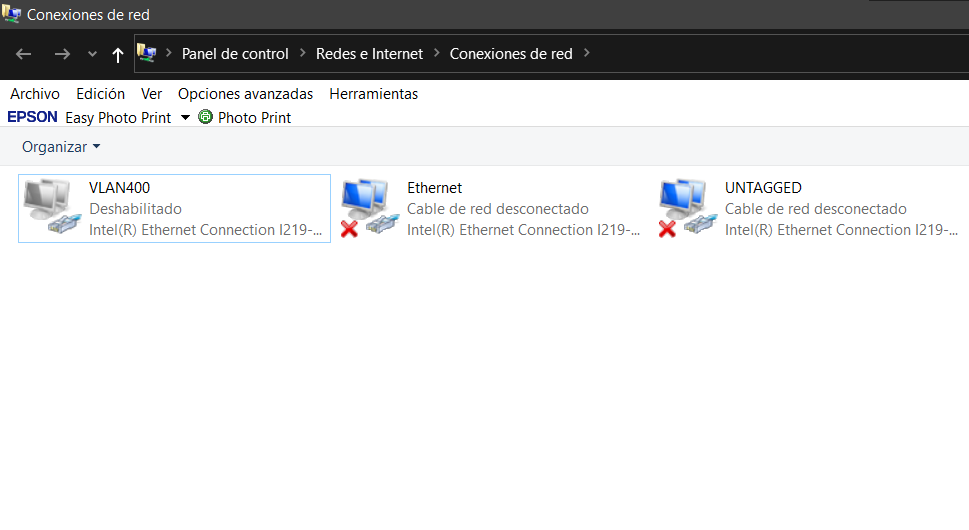
Hi Jay, can you help me to create, an adapter with VLAN 400, and another Adapter with UNTAGGED, like vlan 1. Thanks!
The file below, shows how i used in Win10
- Mark as New
- Bookmark
- Subscribe
- Mute
- Subscribe to RSS Feed
- Permalink
- Report Inappropriate Content
Hello,
This is VERY disappointing news. My company invested in Intel 710-DA2 NICs exactly because they allowed us to use NIC Teaming with Windows client OS that we use for our workstations. We are a software engineering company and our workstations, due to specific use case, need LAPC 2x 10G SFP+ aggregated links to our servers (Which run Fedora, as we work with cutting edge packages, with NIC Teaming on X710-DA2 cards just fine). We based our entire infrastructure on this design just 6 months ago. We also have to upgrade our workstations to Windows 11 for several reasons outside the scope of this post. This means our entire network, that we spent a lot of money on, is now crippled and our entire investment gone as we now have to redesign our infrastructure and invest in new costly hardware 6 months after our initial investment...
We had no notice whatsoever that Intel ANS would become obsolete from this point on and frankly this makes us lose our trust on Intel hardware. We should have gone with Mellanox and we will frankly avoid any further investments when its obvious that functionality may be revoked under our feet without any kind of warning or possible workaround.
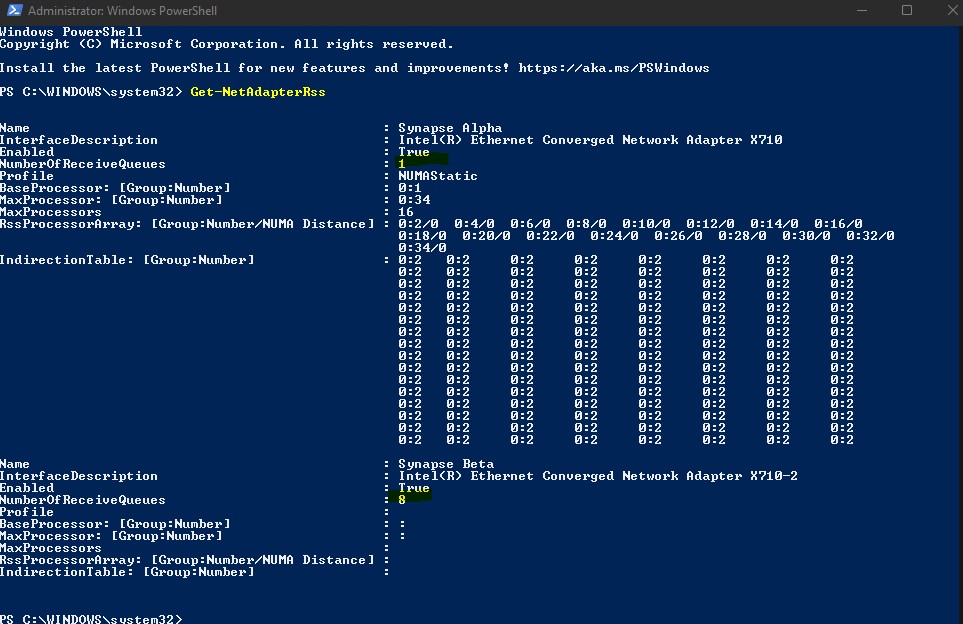
As a second note we have also problems with RSS, which we require for SMB Multichannel as we serve multiple Vmware Workstation VM images to our workstations, with any version of the driver we tried. Specifically, as seen in the screenshot, we get a single RSS queue no matter the driver setting or whatever else we do. If we disable the port in Windows, RSS queue shows as 8, what is set in the driver, when we enable it, it gets set to 1. In the screenshot, "Synapse Beta" is the second, currently disabled, port while "Synapse Alpha" is the enabled port. They are both set up in the exact same way. We have checked the registry key and the value is as it is supposed to be. We have uninstalled and reinstalled the driver, reset the entire winsock stack, nothing works. When it comes to our settings, we just disable Interrupt Moderation and Flow control, we increase Transmit/Receive buffers to the max of 4096 and we enable 9014b Jumbo Packets. But we also tested default settings. Is this the kind of driver quality we can expect now from Intel?
Regards,
P. Kalogiratos
Abnormal Frequency Software
- Mark as New
- Bookmark
- Subscribe
- Mute
- Subscribe to RSS Feed
- Permalink
- Report Inappropriate Content
Hello, colleges, i think, i found the solution.
1) Completly uninstall Proset utilities and device driver
2) Wait until generic driver will be installed by MS
3) Download and install 25th version of proset and install driver only
3a) If can not installed then download vendor drivers for device and update to 25th from it
4) Downaload and install 26th version and update driver only
5) Start installation again and add Proset and services
6) Start adding vlans via PowerShellConsole
7) Profit
PS C:\Users\delta> Get-IntelNetAdapter
Location Name ConnectionName LinkStatus
-------- ---- -------------- ----------
5:0:0:0 Intel(R) I211 Gigabit Network Connection 1,00 Gbps ...
PS C:\Users\delta> Get-IntelNetVLAN
VLANID VLANName ParentName
------ -------- ----------
0 Untagged Intel(R) I211 Gigabit Network Connection
106 VLAN106 Intel(R) I211 Gigabit Network Connection
1 VLAN1 Intel(R) I211 Gigabit Network Connection
Only one issue - is big delay before all interfaces are initialized
- Mark as New
- Bookmark
- Subscribe
- Mute
- Subscribe to RSS Feed
- Permalink
- Report Inappropriate Content
The solution by @Jayman was pretty close, but the powershell commands failed for me when trying to set the VLAN ID.
Eventually stumbled upon this blog post which worked for me. Big advantage of this solution is that it's not limited to Intel network adapters, but works for other brands too (realtek for example).
It also requires you to enable the hyper-v module in windows, have a look at Jayman's post for the screenshot. In my case I just enabled Hyper-V completely.
Relevant bits from the blogpost:
Step 2: Setting up the vSwitch
Hyper-V automatically creates a “Default vSwitch” that you can not delete and unfortunately it is not VLAN-Aware. We will have to keep this one as it is and go ahead creating a second vSwitch. For this, we need to open up powershell as an administrator and enter the following commands.
Your host will lose it’s network connection – Do not do that remotely or with apps running.
# This will return a list of network adapters, find your physical NIC and note its "Name" - In most cases "Ethernet"
Get-NetAdapter

# This creates a new vSwitch named VLAN-vSwitch and bridging our physical NIC called "Ethernet". Also we allow to add virtual Host-NICs to this switch.
New-VMSwitch -name VLAN-vSwitch -NetAdapterName Ethernet -AllowManagementOS $true

# Hyper-V automatically creates a virtual NIC without a VLAN tag to keep the host online - Remove it, except you are using a Untagged/Tagged combination.
Remove-VMNetworkAdapter -ManagementOS -Name VLAN-vSwitch
We do now have a clean new VLAN-Aware vSwitch
Step 3: Setting up VLAN interfaces
# Now we create a new virtual Host-NIC and assign a VLAN tag 123 to it. Please note, that the interface name can be chosen freely. One might want to name them by purpose.
Add-VMNetworkAdapter -ManagementOS -Name "VLAN123" -SwitchName "VLAN-vSwitch" -Passthru | Set-VMNetworkAdapterVlan -Access -VlanId 123

# You can now add as many virtual NICs as you need
Add-VMNetworkAdapter -ManagementOS -Name "VLAN456" -SwitchName "VLAN-vSwitch" -Passthru | Set-VMNetworkAdapterVlan -Access -VlanId 456

# Finally, verify that all adapter are in place
Get-NetAdapter
- Mark as New
- Bookmark
- Subscribe
- Mute
- Subscribe to RSS Feed
- Permalink
- Report Inappropriate Content
This Solution don't works with Intel i225. VLAN an Intel, a terrible relation
- Mark as New
- Bookmark
- Subscribe
- Mute
- Subscribe to RSS Feed
- Permalink
- Report Inappropriate Content
This solution still works with the I225/I226 NIC and Windows 11. But you have to use the 1.x branch of the driver, not the 2.x one. You can read more from this thread https://community.intel.com/t5/Ethernet-Products/Hyper-V-vSwitches-do-not-work-with-2-x-drivers-on-a-I225-V/m-p/1529688
You can get the driver version 1.1.4.42 from here Intel® Ethernet Adapter Complete Driver Pack and manually install the driver from the folder PRO2500\Winx64\NDIS68
- Subscribe to RSS Feed
- Mark Topic as New
- Mark Topic as Read
- Float this Topic for Current User
- Bookmark
- Subscribe
- Printer Friendly Page
- « Previous
-
- 1
- 2
- Next »