- Mark as New
- Bookmark
- Subscribe
- Mute
- Subscribe to RSS Feed
- Permalink
- Report Inappropriate Content
Note: This article is an English translation of this Japanese article. Please refer to the original article for updates.
Introduction
Arm* Development Studio for Intel® SoC FPGA is the official development environment from Arm* for Intel® SoC FPGA (hereafter referred to as Arm* DS). It is primarily used as a debugging tool, with detailed explanations available on the following sites:
- SoCEDS and ARM Development Studio
- Building Bootloader for Cyclone V and Arria 10
- Cyclone V SoC GSRD
- Linux Application Debugging With DS5
- Linux Kernel Debugging With DS-5
- About debugging a Linux kernel
Here, we would like to summarize the basic usage of the debugger. Some of the above materials are for Arm* DS5 (the previous version of Arm* DS), and based on this, we will debug Linux Application, U-Boot-SPL/U-Boot, and Linux Kernel using the latest Arm* DS on the Cyclone® V SoC FPGA Development Kit. Linux Application debugging is performed over the network, so an Ethernet connection is required. U-Boot-SPL/U-Boot and Linux Kernel debugging are done via the Intel® FPGA Download Cable II (formerly known as USB Blaster II), thus requiring a USB connection. Since we will be building Linux Applications and Linux Kernel, the host OS will be Linux.
1. Installation
1.1 Operating System
The OS supported by Arm* DS is listed in the Hardware and host platform requirements:
- Windows 10
- Red Hat Enterprise Linux 7 Workstation
- Ubuntu Desktop Edition 18.04 LTS
- Ubuntu Desktop Edition 20.04 LTS
This time, we will use Ubuntu Desktop Edition 20.04 LTS for building and debugging Linux Applications and Linux Kernel. The specifications of the PC used are as follows:
Item Description
| CPU | Intel® Pentium® Silver N6005 Processor |
| RAM | DDR4 PC3200 16GiB Dual Channel |
| SSD | NVMe PCIe3.0 M.2 2280 512GB |
| OS | Ubuntu 20.04.5 LTS (Focal Fossa) |
It belongs to the MiniPC category, and while it might feel a bit underpowered for building the Linux Kernel, it provided sufficient performance for using Arm* DS. The OS (64-bit PC (AMD64) desktop image) was cleanly installed on this PC for the work.
1.2 Preparation
This article primarily involves using the terminal for tasks. First, create a ~/ARM_DS folder and work there. Execute the following commands to create the ARM_DS folder:
$ cd ~
$ mkdir ARM_DS
Next, install the libraries needed to build U-Boot with the following command:
$ sudo apt-get install -y gawk wget git-core diffstat unzip texinfo \
gcc-multilib build-essential chrpath socat cpio python python3 \
python3-pip python3-pexpect xz-utils debianutils iputils-ping \
python3-git python3-jinja2 libegl1-mesa libsdl1.2-dev pylint3 xterm \
libncurses-dev gawk flex bison openssl libssl-dev
These are copied from Building Bootloader for Cyclone V and Arria 10.
Next, install the libraries required for the Yocto build with the following command. There are some overlaps with the above, but please execute them:
$ sudo apt install gawk wget git diffstat unzip texinfo gcc build-essential chrpath \
socat cpio python3 python3-pip python3-pexpect xz-utils debianutils iputils-ping \
python3-git python3-jinja2 libegl1-mesa libsdl1.2-dev pylint3 xterm python3-subunit \
mesa-common-dev zstd liblz4-tool
These are copied from Setting Up Yocto Build System.
Then, install the additional libraries needed for building Linux Applications and the Linux kernel with the following command:
$ sudo apt install -y autoconf libgmp-dev libmpc-dev libmpfr-dev python2
To use git, replace "you@example.com" and "Your Name" with your own email address and name, and execute the following commands:
$ git config --global user.email "you@example.com"
$ git config --global user.name "Your Name"
This completes the preparation.
1.3 Intel® Quartus® Prime Software
To compile the hardware design of the Cyclone® V SoC used this time, Intel® Quartus® Prime Software is required. Additionally, this tool is needed to access JTAG-related tools of Intel® Quartus® Prime Software during the Debug Configuration setting of Arm* DS. The tools to install are:
- Intel® Quartus® Prime Standard Edition Design Software Version 22.1 for Linux
- Intel® Quartus® Prime Lite Edition Design Software Version 22.1 for Linux
The supported OS can be confirmed from Operating System Support, and it is confirmed that both Intel® Quartus® Prime Standard Edition and Intel® Quartus® Prime Lite Edition support Ubuntu* 20.04 LTS.
Here, we use Intel® Quartus® Prime Standard Edition Design Software Version 22.1 for Linux. The Standard Edition is a paid version, while the Lite Edition is a free version. First, click Intel® Quartus® Prime Standard Edition Design Software Version 22.1 for Linux. Then, scroll down and click "individual files". The following screen will appear:

Download the files QuartusSetup-22.1std.0.915-linux.run and cyclonev-22.1std.0.915.qdz in the red frame. If the download destination is ~/Download, start the installation by entering the following:
$ cd ~/Download
$ chmod +x ./QuartusSetup-22.1std.0.915-linux.run
$ ./QuartusSetup-22.1std.0.915-linux.run
Follow the instructions to install with the default settings. If completed successfully, it will be installed in the ~/intelFPGA/22.1std folder.
Set the paths and environment variables as follows, and add them to ~/.bashrc:
export QUARTUS_ROOTDIR=$HOME/intelFPGA/22.1std/quartus
export QSYS_ROOTDIR=$QUARTUS_ROOTDIR/sopc_builder/bin
export PATH=$QUARTUS_ROOTDIR/bin:$QSYS_ROOTDIR:$PATH
export LM_LICENSE_FILE=[Your License File Path]
Open a new terminal and enter the following command. If the version below is displayed, the installation is correct:
$ quartus_asm --version
Quartus Prime Assembler
Version 22.1std.0 Build 915 10/25/2022 SC Standard Edition
Copyright (C) 2022  Intel Corporation. All rights reserved.
Next, make Intel® FPGA Download Cable II (formerly known as USB Blaster II) recognizable. Save the following as 51-usbblaster.rules in ~/ARM_DS:
# Intel® FPGA Download Cable
SUBSYSTEM=="usb", ATTR{idVendor}=="09fb", ATTR{idProduct}=="6001", MODE="0666", SYMLINK+="usbblaster/%k"
SUBSYSTEM=="usb", ATTR{idVendor}=="09fb", ATTR{idProduct}=="6002", MODE="0666", SYMLINK+="usbblaster/%k"
SUBSYSTEM=="usb", ATTR{idVendor}=="09fb", ATTR{idProduct}=="6003", MODE="0666", SYMLINK+="usbblaster/%k"

# Intel® FPGA Download Cable II
SUBSYSTEM=="usb", ATTR{idVendor}=="09fb", ATTR{idProduct}=="6010", MODE="0666", SYMLINK+="usbblaster2/%k"
SUBSYSTEM=="usb", ATTR{idVendor}=="09fb", ATTR{idProduct}=="6810", MODE="0666", SYMLINK+="usbblaster2/%k"
Execute the following command:
$ sudo cp ~/ARM_DS/51-usbblaster.rules /etc/udev/rules.d
This will make Intel® FPGA Download Cable II (formerly known as USB Blaster II) recognizable. Execute the following command. Currently, the Cyclone® V SoC FPGA Development Kit is not connected to the PC, so:
$ jtagconfig
No JTAG hardware available
If it displays "No JTAG hardware available" as shown above, it is correct.
1.4 Arm Development Studio for Intel® SoC FPGA
Click Arm* Development Studio for Intel® SoC FPGA for Linux.

Click the red frame to download DS000-BN-00001-r22p0-00rel1.tgz. If downloaded to the ~/Download folder, enter the following commands:
$ cd ~/Download
$ tar xf ~/DS000-BN-00001-r22p0-00rel1.tgz
$ cd DS000-BN-00001-r22p0-00rel1
$ sudo ./armds-2022.0.sh
The installation will start. Initially, the license agreement will be displayed. If there is no problem, press Yes. After that, the installation will start by pressing the return key for everything.
==========================================================
Welcome to the Installer for Arm Development Studio 2022.0
==========================================================
--- Host target check...[x86_64]
        END USER LICENSE AGREEMENT FOR ARM SOFTWARE DEVELOPMENT TOOLS

This end user license agreement ("License") is a legal agreement between you (a
single individual), or the company or organisation (a single legal entity) that
you represent and have the legal authority to bind, and Arm relating to use of t
he Arm Tools. Arm is only willing to license the Arm Tools on condition that you
 accept all of the terms of this License. By clicking "I Agree" or by installing
 or otherwise using the Arm Tools and/or any Update thereto (as permitted by thi
s License) you indicate that you agree to be bound by all of the terms and condi
tions of this License. If you do not agree to the terms of this License, Arm wil
l NOT license the Arm Tools to you, you may not install or use the Arm Tools or
any part thereof, and you shall promptly return the Arm Tools to Arm or to your
supplier (if not Arm) and ask for a refund of the license fee paid (if any).

.............

Arm Document Reference LES-PRE-21260, Version 12.4, Effective Date 22.01.2021

Please answer with one of: 'yes' or 'no/quit'
Do you agree to the above terms and conditions? yes

Please answer with one of: 'yes/y' or 'no/n'
Run installation platform requirement checks? [default: yes]

--- Running installation platform requirement checks

Running dependency check [failed]
*** WARNING ***
One or more of the Arm Development Studio system dependencies are not installed, see below for a list of the missing libraries.

 libncurses.so.5 (64-bit)
 libc.so.6 (32-bit)
 libgcc_s.so.1 (32-bit)
 libstdc++.so.6 (32-bit)
 libz.so.1 (32-bit)
One of:
 libwebkit-1.0.so.2 (64-bit)
 libwebkitgtk-1.0.so.0 (64-bit)
 libwebkitgtk-3.0.so.0 (64-bit)

We recommend you install the missing dependencies, otherwise the programs will not run correctly. For further information see the Arm Development Studio readme.

Where would you like to install to? [default: /opt/arm/developmentstudio-2022.0]

Please answer with one of: 'yes/y' or 'no/n'
'/opt/arm/developmentstudio-2022.0' does not exist, create? [default: yes]

--- Installing to '/opt/arm/developmentstudio-2022.0' (This may take a while...)

Please answer with one of: 'yes/y' or 'no/n'
Install desktop menu item additions? [default: yes]

--- Installing menu entries

Post install stage provides the following functions:
- Installation of USB drivers for RealView ICE and DSTREAM hardware units
- Remove unwanted models dependencies for some versions of linux

Please answer with one of: 'yes/y' or 'no/n'
Run post install setup scripts? [default: yes]

--- Running post install setup scripts

-----------------------------------
Installation completed successfully
-----------------------------------

To start using Arm Development Studio 2022.0 either:
- Create a suite sub-shell using /opt/arm/developmentstudio-2022.0/bin/suite_exec
- Launch GUI tools via their desktop menu entries

The Release notes for the product can be found here: file:///opt/arm/developmentstudio-2022.0/sw/info/readme.html

==========================================================
During installation, a library dependency check is performed, and it is confirmed that there are missing libraries. If you want to check dependencies again, execute the following command:
$ /opt/arm/developmentstudio-2022.0/sw/dependency_check/dependency_check_linux-x86_64.sh
Running dependency check [failed]
*** WARNING ***
One or more of the Arm Development Studio system dependencies are not installed, see below for a list of the missing libraries.

 libncurses.so.5 (64-bit)
 libc.so.6 (32-bit)
 libgcc_s.so.1 (32-bit)
 libstdc++.so.6 (32-bit)
 libz.so.1 (32-bit)
One of:
 libwebkit-1.0.so.2 (64-bit)
 libwebkitgtk-1.0.so.0 (64-bit)
 libwebkitgtk-3.0.so.0 (64-bit)

We recommend you install the missing dependencies, otherwise the programs will not run correctly. For further information see the Arm Development Studio readme.
You will see the same error as during installation. The above error depends on the environment of the PC and may vary. Here, we will resolve the above library shortage.
First, execute the following commands to install 32-bit libraries:
$ sudo dpkg --add-architecture i386
$ sudo apt-get update
Next, open /etc/apt/sources.list with root privileges using gedit or vim, add the following at the end:
deb http://cz.archive.ubuntu.com/ubuntu bionic main universe
Save and close the editor. Then, execute:
sudo apt-get update
Next, execute the following command to add libraries:
sudo apt-get install -y libncurses5 libwebkitgtk-3.0-0 libc6-i386 libgcc-s1:i386 lib32stdc++6 lib32z1
To confirm the dependencies again, execute the following command:
$ /opt/arm/developmentstudio-2022.0/sw/dependency_check/dependency_check_linux-x86_64.sh
Running dependency check [succeeded]
If the dependencies are resolved, it will display [succeeded] as shown above. This completes the installation of Arm* DS. Execute the following command:
$ /opt/arm/developmentstudio-2022.0/bin/suite_exec -t "Arm Compiler for Embedded 6" bash
Environment configured for 'Arm Compiler for Embedded 6'
This will transition to the ARM Shell. The above command is long, so if you register the following in ~/.bashrc, ARM Shell will start with arm6:
alias arm6='/opt/arm/developmentstudio-2022.0/bin/suite_exec -t "Arm Compiler for Embedded 6" bash'
Then, Arm* DS will start with the following command:
$ armds_ide &
When starting, the following screen will be displayed:

The following screen will appear. If the workspace selection screen is displayed, specify ~/ARM_DS.

The first startup requires setting up the license. For details, refer to SoC Beginner's Guide. For those who do not have a license, this site also describes how to obtain an evaluation version, so please refer to it.
1.5 GNU Compiler
Install the GNU C Compiler with the following commands:
$ cd ~/ARM_DS
$ wget https://developer.arm.com/-/media/Files/downloads/gnu-a/10.3-2021.07/binrel/gcc-arm-10.3-2021.07-x86_64-arm-none-linux-gnueabihf.tar.xz
$ tar xf gcc-arm-10.3-2021.07-x86_64-arm-none-linux-gnueabihf.tar.xz
$ rm gcc-arm-10.3-2021.07-x86_64-arm-none-linux-gnueabihf.tar.xz
Next, add the following to ~/.bashrc:
export PATH=$HOME/ARM_DS/gcc-arm-10.3-2021.07-x86_64-arm-none-linux-gnueabihf/bin:$PATH
export ARCH=arm
export CROSS_COMPILE=arm-none-linux-gnueabihf-
After adding, reopen the terminal and check the version with the following command:
$ ${CROSS_COMPILE}gcc --version
arm-none-linux-gnueabihf-gcc (GNU Toolchain for the A-profile Architecture 10.3-2021.07 (arm-10.29)) 10.3.1 20210621
Copyright (C) 2020 Free Software Foundation, Inc.
This is free software; see the source for copying conditions.  There is NO
warranty; not even for MERCHANTABILITY or FITNESS FOR A PARTICULAR PURPOSE.
If the above is displayed, the GNU C Compiler has been installed correctly.
1.6 Serial Port Terminal (minicom)
Install the serial port tool. If you already have a tool, skip this step. Here, we use minicom. Install it with the following command:
$ sudo apt-get install -y minicom
Detailed setup will be explained after connecting the Cyclone® V SoC FPGA Development Kit to the PC with a USB cable in 2.3 USB Cable Connection and Confirmation.
2. Cyclone® V SoC FPGA Development Kit Preparation
2.1 Switch and Jumper Check
First, check the DIP switches and jumpers of the Cyclone® V SoC FPGA Development Kit used this time. The checklist is listed in Configuring Board.
Check the following settings:

Item SettingItem Setting
| J5 | Open |
| J6 | Short |
| J7 | Short |
| J9 | Open |
| J13 | Short |
| J16 | Open |
| J26 | Short pins 1-2 |
| J27 | Short pins 2-3 |
| J28 | Short pins 1-2 |
| J29 | Short pins 2-3 |
| J30 | Short pins 1-2 |
| J31 | Open |
| SW1 | All OFF |
| SW2 | All OFF |
| SW3 | ON-OFF-ON-OFF-ON-ON |
| SW4 | OFF-OFF-ON-ON |
2.2 SD Card Preparation
Prepare the boot SD card. If your PC does not have an SD card slot, prepare a USB-connected memory card writer.
Enter the following commands to download the pre-created SD card image:
$ mkdir -p ~/ARM_DS/sdimage
$ cd ~/ARM_DS/sdimage
$ wget https://releases.rocketboards.org/2022.11/gsrd/c5_gsrd/sdimage.tar.gz
$ wget https://releases.rocketboards.org/2022.11/gsrd/c5_gsrd/sdimage.tar.gz.md5sum
Next, check if the downloaded file is correct with the following commands:
$ cat sdimage.tar.gz.md5sum
3e566be8035bfccd1b91007e351fc210  sdimage.tar.gz
$ md5sum sdimage.tar.gz
3e566be8035bfccd1b91007e351fc210  sdimage.tar.gz
This confirms that the downloaded file is correct as the MD5 values match. Writing can be done from the command line (Creating SD Card reference), but as entering the wrong device name can destroy the PC's file system, we will use the Startup Disk Creator to write this image to the SD card. Since the Startup Disk Creator does not display files without the img extension in the file selection screen, extract and change the extension with the following commands:
$ tar xf sdimage.tar.gz
$ mv gsrd-console-image-cyclone5.wic gsrd-console-image-cyclone5.img
Next, open the application search menu at the bottom left, enter "disk", and select the Startup Disk Creator in the red frame:

The following screen will open, click the "Other..." button:

Select Disk image and choose \ARM_DS\sdimage\gsrd-console-image-cyclone5.img, then click "Open":

Check the SD drive to write to and click the "Make Startup Disk" button:

The write confirmation screen will appear, click the "Yes" button, then the root password request screen will appear, enter the password:

After entering, the writing will begin as shown below:

When the write is complete, the following will be displayed, click the "Quit" button:

This completes the writing to the SD card. Insert this card into the SD card slot of the Cyclone® V SoC FPGA Development Kit.
2.3 USB Cable Connection and Confirmation
Connect the UART and Intel® FPGA Download Cable II (formerly known as USB Blaster II) connectors of the Cyclone® V SoC FPGA Development Kit to the PC with two USB cables. Ensure direct connection to the PC without using a USB hub as it may cause problems. UART stands for Universal Asynchronous Receiver/Transmitter and refers to a general serial port.
After completing the connection, the UART port can be recognized on the PC. Enter the following:
$ ls /dev/ttyUSB*
/dev/ttyUSB0
If ttyUSB0 is displayed, the UART port is recognized correctly. If multiple UART ports are connected, ttyUSB1, etc., will be added. Then, set up minicom as installed earlier. Enter the following to open the settings screen:
$ sudo minicom -s
When the following screen is displayed, select "Serial Port Setup":

Next, enter /dev/ttyUSB0 for Serial Device and set "Hardware Flow Control" to No as shown below:

Return to the original screen with the ESC key, select "Save Setup as dfl" to save the initial environment settings, and then select "Exit from Minicom" to exit the settings screen:

Finally, add the following alias to ~/.bashrc to easily start minicom:
alias com="sudo minicom -D /dev/ttyUSB0"
After adding to .bashrc, reopen the terminal and enter com and the root password. The following screen will open:

If the above screen is displayed, the minicom setup is complete. This will be referred to as the serial console from now on. Leave this serial console as it is.
2.4 Linux Boot
Connect the network cable to the Ethernet connector next to the SD card slot of the Cyclone® V SoC FPGA Development Kit and turn on the power. First, U-Boot SPL will start, then U-Boot will start, and finally, Linux will start booting. A part of the boot log is shown below:
U-Boot SPL 2019.10-g8e98071-dirty (Aug 04 2020 - 22:50:14 +0800)
DDRCAL: Scrubbing ECC RAM (1024 MiB).
DDRCAL: SDRAM-ECC initialized success with 580 ms
Trying to boot from MMC1


U-Boot 2019.10-g8e98071-dirty (Aug 04 2020 - 22:50:14 +0800), Build: jenkins-uboot-s7

CPU:   Altera SoCFPGA Platform
FPGA:  Altera Cyclone V, SE/A6 or SX/C6 or ST/D6, version 0x0
BOOT:  SD/MMC Internal Transceiver (3.0V)
       Watchdog enabled
DRAM:  1 GiB
MMC:   dwmmc0@ff704000: 0
Loading Environment from MMC... OK
In:    serial
Out:   serial
Err:   serial
Model: Altera SOCFPGA Cyclone V SoC Development Kit
Net:
Warning: ethernet@ff702000 (eth0) using random MAC address - 76:a3:20:6e:9d:0e
eth0: ethernet@ff702000
Hit any key to stop autoboot:  0
162 bytes read in 2 ms (79.1 KiB/s)
## Executing script at 02100000
  5048976   zImage
    29016   socfpga_cyclone5_socdk.dtb
  2387888   soc_system.rbf
            extlinux/
      162   u-boot.scr
 594968111   GPL-source-20.1.tar.gz
 19418639   u-boot-socfpga-20.1-src.tar.gz
 178086315   linux-socfpga-5.4.23-lts-src.tar.gz
  1560699   cyclone5-poky-v2020.01-zeus-source.tar.gz

8 file(s), 1 dir(s)

2387888 bytes read in 119 ms (19.1 MiB/s)
switch to partitions #0, OK
mmc0 is current device
Scanning mmc 0:1...
Found /extlinux/extlinux.conf
Retrieving file: /extlinux/extlinux.conf
121 bytes read in 4 ms (29.3 KiB/s)
1:      Linux Default
Retrieving file: /extlinux/../zImage
5048976 bytes read in 251 ms (19.2 MiB/s)
append: root=/dev/mmcblk0p2 rw rootwait earlyprintk console=ttyS0,115200n8
Retrieving file: /extlinux/../socfpga_cyclone5_socdk.dtb
29016 bytes read in 7 ms (4 MiB/s)
## Flattened Device Tree blob at 02000000
   Booting using the fdt blob at 0x2000000
   Loading Device Tree to 09ff5000, end 09fff157 ... OK

Starting kernel ...

Deasserting all peripheral resets
[    0.000000] Booting Linux on physical CPU 0x0
[    0.000000] Linux version 5.4.23-altera (oe-user@oe-host) (gcc version 9.2.0 (GCC0

.....
.....

[   12.321234] random: crng init done
[   12.324630] random: 7 urandom warning(s) missed due to ratelimiting

Poky (Yocto Project Reference Distro) 3.0.3 cyclone5 ttyS0

cyclone5 login: root
Last login: Tue Dec 13 08:14:04 +0000 2022 on /dev/ttyS0.
root@cyclone5:~#
Finally, if "cyclone5 login:" is displayed, enter "root". If "root@cyclone5:~#" prompt is displayed, it is normal. Since the system used this time does not have a password set, there is no password request. Next, enter "ifconfig", if "inet addr" is displayed, the network is recognized correctly.
root@cyclone5:~# ifconfig
eth0      Link encap:Ethernet  HWaddr b2:ad:ce:16:ca:9a
          inet addr:192.168.50.204  Bcast:192.168.50.255  Mask:255.255.255.0
          inet6 addr: fe80::b0ad:ceff:fe16:ca9a/64 Scope:Link
          UP BROADCAST RUNNING MULTICAST  MTU:1500  Metric:1
          RX packets:250 errors:0 dropped:136 overruns:0 frame:0
          TX packets:52 errors:0 dropped:0 overruns:0 carrier:0
          collisions:0 txqueuelen:1000
          RX bytes:21244 (20.7 KiB)  TX bytes:7841 (7.6 KiB)
          Interrupt:33 Base address:0x4000

lo        Link encap:Local Loopback
          inet addr:127.0.0.1  Mask:255.0.0.0
          inet6 addr: ::1/128 Scope:Host
          UP LOOPBACK RUNNING  MTU:65536  Metric:1
          RX packets:4 errors:0 dropped:0 overruns:0 frame:0
          TX packets:4 errors:0 dropped:0 overruns:0 carrier:0
          collisions:0 txqueuelen:1000
          RX bytes:280 (280.0 B)  TX bytes:280 (280.0 B)

root@cyclone5:~#
This confirms that the IP address of the Cyclone® V SoC FPGA Development Kit is 192.168.50.204. Open another terminal and execute the following command:
$ jtagconfig
1) USB-BlasterII [1-3]
  4BA00477   SOCVHPS
  02D020DD   5CSEBA6(.|ES)/5CSEMA6/..
If the above is displayed, the device is recognized correctly.
3. Linux Application Debug
Debug the Linux Application according to Linux Application Debugging With DS5.
3.1 Building memtool
As a sample, we will use memtool. In environments like Linux that use virtual memory for memory protection, direct access to physical memory and peripheral physical registers is generally not possible. Memtool enables this access. This tool is frequently used for debugging, and its small code size makes it a good choice for a sample. Below are the commands and build logs:
$ cd ~/ARM_DS
$ git clone https://github.com/pengutronix/memtool
Cloning into 'memtool'...
remote: Enumerating objects: 329, done.
remote: Counting objects: 100% (329/329), done.
remote: Compressing objects: 100% (137/137), done.
remote: Total 329 (delta 182), reused 328 (delta 182), pack-reused 0
Receiving objects: 100% (329/329), 370.34 KiB | 5.29 MiB/s, done.
Resolving deltas: 100% (182/182), done.

$ cd memtool

$ autoreconf -fi
configure.ac:6: installing './compile'
configure.ac:4: installing './install-sh'
configure.ac:4: installing './missing'
Makefile.am: installing './depcomp'

$ ./configure --host ${CROSS_COMPILE}gcc CFLAGS="-g -O0" --disable-mdio
checking for a BSD-compatible install... /usr/bin/install -c
checking whether build environment is sane... yes
checking for arm-none-linux-gnueabihf-gcc-strip... no
checking for strip... strip
checking for a thread-safe mkdir -p... /usr/bin/mkdir -p
checking for gawk... no
checking for mawk... mawk
checking whether make sets $(MAKE)... yes
checking whether make supports nested variables... yes
checking for arm-none-linux-gnueabihf-gcc-gcc... arm-none-linux-gnueabihf-gcc
checking whether the C compiler works... yes
checking for C compiler default output file name... a.out
checking for suffix of executables...
checking whether we are cross compiling... yes
checking for suffix of object files... o
checking whether we are using the GNU C compiler... yes
checking whether arm-none-linux-gnueabihf-gcc accepts -g... yes
checking for arm-none-linux-gnueabihf-gcc option to accept ISO C89... none needed
checking whether arm-none-linux-gnueabihf-gcc understands -c and -o together... yes
checking whether make supports the include directive... yes (GNU style)
checking dependency style of arm-none-linux-gnueabihf-gcc... gcc3
checking whether make sets $(MAKE)... (cached) yes
checking for special C compiler options needed for large files... no
checking for _FILE_OFFSET_BITS value needed for large files... 64
checking for mdio support... no
checking that generated files are newer than configure... done
configure: creating ./config.status
config.status: creating Makefile
config.status: executing depfiles commands

$ make
arm-none-linux-gnueabihf-gcc -DPACKAGE_NAME=\"memtool\" -DPACKAGE_TARNAME=\"memtool\" -DPACKAGE_VERSION=\"2018.03.0\" -DPACKAGE_STRING=\"memtool\ 2018.03.0\" -DPACKAGE_BUGREPORT=\"oss-tools@pengutronix.de\" -DPACKAGE_URL=\"\" -DPACKAGE=\"memtool\" -DVERSION=\"2018.03.0\" -D_FILE_OFFSET_BITS=64 -I.     -g -O0 -MT memtool.o -MD -MP -MF .deps/memtool.Tpo -c -o memtool.o memtool.c
mv -f .deps/memtool.Tpo .deps/memtool.Po
arm-none-linux-gnueabihf-gcc -DPACKAGE_NAME=\"memtool\" -DPACKAGE_TARNAME=\"memtool\" -DPACKAGE_VERSION=\"2018.03.0\" -DPACKAGE_STRING=\"memtool\ 2018.03.0\" -DPACKAGE_BUGREPORT=\"oss-tools@pengutronix.de\" -DPACKAGE_URL=\"\" -DPACKAGE=\"memtool\" -DVERSION=\"2018.03.0\" -D_FILE_OFFSET_BITS=64 -I.     -g -O0 -MT fileaccess.o -MD -MP -MF .deps/fileaccess.Tpo -c -o fileaccess.o fileaccess.c
mv -f .deps/fileaccess.Tpo .deps/fileaccess.Po
arm-none-linux-gnueabihf-gcc -DPACKAGE_NAME=\"memtool\" -DPACKAGE_TARNAME=\"memtool\" -DPACKAGE_VERSION=\"2018.03.0\" -DPACKAGE_STRING=\"memtool\ 2018.03.0\" -DPACKAGE_BUGREPORT=\"oss-tools@pengutronix.de\" -DPACKAGE_URL=\"\" -DPACKAGE=\"memtool\" -DVERSION=\"2018.03.0\" -D_FILE_OFFSET_BITS=64 -I.     -g -O0 -MT acc_mmap.o -MD -MP -MF .deps/acc_mmap.Tpo -c -o acc_mmap.o acc_mmap.c
mv -f .deps/acc_mmap.Tpo .deps/acc_mmap.Po
arm-none-linux-gnueabihf-gcc  -g -O0   -o memtool memtool.o fileaccess.o acc_mmap.o
This completes the build of memtool. If ~/ARM_DS/memtool/memtool is generated, the build is successful. For debugging, optimization is turned off initially to avoid source code position discrepancies. If you want to enable optimization, change -O0 to -O2 in the CFLAGS of the ./configure command.
3.2 Importing Project
Start Arm* DS with the following commands:
$ arm6
$ armds_ide &
Import the built memtool into Arm* DS. Select the File -> Import menu. Choose C/C++ -> Existing Code as Makefile Project and click "Next".

Select the ~/ARM_DS/memtool folder and click "Open".

Ensure that the project name is "memtool" and the Existing Code Location is ~/ARM_DS/memtool, then click "Finish".

If the import is successful, the memtool files will be displayed in the Project Explorer as shown below:

This completes the import. Next, we will configure the Remote System.
3.3 Configuring Remote Systems
For Linux Application debugging, it is done over Ethernet. Therefore, the target Linux must support GNU Debugger and SSH. The pre-built SD card image used here already includes GNU Debugger and SSH. If these files are not included, Linux Application debugging cannot be performed. When building the Root File System, ensure these are included. For example, when constructing the Root File System, the following command from Building Yocto Rootfs should be executed:
cd $ROOTFS_TOP
rm -rf cv && mkdir cv && cd cv
git clone -b honister https://git.yoctoproject.org/poky
git clone -b honister https://git.yoctoproject.org/meta-intel-fpga
source poky/oe-init-build-env ./build
echo 'MACHINE = "cyclone5"' >> conf/local.conf
echo 'BBLAYERS += " ${TOPDIR}/../meta-intel-fpga "' >> conf/bblayers.conf
# Uncomment next line to add more packages to the image
# echo 'CORE_IMAGE_EXTRA_INSTALL += "openssh gdbserver"' >> conf/local.conf
bitbake core-image-minimal
ln -s $ROOTFS_TOP/cv/build/tmp/deploy/images/cyclone5/core-image-minimal-cyclone5.tar.gz $LINUX_BIN/a9/
To ensure GNU Debugger and SSH are enabled, uncomment and execute the line # echo 'CORE_IMAGE_EXTRA_INSTALL += "openssh gdbserver"' >> conf/local.conf.
To configure Remote Systems, click the "+" button next to "Debug Control" in the lower left corner.

Click "Other..." at the bottom of the displayed menu.

Select "Remote Systems" and click "Open".

Remote Systems will be added next to "Debug Control". Click the add button in the red frame.

Select "SSH Only" and click "Next".

Enter the "Host Name" and other details. The "Host Name" should be the IP address of eth0 confirmed by ifconfig in 2.4 Linux Boot (in this case, 192.168.50.204).

Enter the details as shown below and click "Finish".

Next, click "Sftp files -> Root" in Remote Systems.

You will be prompted to enter the User ID and Password. As the password is not set, enter as shown below and click "OK".

The target file system will be displayed.

This completes the "Remote Systems" configuration.
3.4 Debug Configuration
Configure the debug settings by selecting the Run -> Debug Configuration menu. Right-click on Generic Arm C/C++ Application and select "New Configuration".

Enter "memtool" for "Name" and click the "Connection" tab. From "Select target", choose "Intel SoC FPGA -> Cyclone V SoC (Dual Core) -> Linux Application Debug -> Download and debug application". Ensure that "RSE connection" is set to the previously configured "socdevkit".

Click the "Files" tab, click "Workspace...", and select memtool. The "Application on host to download" should look like below. Enter "/home/root" for both "Target download directory" and "Target working directory".

Next, click the "Debugger" tab and ensure "Run control" is set to "Debug from symbol (main)". Uncheck "Use default" for "Host working directory", click "Workspace...", and select memtool to match the settings below.

Finally, click the "Arguments" tab, enter "md 0x100000" in "Program Arguments", click "Apply" to save the settings.

Click the "Debug" button to start debugging.
3.5 Debugging
Click the "Debug" button to start debugging. The application will be downloaded to /home/root as specified in the "Files" tab, and it will break at the main function specified in the "Debugger" tab with the arguments set in the "Arguments" tab.

Here's a brief explanation of the "Debug control" toolbar:

No Name Description
| 1 | Connect | Connect/disconnect to/from the target |
| 2 | Continue | Resume execution |
| 3 | Interrupt | Pause execution |
| 4 | Step in | Execute one line, jump into functions |
| 5 | Step over | Execute one line, skip over functions |
| 6 | Step out | Return to the calling function |
| 7 | Inline | Switch between single-line assembly and single-line C code execution |
With "md 0x100000" as the argument, repeatedly executing "Step in" will eventually call the cmd_memory_display function to display memory. Entering "info locals" in Commands will display the local variables at that point. Click the "Continue" button on the "Debug control".

The memory contents will be displayed in the "App console" upon completion of execution.

This completes the Linux Application debugging. Once connected, subsequent debugging sessions can be started by double-clicking "memtool disconnected" in "Debug Control".
4. U-Boot-SPL/U-Boot Debug
4.1 Building U-Boot-SPL/U-Boot
U-Boot is a type of bootloader that can use various commands as a monitor program. This U-Boot is generally expanded and executed in external memory such as SDRAM. For devices like the Cyclone® V SoC FPGA, external memory is not enabled at startup. U-Boot-SPL, which stands for Secondly Program Loader, is the bootloader that initializes external memory, allowing U-Boot to be loaded into it.
The latest U-Boot build flow is Cyclone V SoC - Boot from SD Card. Following this flow will generate U-Boot-SPL/U-Boot.
4.1.1 Compiling the Golden Hardware Reference Design (GHRD)
First, compile the GHRD by executing the following commands to download and unzip the GHRD:
$ cd ~/ARM_DS
$ mkdir cv_gsrd
$ cd cv_gsrd/
$ export TOP_FOLDER=$(pwd)
$ wget https://github.com/altera-opensource/ghrd-socfpga/archive/refs/tags/QPDS22.1STD_REL_GSRD_PR.zip
$ unzip QPDS22.1STD_REL_GSRD_PR.zip
$ mv ghrd-socfpga-QPDS22.1STD_REL_GSRD_PR/cv_soc_devkit_ghrd/ .
$ rm -rf ghrd-socfpga-QPDS22.1STD_REL_GSRD_PR
$ cd cv_soc_devkit_ghrd
Next, compile the GHRD using the following commands to start the Nios2 Command Shell. The compilation takes approximately 15 minutes.
$ $QUARTUS_ROORDIR/../nios2eds/nios2_command_shell.sh
------------------------------------------------
Altera Nios2 Command Shell

Version 22.1, Build 915
------------------------------------------------
$ make generate_from_tcl
$ make rbf
4.1.2 Compiling U-Boot-SPL/U-Boot
Build U-Boot-SPL/U-Boot using the following commands:
$ cd $TOP_FOLDER/cv_soc_devkit_ghrd
$ mkdir -p software/bootloader && cd software/bootloader
$ git clone https://github.com/altera-opensource/u-boot-socfpga
$ cd u-boot-socfpga
$ git checkout -b test-bootloader -t origin/socfpga_v2022.04
$ cd arch/arm/mach-socfpga/cv_bsp_generator
$ python2 cv_bsp_generator.py -i $TOP_FOLDER/cv_soc_devkit_ghrd/hps_isw_handoff/soc_system_hps_0 -o ../../../../board/altera/cyclone5-socdk/qts
Next, add the following to
$TOP_FOLDER/cv_soc_devkit_ghrd/u-boot-socfpga/configs/socfpga_cyclone5_defconfig
Add the following:
CONFIG_BOOTDELAY=60
The "CONFIG_BOOTDELAY=60" setting extends the U-Boot startup delay to 60 seconds, allowing ample time to enter U-Boot commands during debugging.
Also, modify the following function, which displays "FPGA: Altera Cyclone V, SE/A6 or SX/C6 or ST/D6, version 0x0" in the U-Boot startup log:
U-Boot 2019.10-g8e98071-dirty (Aug 04 2020 - 22:50:14 +0800), Build: jenkins-uboot-s7

CPU:   Altera SoCFPGA Platform
FPGA:  Altera Cyclone V, SE/A6 or SX/C6 or ST/D6, version 0x0
BOOT:  SD/MMC Internal Transceiver (3.0V)
       Watchdog enabled
DRAM:  1 GiB
MMC:   dwmmc0@ff704000: 0
Loading Environment from MMC... OK
This function is called by int print_cpuinfo(void), which calls scan_mgr_get_fpga_id() to access the JTAG port. Arm* DS uses the JTAG port, so calling this function will cause a port conflict and Arm* DS will hang.
To avoid this issue, change
[arch/arm/mach-socfpga/misc_gen5.c(91)](https://github.com/altera-opensource/u-boot-socfpga/blob/socfpga_v2022.04/arch/arm/mach-socfpga/misc_gen5.c#L91)
	const u32 id = scan_mgr_get_fpga_id();
to
const u32 id = 0x02d020dd;
And modify
[lib/display_options.c(57)](https://github.com/altera-opensource/u-boot-socfpga/blob/socfpga_v2020.04/lib/display_options.c#L57)
    unsigned long d = 1e9;
to
unsigned long d = 1000000000;
Execute the following commands to build U-Boot-SPL/U-Boot:
$ make socfpga_cyclone5_defconfig
$ make -j 8
The number after -j specifies the number of CPU threads to use during the build. If not specified, all CPU threads will be used.
Upon successful build, the following files will be generated:
File Path Description
| u-boot | ~/ARM_DS/cv_gsrd/cv_soc_devkit_ghrd/u-boot-socfpga | u-boot ELF file |
| u-boot.dtb | ~/ARM_DS/cv_gsrd/cv_soc_devkit_ghrd/u-boot-socfpga | u-boot DTB file |
| u-boot-spl | ~/ARM_DS/cv_gsrd/cv_soc_devkit_ghrd/u-boot-socfpga/spl | u-boot-spl ELF file |
| u-boot-spl.dtb | ~/ARM_DS/cv_gsrd/cv_soc_devkit_ghrd/u-boot-socfpga/spl | u-boot-spl DTB file |
If you need to recompile after modifying the files, use:
$ make -j
If it doesn't compile correctly, use:
$ make clean && make -j
If socfpga_cyclone5_defconfig is modified, use:
$ make mrproper && make clean
$ make socfpga_cyclone5_defconfig
$ make -j
4.2 Yocto Build
Yocto builds the entire environment including U-Boot-SPL/U-Boot/Linux Kernel/Root File System. Although not necessary since we are using a pre-generated SD card image, the build process is explained here.
Follow the instructions in Setting Up Yocto Build System to build Yocto.
Prepare for the build with the following commands:
$ cd ~/ARM_DS/cv_gsrd
$ export TOP_FOLDER=$(pwd)
$ git clone -b kirkstone https://github.com/altera-opensource/gsrd_socfpga
$ cd gsrd_socfpga/
$ . cyclone5-gsrd-build.sh
$ build_setup
Disable patches that affect the U-Boot build:
$ sed -i '/file:.*patch/d' meta-intel-fpga-refdes/recipes-bsp/u-boot/u-boot-socfpga_v2021.07.bbappend
$ sed -i '/file:.*patch/d' meta-intel-fpga-refdes/recipes-bsp/u-boot/u-boot-socfpga_v2021.10.bbappend
Re-run the setup to enable the above:
$ cd $TOP_FOLDER/gsrd_socfpga
$ . ./poky/oe-init-build-env cyclone5-gsrd-rootfs/
Ensure the current folder is ~/ARM_DS/cv_gsrd/gsrd_socfpga/cyclone5-gsrd-rootfs and set a symbolic link to the RBF file generated by GHRD:
$ ln -s $TOP_FOLDER/cv_soc_devkit_ghrd/output_files/soc_system.rbf  \
  $WORKSPACE/meta-intel-fpga-refdes/recipes-bsp/ghrd/files/cyclone5_gsrd_soc_system.rbf
Update the Yocto GHRD recipe:
$ export NEW_HASH=$(sha256sum $WORKSPACE/meta-intel-fpga-refdes/recipes-bsp/ghrd/files/cyclone5_gsrd_soc_system.rbf | cut -f1 -d" ")
$ sed -i "s/SRC_URI:cyclone5.*/SRC_URI:cyclone5 ?= \"file:\/\/cyclone5_gsrd_soc_system.rbf;sha256sum=$NEW_HASH\"/g" $WORKSPACE/meta-intel-fpga-refdes/recipes-bsp/ghrd/hw-ref-design.bb
$ sed -i "/SRC_URI\[cyclone5_gsrd_core.sha256sum\]/d" $WORKSPACE/meta-intel-fpga-refdes/recipes-bsp/ghrd/hw-ref-design.bb
Reflect GHRD handoff information:
$ cd $TOP_FOLDER/gsrd_socfpga/cyclone5-gsrd-rootfs
$ devtool modify virtual/bootloader
$ cd workspace/sources/u-boot-socfpga
$ python2 arch/arm/mach-socfpga/cv_bsp_generator/cv_bsp_generator.py \
    -i $TOP_FOLDER/cv_soc_devkit_ghrd/hps_isw_handoff/soc_system_hps_0 \
    -o board/altera/cyclone5-socdk/qts
$ git commit -a -m "update handoff files for modified project"
If errors occur with python2 or git, check the Preparation section. Ensure the current folder is ~/ARM_DS/cv_gsrd/gsrd_socfpga/cyclone5-gsrd-rootfs/workspace/sources/u-boot-socfpga, then execute:
$ bitbake-layers create-layer $TOP_FOLDER/gsrd_socfpga/meta-modified-project
$ devtool update-recipe -a $TOP_FOLDER/gsrd_socfpga/meta-modified-project u-boot-socfpga
$ cd $TOP_FOLDER/gsrd_socfpga/cyclone5-gsrd-rootfs/
$ bitbake-layers add-layer $TOP_FOLDER/gsrd_socfpga/meta-modified-project
$ bitbake-layers remove-layer $TOP_FOLDER/gsrd_socfpga/cyclone5-gsrd-rootfs/workspace
$ rm -rf $TOP_FOLDER/gsrd_socfpga/cyclone5-gsrd-rootfs/workspace
This completes the Yocto setup.
Build Linux for the Cyclone® V SoC FPGA Development Kit with Yocto using the following command. Note that the build process takes several hours:
$ bitbake_image
Run the following command to consolidate the generated files:
$ bitbake_image
If the file ~/ARM_DS/cv_gsrd/gsrd_socfpga/cyclone5-gsrd-rootfs/tmp/deploy/images/cyclone5/gsrd-console-image-cyclone5.wic is generated, the build is successful. This is the file written to the SD card initially.
4.3 U-Boot-SPL Debug Configuration
Import U-Boot into Arm* DS. Follow the instructions in 3.2 Importing Project. Set "Project Name" to u-boot-socfpga and Existing Code Location to ~/ARM_DS/cv_gsrd/cv_soc_devkit_ghrd/u-boot-socfpga.
Save the following as debug_uboot_spl.ds in ~/ARM_DS/cv_gsrd/cv_soc_devkit_ghrd/u-boot-socfpga. This script loads U-Boot-SPL in Arm* DS:
# initialize system
stop
wait 5s
reset
stop
wait 5s
set trust-ro-sections-for-opcodes off

# load SPL and run up until spl_boot_device
loadfile spl/u-boot-spl 0x0
start
wait
restore spl/u-boot-spl.dtb binary __bss_end
thbreak spl_boot_device
continue
wait 60s
The spl/u-boot-spl file is the executable, and spl/u-boot-spl.dtb is the device tree file. Although all files are combined into u-boot-with-spl.sfp in u-boot-socfpga, when debugging with Arm* DS, load the executable with the loadfile command and load the DTB file immediately after SPL with the restore command.
To configure debugging, select the Run -> Debug Configuration menu. Right-click on Generic Arm C/C++ Application and select "New Configuration". Enter "u-boot-spl" for "Name", click the "Connection" tab, and select "Intel SoC FPGA -> Cyclone V SoC (Dual Core) -> Bare Metal Debug -> Debug Cortex-A9_0" from "Select target". Ensure "Target Connection, Debug Port, Clock Speed" matches the settings below, and click "Browse..." next to "Bare Metal Debug".

If the JTAG port is recognized, the screen below will be displayed. Select the port and click "Select".

If the tool path is not set, the following screen will be displayed. In this case, recheck the path for Intel® Quartus® Prime Software.

Next, click the "Debugger" tab, select "Connection only", enable "Run target initialization debugger script", click "Workspace...", and select the debug_uboot_spl.ds file. Ensure the settings match the screenshot below.

Click "Apply" to save the settings. Open the serial console in a separate terminal. Click the "Debug" button to start debugging.
4.4 U-Boot-SPL Debugging
When you start debugging, it will stop at spl_boot_device.
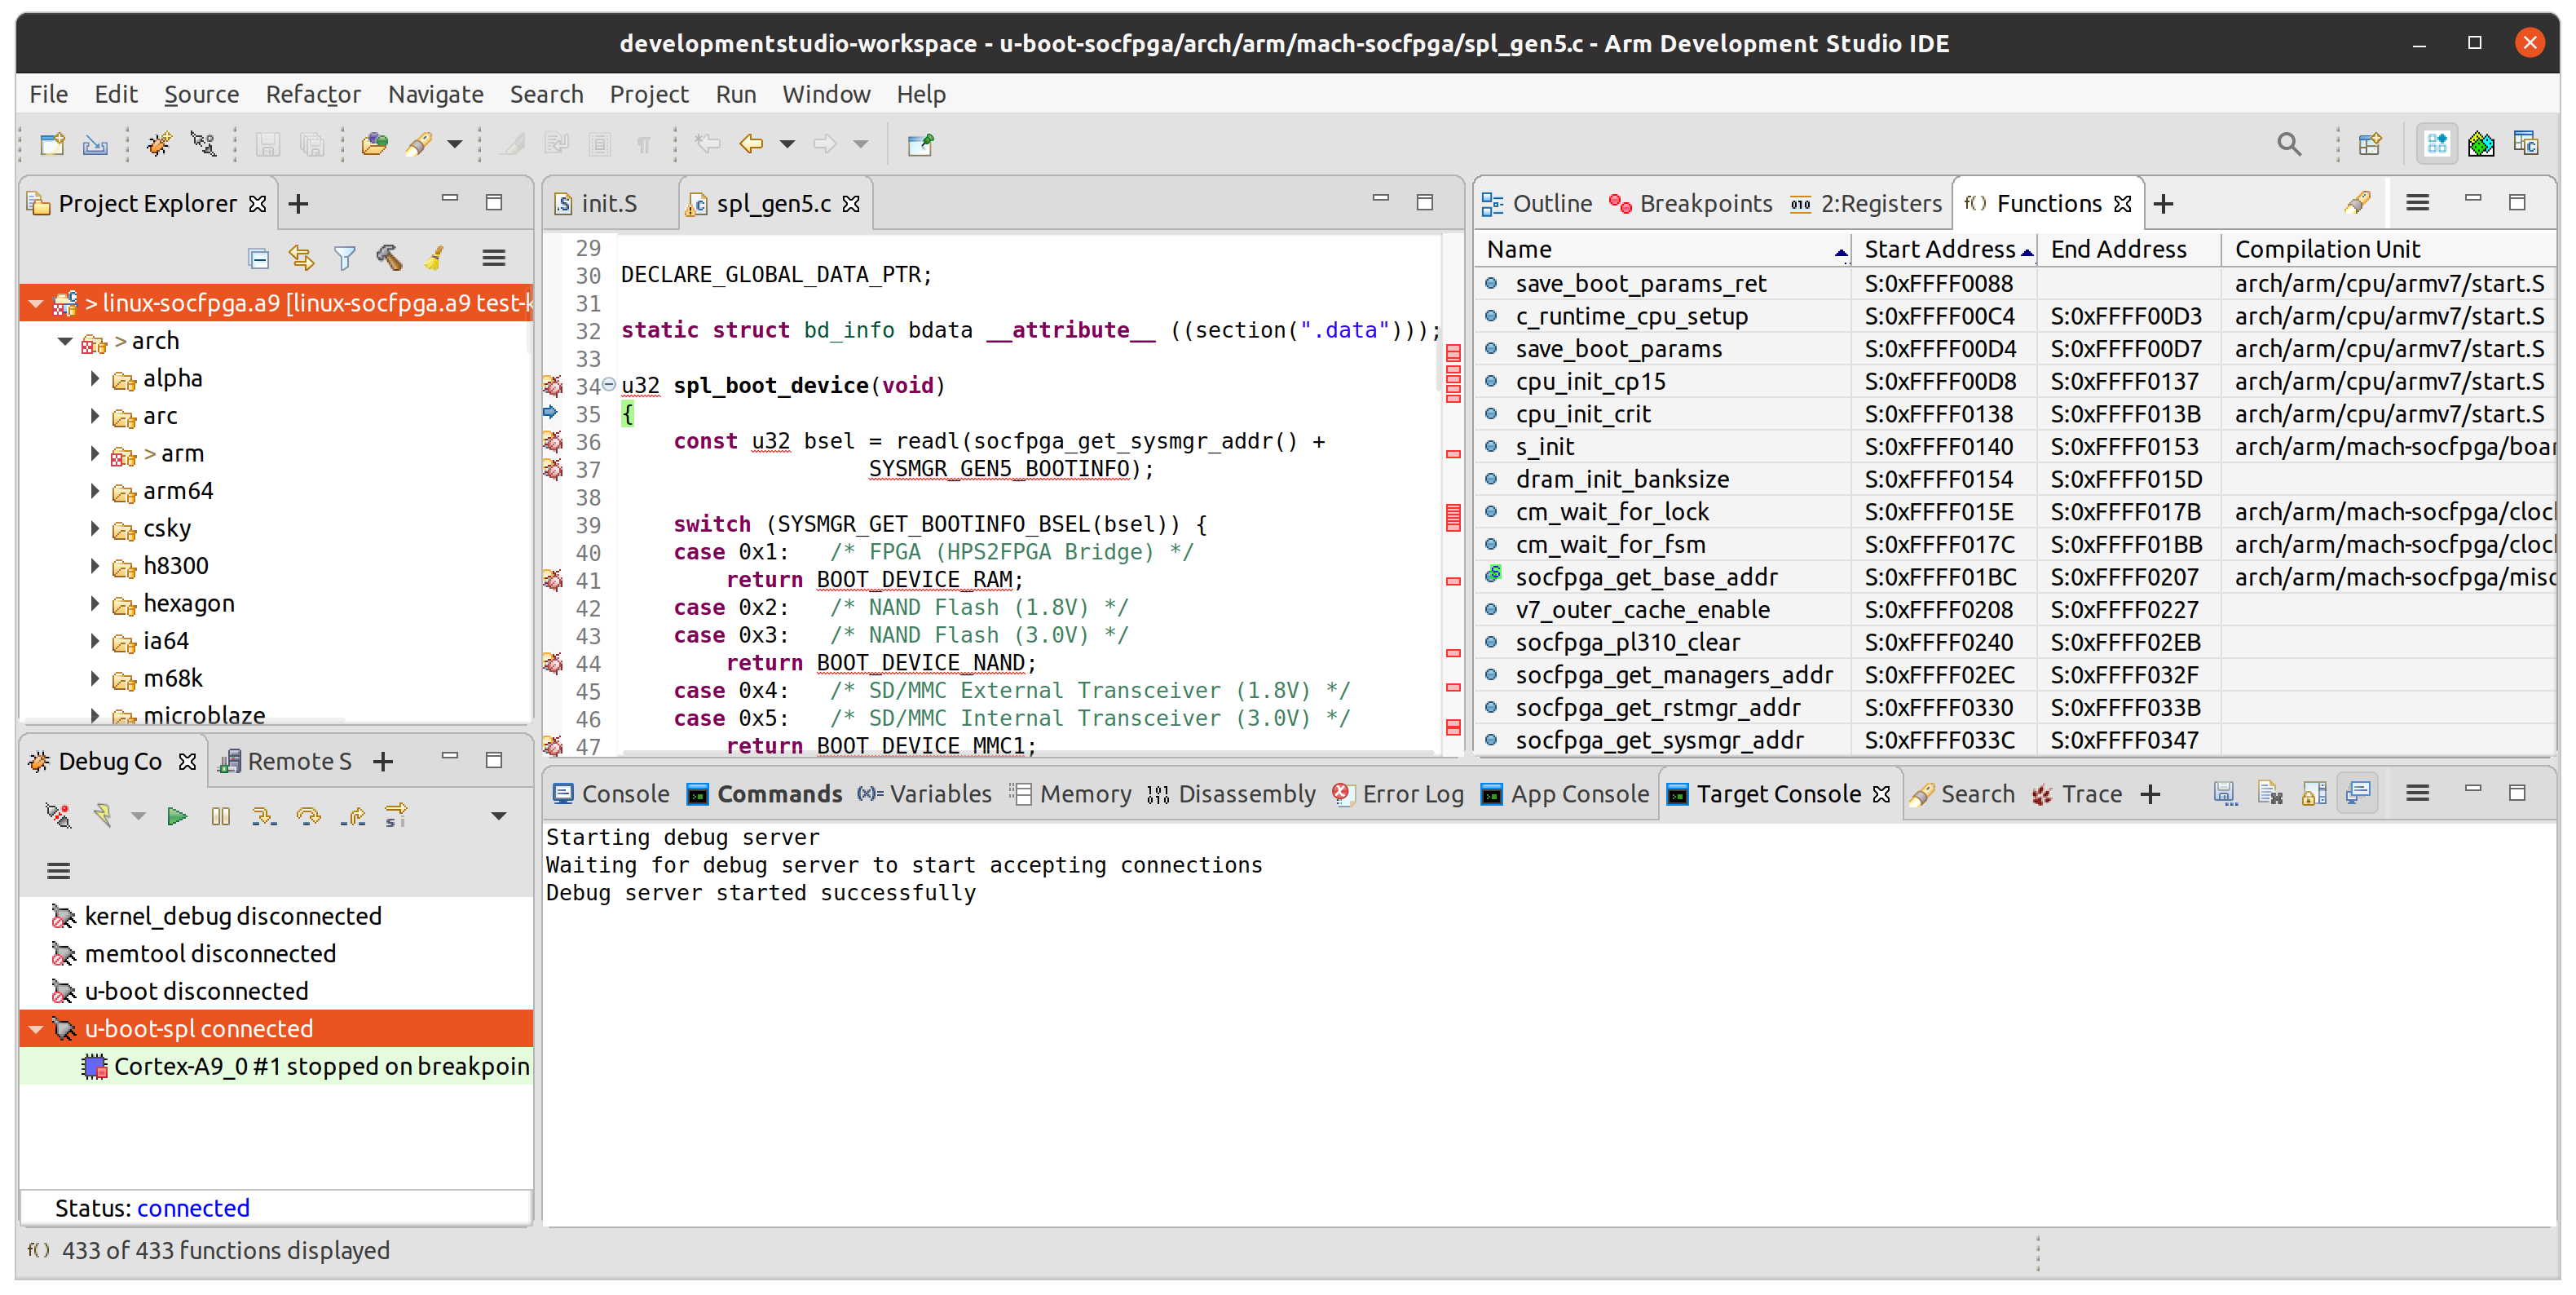
This is because of the thbreak spl_boot_device command in debug_uboot_spl.ds, which sets a temporary hardware breakpoint. Temporary means that the breakpoint is automatically deleted once it is hit. Also, the function list is displayed in the top right window. You can add it by clicking + and selecting Functions as shown below.

In this state, the serial console should display the following:

Next, set a hardware breakpoint at line 767 in common/spl/spl.c. Open the file, right-click on the left of the line number, and select DS Breakpoints -> Toggle Hardware Breakpoint as shown below.

Once set, a red circle with an "H" mark should appear next to the line number, indicating the hardware breakpoint is set. Click the Continue button on the Debug Control toolbar or type cont in the Commands to resume execution.

The execution will stop at line 767, as shown below. Type info locals in Commands to display local variables.

One of the last functions called by U-Boot-SPL is jump_to_image_no_args, so let's stop at this function. Click the Search button under Functions.

Enter "jump_to_image_no_args" in the search keyword and click OK.

Once jump_to_image_no_args appears in Functions, right-click it and select Toggle Hardware Breakpoint. Then, click the Continue button on the Debug Control toolbar or type cont in Commands to resume execution.

The execution will stop at jump_to_image_no_args, confirming that it was successfully interrupted.

Check that the serial console displays "Trying to boot from MMC1" as shown below. This indicates normal behavior. This concludes the U-Boot-SPL debugging.

Note: If the SD card is not inserted, an SD card detection error will occur.
4.5 U-Boot Debug Configuration
Since U-Boot shares the same project as U-Boot-SPL, there is no need to import it separately. Save the following as debug_uboot.ds in ~/ARM_DS/cv_gsrd/cv_soc_devkit_ghrd/u-boot-socfpga.
# initialize system
    stop
    wait 5s
    reset
    stop
    wait 5s
    set trust-ro-sections-for-opcodes off

    # load SPL and run up until spl_boot_device
    loadfile spl/u-boot-spl 0x0
    start
    wait
    restore spl/u-boot-spl.dtb binary __bss_end
    thbreak spl_boot_device
    continue
    wait 60s

    # load and start U-Boot
    delete
    loadfile u-boot
    start
    wait
    restore u-boot.dtb binary &_end

    # run until relocation, and adjust symbols accordingly
    thbreak relocate_code
    cont
    wait 60s
    symbol-file u-boot ((gd_t*)$r9)->reloc_off
    thbreak board_init_r
    continue
    wait 60s
This is the script to load U-Boot in Arm* DS. The first half is the same as debug_uboot_spl.ds. Below are the execution steps for U-Boot.
- Run up to spl_boot_device with U-Boot-SPL to perform minimum initialization and enable external memory.
- Load U-Boot with loadfile u-boot.
- Load U-Boot's DTB file with restore u-boot.dtb binary &_end.
- Run until relocate_code and adjust symbols accordingly with symbol-file u-boot ((gd_t*)$r9)->reloc_off.
- Stop just before the initialization function board_init_r with thbreak board_init_r.
Open Debug Configuration, right-click Generic Arm C/C++ Application, and select New Configuration. Enter "u-boot" in Name and click the Connection tab. Set it up like U-Boot-SPL's configuration. Confirm that Target Connection, Debug Port, and Clock Speed are as shown below.

Click the Debugger tab. Except for the change from debug_uboot_spl.ds to debug_uboot.ds, the configuration is the same as U-Boot-SPL. Set it up as shown below.

Click Apply to save the settings. Ensure the serial console is open. Click Debug to start debugging.
4.6 U-Boot Debugging
When debugging starts, it will stop at board_init_r.

The serial console should look like this:

Here, we'll check the operation of the memory dump command (md) in Arm* DS. Below is an example of executing the md command in a regular serial console:
=> md 100000 5
    00100000: 00000000 00000000 00000000 00000000  ................
    00100010: 00000000                             ....
    => help md
    md - memory display

    Usage:
    md [.b, .w, .l, .q] address [# of objects]
    =>
From the keyword "memory display" in the help, we can find the function of the md command. Click the Search icon under Navigate menu or select Search -> File... The screen below appears, enter "memory display" in Containing text, and click Search.

Double-click the part containing "memory display" in the search results to open the source file.

Below is an excerpt of the source code, indicating that the execution function of the md command is do_mem_md.
U_BOOT_CMD(
        md,    3,    1,    do_mem_md,
        "memory display",
        "[.b, .w, .l" HELP_Q "] address [# of objects]"
    );
Now, set a breakpoint for the function. In Commands, type thbreak do_mem_md to set the breakpoint. Click the Continue button on the Debug Control toolbar or type cont in Commands to resume execution.

After resuming debugging, move to the serial console, press Enter to stop U-Boot's startup.

Then, type md 100000 5 as shown below.

Return to Arm* DS, and it should stop at do_mem_md.

Continue stepping over, and at an appropriate point, type info locals in Commands to check local variables.

You can see that the value of addr is 1,048,576, which is the decimal value of the argument 0x100000. Click the Continue button on the Debug Control toolbar or type cont in Commands to resume execution. The values should be displayed on the serial console as shown below.

This concludes the U-Boot debugging.
5. Linux Kernel Debugging
We will perform Linux Kernel debugging. Follow Linux Kernel Debugging With DS-5 for instructions.
5.1 Linux Kernel Build
Build the Linux Kernel as described in Building Linux Kernel. Execute the following commands:
$ cd ~/ARM_DS
    $ git clone https://github.com/altera-opensource/linux-socfpga linux-socfpga.a9
    $ cd linux-socfpga.a9/
    $ git checkout -b test-kernel -t origin/socfpga-5.15.50-lts
    $ sed -i 's/120MB for jffs2 data/56MB for jffs2 data/g' arch/arm/boot/dts/socfpga_cyclone5_socdk.dts
    $ sed -i 's/<0x800000 0x7800000>;/<0x800000 0x3800000>;/g' arch/arm/boot/dts/socfpga_cyclone5_socdk.dts
    $ make socfpga_defconfig
Next, as described in About debugging a Linux kernel in the Arm Development Studio User Guide, the following settings are necessary:
CONFIG_DEBUG_KERNEL=y
    CONFIG_DEBUG_INFO=y
    CONFIG_DEBUG_INFO_REDUCED=n
    CONFIG_PERF_EVENTS=n
Verify the configuration settings. Running the command below will confirm the settings:
$ cat .config | grep -e CONFIG_DEBUG_KERNEL -e CONFIG_PERF_EVENTS -e CONFIG_DEBUG_INFO
    CONFIG_PERF_EVENTS=y
    CONFIG_DEBUG_INFO=y
    # CONFIG_DEBUG_INFO_REDUCED is not set
    # CONFIG_DEBUG_INFO_COMPRESSED is not set
    # CONFIG_DEBUG_INFO_SPLIT is not set
    CONFIG_DEBUG_INFO_DWARF_TOOLCHAIN_DEFAULT=y
    # CONFIG_DEBUG_INFO_DWARF4 is not set
    # CONFIG_DEBUG_INFO_DWARF5 is not set
    # CONFIG_DEBUG_INFO_BTF is not set
    CONFIG_DEBUG_KERNEL=y
The above output confirms that the conditions described in About debugging a Linux kernel are met. Proceed to build the Linux Kernel with the following command:
$ make -j 8 zImage Image dtbs modules
Next, copy the generated zImage to the SD card. Connect the SD card to the PC. Execute the following command to display zImage, confirming the path to overwrite:
$ ls /media/$USER/boot
    extlinux  socfpga_cyclone5_socdk.dtb  soc_system.rbf  u-boot.scr  zImage
Overwrite the SD card's zImage with the generated zImage by running the commands below:
$ cd ~/ARM_DS/linux-socfpga.a9
    $ cp arch/arm/boot/zImage /media/$USER/boot/
    $ sudo sync
Once overwriting is complete, connect the SD card to the Cyclone® V SoC FPGA Development Kit. Open the serial console and power on the device to boot Linux. Log in and leave the system in a waiting state as shown below.

5.2 Debug Configuration
Import the Linux Kernel into Arm* DS with the project name linux-socfpga.a9 and the existing code location ~/ARM_DS/linux-socfpga.a9. For details, refer to 3.2 Project Import.
Open Debug Configuration, right-click Generic Arm C/C++ Application, and select New Configuration. Enter kernel_debug in Name and click the Connection tab. Select Intel SoC FPGA-> Cyclone V SoC(Dual Core)->Linux Kernel and/or Device Driver debug->Debug Cortex-A92x SMP. Other settings are the same as U-Boot-SPL, so confirm Target Connection, Debug Port, Clock Speed as shown below.

Click the Debugger tab. Set Run Control to Connect only, check Execute debug commands, and enter the following commands. Set the source path as shown below.

Click Apply to save the settings. Ensure the serial console is open. Click Debug to start debugging.
5.3 Kernel Debugging
When debugging starts, it will stop at some point. The stopping location depends on the Linux Kernel state.

Here, as a debugging example, we'll set a breakpoint at the Ethernet link-up function and verify that it stops there. This function is called when the Ethernet link is up, meaning when the LAN cable is connected. First, open drivers/net/ethernet/stmicro/stmmac/stmmac_main.c in the Project Explorer. Press Ctrl+F to open the search dialog, enter "link_up" in the search keyword, and click Find.

The stmmac_mac_link_up function is called when the link is up. Set a hardware breakpoint at line 1094. Click the Continue button on the Debug Control toolbar or type cont in Commands to resume execution.

Unplug the LAN cable. The serial console should display a link-down message as shown below.

Reconnect the LAN cable. It should stop at stmmac_mac_link_up as shown below.

Click the Continue button on the Debug Control toolbar or type cont in Commands to resume execution. The serial console should display a link-up message as shown below.

This concludes the Linux Kernel debugging.
5.4 Kernel Initialization Debugging
Previously, we debugged the running Linux Kernel. Here, we will debug the Linux kernel from initialization. The debug configuration is the same as the Linux kernel debugging. The difference is that we connect the debugger at U-Boot instead of after the system has booted.
First, reboot U-Boot. If Linux is running, use the reboot command to start U-Boot. When U-Boot is waiting, press Enter to stop the startup. Then, type edit bootcmd. The startup command is displayed, and we see it is run fatscript;bridge enable;run distro_bootcmd. Run the first two commands to configure the FPGA and enable the bridge. It should look like this if successful.

Now, connect Arm* DS. Double-click "kernel debug" in "Debug control" to connect. Once connected, it should look like this. Click the Search button under Functions.

Enter "kernel_init" in the search keyword and click OK.

Set a hardware breakpoint at kernel_init.

Click Breakpoints to confirm the breakpoint is correctly set at kernel_init, then click the Continue button on the Debug Control toolbar or type cont in Commands to resume execution. Confirm that "Cotex-A9_0#0" is "running" as shown below, and move to the serial console.

Here, enter the last startup command run distro_bootcmd to start the Linux boot.

Execution will start and stop as shown below. Move to Arm* DS.

Arm* DS should confirm that it has stopped at kernel_init.

This concludes the Kernel initialization debugging.
6. Arm* DS Useful Features
6.1 Online Help
Refer to online help from Help -> Help Contents. Various materials are available, so please take a look. The Arm Debugger commands listed in groups section is particularly useful, so it is recommended to read it.

The following are memory-related commands. The x command at the bottom is for reading memory, and the memory set command is for writing to memory.

6.2 Register View
Arm* DS has a register display function that shows the CPU's general-purpose registers, CPU extension registers, and FPGA peripheral registers. Below is the display of the CPU's general-purpose registers. Switch cores by selecting the core in "Debug Control".

Below is the display of the CPU extension registers.

Below is the display of FPGA peripheral registers. This function allows you to check the register values without knowing the addresses.

Below is the value of the Reset Manager in the FPGA peripheral registers. A value of 1 indicates a reset state, showing that almost all peripherals are in a reset state.

6.3 MMU Information
Arm* DS makes it easy to display MMU settings, allowing you to easily obtain virtual memory settings. The command is listed in the online help as shown below.

Enter mmu memory-map in Commands or check it in the MMU/MPU window as shown below.

7. Summary
We performed a brief demo of debugging Linux Application, U-Boot-SPL/U-Boot, and Linux Kernel using Arm* DS. Arm* DS has many useful features, so please refer to the online help and explore. We hope this article serves as a helpful reference for your debugging tasks.
8. References
- Arm* Development Studio for Intel® SoC FPGA for Linux
- Arm Development Studio Intel SoC FPGA Edition
- Arm Development Studio
- Arm Development Studio User Guide
- SoCEDS and ARM Development Studio
- Building Bootloader for Cyclone V and Arria 10
- Cyclone V SoC GSRD
- Linux Application Debugging With DS5
- Linux Kernel Debugging With DS-5
- About debugging a Linux kernel
- Profile your Linux application
- インテル® SoC FPGA 向けデバッガー(Arm® DS / DS-5)の使い方
- SoCはじめてガイド
9. Notices & Disclaimers
Intel technologies may require enabled hardware, software, or service activation. No product or component can be absolutely secure. Your costs and results may vary.
© Intel Corporation. Intel, the Intel logo, and other Intel marks are trademarks of Intel Corporation or its subsidiaries. Other names and brands may be claimed as the property of others.
The products described may contain design defects or errors known as errata which may cause the product to deviate from published specifications. Current characterized errata are available on request.
Intel disclaims all express and implied warranties, including without limitation, the implied warranties of merchantability, fitness for a particular purpose, and non-infringement, as well as any warranty arising from course of performance, course of dealing, or usage in trade.
Link Copied
- Subscribe to RSS Feed
- Mark Topic as New
- Mark Topic as Read
- Float this Topic for Current User
- Bookmark
- Subscribe
- Printer Friendly Page