- Mark as New
- Bookmark
- Subscribe
- Mute
- Subscribe to RSS Feed
- Permalink
- Report Inappropriate Content
Hi,
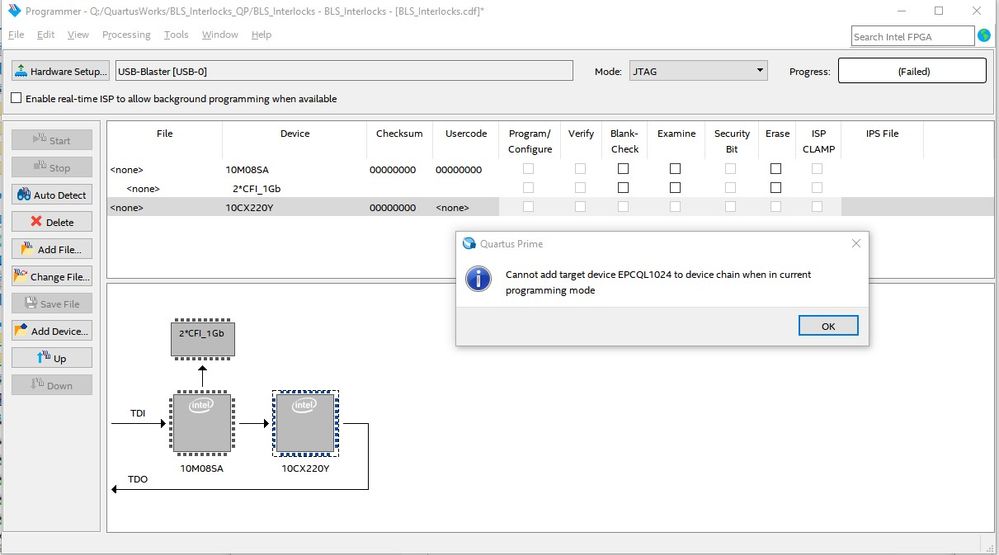
New here so I hope I'm asking this correctly. I have a Cyclone 10 GX FPGA Development Kit and need to program the board to load my project on power-up. The board allows two modes to configure the FPGA, 1) AS(x1 & x4) and 2) PS and FPP. The kit manual and schematic shows a EPCQ-L (EPCQL1024) directly connected to the Cyclone 10, but the programmer does not allow me to add a EPCQL1024 to Cyclone 10. See attached.
How do I program this EPCQL1024?
Or, how do I program the Flash? I tried creating a .hexout file but the Programmer won't accept it. Tried using a POF file but I get a message saying I need to use Flash Memory Programmer Object File, which I can't file any info on.
Intel Cyclone 10 GX Development Kit
Thanks,
Nick
Link Copied
- Mark as New
- Bookmark
- Subscribe
- Mute
- Subscribe to RSS Feed
- Permalink
- Report Inappropriate Content
Well, after some time I figured it out. I have always designed my boards with a JTAG going directly to the EPC so this was new to me having the EPC's only connection through the FPGA. Discovered I needed a Serial Flash Loader (SFL) in my design. Created a step-by-step list in creating the necessary files to make this work. Hope this helps someone in the future.
To program the EPCQL1024 on the Cyclone 10 GX Development Kit the following steps need to be done.
- Instantiate a Serial Flash Loader (SFL) on the top-level design.
- If needed, select the ASMI interface. (Was not selected for this procedure )
- Tie the nOE_IN signal to ground.
- In Quartus Prime Pro click on Assignments, Device and then “Device and pin Options…”
- Select Configuration tab.
- Select “Active Serial x4 (can use Configuration Device)” from “Configuration scheme:”.
- Select EPCQL1024 in the “Configuration device” section.
- Select “100 MHz Internal Oscillator” for “Active serial clock source:”.
- Click OK.
- Click OK on Device window.
- Compile project.
- When compile is complete, go to File and select “Convert Programming Files…”.
- Change “Programming file type:” to “JTAG Indirect Configuration File (.jic)”.
- Change “Configuration device:” to EPCQL1024.
- Change Mode: to “Active Serial x4”.
- Create a “File name:”, example: “output_file/ASx4.jic”.
- Add Input files, for SOF select <project_name>.sof, 10CX220YF780 appears under Page_0.
- Select device for “Flash Loader” by clicking on “Add Device”.
- Now select “Cyclone 10 GX” and then 10CX220Y.
- Save Conversion setup to a file.
- Click on Generate, a JIC file should now be in the output_files folder.
- Open the Programmer and connect the USB-BlasterII to the board and computer.
- Verify that “Use the enhanced mode SerialFlash Loader (SFL) IP for factory helper image” from Tools and then Options. Should be checked by default.
- Select Hardware, select USB-BlasterII.
- Click on “Auto Detect”, select 10M08SA (MAX10) and 10CX220Y (Cyclone10GX) when prompted.
- Change file for the 10CX220Y to the <project_name>.sof and click on “Program/Configure”.
- Program by clicking on “Start”.
- When finished click on “Auto Detect” again. (this step may not be needed)
- Change file for 10CX220Y to “output_file/ASx4.jic”.
- The file name changes to “Factory default SFL image” in blue letters and EPCQL1024 is below 10CX220Y with file of “output_file/ASx4.jic”.
- Click “Program/Configure” for both 10CX220Y and EPCQL1024 if not done automatically.
- Click on Start and the EPCQL1024 is now being programmed.
- When complete, disconnect USB-BlasterII and test.
The above steps should be an example for other FPGAs/EPCs.
The above steps are for the initial setup. If the code needs to change, after a compile just “Convert Programming Files…” using the saved Conversion setup file and then the Programmer saved configuration.
- Mark as New
- Bookmark
- Subscribe
- Mute
- Subscribe to RSS Feed
- Permalink
- Report Inappropriate Content
Hi,
I am glad that you have solved the problem from your end. Thank you for sharing the solution with other community users.
Regards,
Aiman
- Subscribe to RSS Feed
- Mark Topic as New
- Mark Topic as Read
- Float this Topic for Current User
- Bookmark
- Subscribe
- Printer Friendly Page
