- Mark as New
- Bookmark
- Subscribe
- Mute
- Subscribe to RSS Feed
- Permalink
- Report Inappropriate Content
I've been using this Grrrrreat NAS Array and had been working for YEARS. Just last week it is now 100% Full and my share is gone.
It has FW fs-bc 1.3-b524, 4 x 500GB HD's and a 1.3TB shares (but i cant access any of the shares \\share any more), but I can PING the NAS
Here is a lot info so you can get idea on the status on the array;
I can login into browser (using Firfox ver 29) the 3 x Green lights are on, the 4 HD's show (and are powered on and green {even during a bootup they do light up in order top/bottom}) also show Hot plug Indicator (in yellow) they are all ST3500641AS (465GB each), I can't expand the share (it shows i have only available disk space is -2 MB free), It will not let me enable FTP (the on/off button shows, but will not complete when i enable it), i can't enable SSH (the on button shows, but will not complete when i press it), The SHARED folders show NOT READY backup clients NOT Ready. Under the SYSTEM Status screen CPU is 100% Idle (all day long, even after a reboot(s)), network IPs are still good, FANs are 1704 RPM, disk temps are 54,35,38 Deg C, i can't even make a XRAY and save the file. I've tried using many ver of IE, Google chrome.
So, now I'm asking this community if you can help me. I've ran out of ideas on what to do. I also have the org Recovery CD's (but the PC i'm using does not support the NIC). Is there ANY WAY I can access the DATA off these HD's from ANY other way? like BOOT a CD using USB, Or access the data and maybe del a folder or 2 to free up some space, so that it will boot up. or some other Advance HTTP CGI script (fsck check, del temp files..etc), that will enable me to see the boot up, or enable TFTP (i even tried to connect using that) or any other copy job.
i have been reading the posts and i did find out someway you can make a serial ribbon cable and show the boot up (by taking case off), but i have not tried that part yet.
Any help you can give?
Thank you for your time.
Link Copied
- Mark as New
- Bookmark
- Subscribe
- Mute
- Subscribe to RSS Feed
- Permalink
- Report Inappropriate Content
Marcop300,
I don't know if this will help and it's been a long time since I worked with the Intel® Entry Storage System SS4000-Es. I went through some old archives I had and put this together. Accessing the SS4000-E by the serial port requires root level command line access. If you are unfamiliar with Linux command line use, we recommend that you do not attempt to use this. A command error at root level access can cause unrecoverable damage to the file system. If you choose to use the instructions here, you're on your own. The Intel® Entry Storage System SS4000-E reached end of interactive support status nearly two years ago.
1) Connect to SS4000 via serial port
a. Acquire DH-10 to DB-9 serial cable
b. Power off the system and remove SS4000 cover
c. Attach the DH-10 connector to the SS4000 serial port (behind the DIMM socket)
d. Attach the DB-9 connector to your computer
e. Configure HyperTerminal
i. Use appropriate COM port
ii. 115K bits per second, 8 Data bits, No Parity, 1 Stop bit and No Hardware flow control
iii. Power on the system and you should see the boot process the HyperTerminal screen. Allow the boot to complete and the system to reach a steady state.
iv. Press Enter to get a login prompt. It may take up to 30 seconds for the prompt to appear
v. Log in as root, password storage
2) To copy files, insert a USB stick into one of the USB ports on the back of the SS4000. The USB stick will mount automatically
a. The top USB port will mount as usbdisk1, the bottom usbdisk2
3) Move files to the USB stick
a. Navigate to the folder with the data to be moved to the USB stick. Example: cd: /nas/NASDisk-00002/public (this maybe different for your system)
i. The ls command will list the contents of the current directory so you can see what is there
c. Move files. Example: mv /nas/NASDisk-00002/public/myfiles.txt /nas/usbdisk2
The too full condition on the SS4000 is a difficult position to be in. I don't know if removing files from the system will actually free the space.
Regards,
John
- Mark as New
- Bookmark
- Subscribe
- Mute
- Subscribe to RSS Feed
- Permalink
- Report Inappropriate Content
Your reply is great. I did order a $6.00 cable dt10 to Db9 I did this Monday should be here today (got to love Amazon prime) but yes what your telling me to do below is my EXACTLY Next steps. I just hope I can free up space and not have to run intel Fix root FS script. I will see. THANK YOU for replying
I will let you know what I found out. I've spent so many hours on this, like over 30. I cannot have a computer beat me at this recovery, lol. Thank u.
I work for WWW.EMC.COM, So I know a lot about storage But not a lot about your Intel box. But thanks to Google your site and YouTube I've learned a lot. I even bought another ss4000-e but it came with firmware 1.4 (So I cannot move the drives over). And it will not let me downgrade the code (do u know of a force way)? I want it for a backup if the 1st dies. Once I get data off I will update to 1.4 Then it will fix many issues. Thank you. My cable did come into today but not I need to find a old PC with serial post most of my laptops have USB. So not I need to go buy a Usb/dB9.
I Will post what I did to fix this. THANK YOU AGAIN
- Mark as New
- Bookmark
- Subscribe
- Mute
- Subscribe to RSS Feed
- Permalink
- Report Inappropriate Content
Marcop300,
I believe you can downgrade the firmware. Just follow the "Upgrading the Firmware" instructions in the user guide without any hard disks installed with the 1.3 version you want.
The system operating system, "the firmware", is actually run from the hard disks after the system is initialized. The firmware is uploaded to the hard disks at initialization.
In your case with 1.3 on the SS4000 after the "downgrade" and 1.3 on the hard disks, it'll just boot normally.
John
- Mark as New
- Bookmark
- Subscribe
- Mute
- Subscribe to RSS Feed
- Permalink
- Report Inappropriate Content
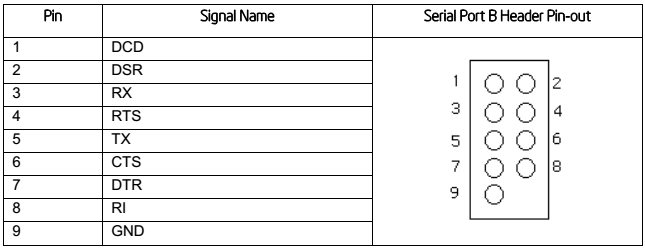
Update. I have 2 PC's that have DB9 Serial ports on them. Im using PUTTY and Tera Term and when I boot the SS4000-e get Garbage chars going across the screen. I've also pin out each port from DT-10/DB9 and they are straight through 1-1,2-2,3-3,4-4,5-5,6-6.7-7,8-8 and 9-9 and port 10 on the DT-10 is not connected. So I will now google more and find the correct PIN outs to use 115200,8,n,1.
- Mark as New
- Bookmark
- Subscribe
- Mute
- Subscribe to RSS Feed
- Permalink
- Report Inappropriate Content
I've seen some boards with different pin definitions of DH-10 port. If I remember correctly below is the definition of SS4000-E:
- Mark as New
- Bookmark
- Subscribe
- Mute
- Subscribe to RSS Feed
- Permalink
- Report Inappropriate Content
Thanks Edward.
Marco, What we used to use was a serial port header cable that came with Intel server boards to run a DH-10 from the server board header to a DB-9 (serial port) out to the back panel. From that DB-9, we connected a DB-9 to DB-9 null modem cable.
John
- Mark as New
- Bookmark
- Subscribe
- Mute
- Subscribe to RSS Feed
- Permalink
- Report Inappropriate Content
TODAY IS A HAPPY DAY
bought $12 in parts... and spent about 6 more hrs and made a cable. I went back to the basics and drew out a pic from NAS system board (pin outs) to what each single needs to goto, like TD-RD, GND-GND, RTS-CTS..etc thanks for website www zytrax com/tech/layer_1/cables/tech_rs232.htm. (Edwardzh, your pic is right from the system board of the NAS {looking from TOP of the nas when you have the cover off and RAM is on your right) then I BOOT the NAS array up and shows this.... (sample of some of the boot up).... I also DID NOT USE PINS 1 and 2 from the DT-10 ports, was not needed)
Now is time to guess the ROOT password, is not the same as the HTTP login user (I tried storage), but if i don't fully let the array boot up I can login as root/storage (Wired!!! ).
Thanks, John and Edward for sitting me straight and giving me ideas.
EM-7210 ver.T04 2005-12-12 (For ver.AA)
== Executing boot script in 1.000 seconds - enter ^C to abort
RedBoot> fis load ramdisk.gz
RedBoot> fis load zImage
RedBoot> exec
Using base address 0x01008000 and length 0x00200000
Uncompressing Linux........................................................................................ done, booting the kernel.
Linux version 2.6.10-iop1-9 (root@Builder) (gcc version 3.3.2) # 1 Thu Nov 2 21:34:13 CST 2006
CPU: XScale-IOP8032x Family [69052e20] revision 0 (ARMv5TE)
CPU: D VIVT undefined 5 cache
CPU: I cache: 32768 bytes, associativity 32, 32 byte lines, 32 sets
CPU: D cache: 32768 bytes, associativity 32, 32 byte lines, 32 sets
Machine: Intel IQ31244
Memory policy: ECC disabled, Data cache writeback
Built 1 zonelists
Kernel command line: console=ttyS0,115200 rw root=/dev/ram0 init=/linuxrc initrd=0xa1800000,8M mem=256M@0xa0000000
PID hash table entries: 2048 (order: 11, 32768 bytes)
Console: colour dummy device 80x30
Dentry cache hash table entries:65536 (order: 6, 262144 bytes)
Inode-cache hash table entries: 32768 (order: 5, 131072 bytes)
Memory: 256MB = 256MB total
Memory: 248576KB available (2151K code, 535K data, 88K init)
Mount-cache hash table entries: 512 (order: 0, 4096 bytes)
CPU: Testing write buffer coherency: ok
checking if image is initramfs...it isn't (no cpio magic); looks like an initrd
Freeing initrd memory: 8192K
NET: Registered protocol family 16
PCI: bus0: Fast back to back transfers disabled
SCSI subsystem initialized
Intel IOP3XX DMA Copyright(c) 2004 Intel Corporation
NetWinder Floating Point Emulator V0.97 (double precision)
JFFS2 version 2.2. (C) 2001-2003 Red Hat, Inc.
SGI XFS with ACLs, no debug enabled
SGI XFS Quota Management subsystem
I2C: M41ST85W RTC driver successfully loaded
Serial: 8250/16550 driver $Revision: 1.90 $ 4 ports, IRQ sharing disabled
ttyS0 at MMIO 0xfe800000 (irq = 28) is a 16550A
io scheduler noop registered
io scheduler anticipatory registered
io scheduler deadline registered
io scheduler cfq registered
RAMDISK driver initialized: 16 RAM disks of 32768K size 1024 blocksize
elevator: using anticipatory as default io scheduler
physmap flash device: 2000000 at f0000000
phys_mapped_flash: Found 1 x16 devices at 0x0 in 16-bit bank
Intel/Sharp Extended Query Table at 0x010A
Using buffer write method
cfi_cmdset_0001: Erase suspend on write enabled
cmdlinepart partition parsing not available
10 RedBoot partitions found on MTD device phys_mapped_flash
Creating 10 MTD partitions on "phys_mapped_flash":
0x00000000-0x00040000 : "RedBoot"
0x00040000-0x00060000 : "log"
0x00060000-0x000a0000 : "rammode"
0x000a0000-0x000c0000 : "naskey"
0x000c0000-0x002c0000 : "zImage"
0x002c0000-0x006c0000 : "ramdisk.gz"
0x006c0000-0x01f40000 : "vendor"
0x01f40000-0x01fc0000 : "wmdata"
0x01fc0000-0x01fc1000 : "RedBoot config"
0x01fe0000-0x02000000 : "FIS directory"
mice: PS/2 mouse device common for all mice
i2c /dev entries driver
md: linear personality registered as nr 1
md: raid0 personality registered as nr 2
md: raid1 personality registered as nr 3
md: raid10 personality registered as nr 9
md: raid5 personality registered as nr 4
raid5: measuring checksumming speed
arm4regs : 227.600 MB/sec
8regs : 262.000 MB/sec
32regs : 285.200 MB/sec
raid5: using function: 32regs (285.200 MB/sec)
md: md driver 0.90.1 MAX_MD_DEVS=256, MD_SB_DISKS=27
NET: Registered protocol family 2
IP: routing cache hash table of 2048 buckets, 16Kbytes
TCP: Hash tables configured (established 16384 bind 32768)
NET: Registered protocol family 1
NET: Registered protocol family 17
md: Autodetecting RAID arrays.
md: autorun ...
md: ... autorun DONE.
RAMDISK: Compressed image found t block 0
VFS: Mounted root (ext2 filesystem).
Freeing init memory: 88K
++ /bin/cat /etc/version
+ echo '======== /linuxrc =(fs-bc - 1.3-b524)============='
======== /linuxrc =(fs-bc - 1.3-b524)=============
+ PATH=/bin:/sbin:/usr/bin:/usr/sbin
+ export PATH
+ UPGRADE_PKG=/sysroot/tmp/upgrade.tgz
+ SIGNATURE=FALCONSTOR@INTEL
+ SIGNATURE_LEN=16
+ UPGRADE_FLASH_ONLY_LCK=/upgrade_flash_only
+ echo 'Mounting /proc filesystem ...'
Mounting /proc filesystem ...
+ /bin/mount -t proc /proc /proc
+ grep ' hda$' /proc/partitions
+ '[' 1x = 0x ']'
+ PHYSICAL_DISK=sda
+ echo Creating root device ...
Creating root device ...
+ echo 0x0100
+ /fs/hwtool -startdriver
...- Mark as New
- Bookmark
- Subscribe
- Mute
- Subscribe to RSS Feed
- Permalink
- Report Inappropriate Content
was root password something like the MAC address of the port that Im plug into? or port 1??? like i 00E0CF12345 guess i better start reading me.
- Mark as New
- Bookmark
- Subscribe
- Mute
- Subscribe to RSS Feed
- Permalink
- Report Inappropriate Content
Marco,
The default password is storage. For the web interface the original administrator user name is admin, but from the Linux command line you log in as root with the password storage if at the default.You can reset the SS4000 to defaults using the http://www.intel.com/support/motherboards/server/ss4000-e/sb/CS-022318.htm System (password) reset procedure. This should return the password to the default storage.
John
- Mark as New
- Bookmark
- Subscribe
- Mute
- Subscribe to RSS Feed
- Permalink
- Report Inappropriate Content
Marco,
When you do get logged into the system, can you run the following command and provide the output here so we can see the status of the internal array:
mdadm –detail /dev/md1 (note: there are two dashes before "detail")
Thanks,
Johm
- Mark as New
- Bookmark
- Subscribe
- Mute
- Subscribe to RSS Feed
- Permalink
- Report Inappropriate Content
yeah, i read the procedure and was thinking to reset PW, but wanted to make sure the boot up was not changing anything. because it boots to this....
BLAH BLAH....................................
Writing inode tables: done
Writing superblocks and filesystem accounting information: done
This filesystem will be automatically checked every 26 mounts or
180 days, whichever comes first. Use tune2fs -c or -i to override.
+ mount /devext3: No journal on filesystem on ram1
/ram1 /tmp
+ grep inetd /etc/inittab
+ '[' 1 '!=' 0 ']'
+ /usr/sbin/inetd
+ '[' -f /fs/sshd.sh ']'
+ /fs/sshd.sh service
/dev/ram0 on / type ext2 (rw)
/dev/ram1 on /tmp type ext2 (rw)
Generating public/private rsa1 key pair.
Your identification has been saved in /etc/ssh/ssh_host_key.
Your public key has been saved in /etc/ssh/ssh_host_key.pub.
The key fingerprint is:
b3:29:fd:31:a5:d9:f6:a7:62:43:57:03:24:19:f2:e4 root@fs_000E0xxxxxx
Generating public/private dsa key pair.
Your identification has been saved in /etc/ssh/ssh_host_dsa_key.
Your public key has been saved in /etc/ssh/ssh_host_dsa_key.pub.
The key fingerprint is:
eb:15:94:a6:23:b4:3b:cf:cd:bb:66:40:29:82:56:96 root@fs_000E0xxxxxx
Generating public/private rsa key pair.
Your identification has been saved in /etc/ssh/ssh_host_rsa_key.
Your public key has been saved in /etc/ssh/ssh_host_rsa_key.pub.
The key fingerprint is:
ec:f5:7a:0f:bf:ad:df:89:93:b8:6a:40:cf:20:99:20 root@fs_000E0Cxxxxxxx
+ /fs/hwtool -systemready
/dev/ram0 on / type ext2 (rw)
severity = I message_id = 60001 message = "System starting up" number_param = 0
+ exit 0
/bin/discoverd: waiting for data on port UDP 11575
________________it will come to this point and I can login as root/storage_______
But if I wait and DO NOT LOGIN it continues to boot, then I can't LOGIN as storage
fs_000E0xxxxxx login: root
Password:
_________________________ this is me after i put pw storage ____________________
Welcome to
_/_/_/ _/_/_/ _/_/_/ _/
_/ _/ _/ _/ _/_/_/_/ _/_/ _/ _/_/
_/ _/_/_/ _/_/ _/ _/ _/ _/_/
_/ _/ _/ _/ _/ _/ _/
_/_/_/ _/ _/_/_/ _/_/ _/_/ _/
Powered by FalconStor Software, Inc.
Copyright 2001-2006 by FalconStor.
All Rights Reserved.
http://www.falconstor.com http://www.falconstor.com
#
The data above is me explaining that i can login as root/storage.. IF after it names the NAS FS_the MAC address of the NAS array
after this ROM boot, it then looks like it boots,enables the 4 x HD, then runs mdadm and looks at the partition info, then build the raid and mounts the disks. but again, I can see that because i dont know root pw after this PREBOOT.
maybe, I should not be so GUN SHY and really reset everything. :O)
- Mark as New
- Bookmark
- Subscribe
- Mute
- Subscribe to RSS Feed
- Permalink
- Report Inappropriate Content
The reset procedure will reset the storage system to use its original administrator user name (admin) and password (storage) by pressing the small, recessed reset button on the back of the storage system. The admin user name is for the web UI login. From the command line you use root. The password is the same between the two.
The procedure also resets the storage system to its original network settings. If you previously configured the storage system to use a specific IP address, it will now obtain its IP address from the DHCP server (if any). If you don't have a DHCP server on the network, it will use its default IP address (192.168.0.101), subnet 255.255.255.0.
The system reset procedure will not delete RAID configuration or data on the hard disk drives.
John
- Subscribe to RSS Feed
- Mark Topic as New
- Mark Topic as Read
- Float this Topic for Current User
- Bookmark
- Subscribe
- Printer Friendly Page