- Mark as New
- Bookmark
- Subscribe
- Mute
- Subscribe to RSS Feed
- Permalink
- Report Inappropriate Content
Hi everyone,
If you use the TrackingAction RealSense script in Unity to power the rotation of objects then you may notice that the object will sometimes jump out of the desired position. This occurs particularly when the camera gains and loses tracking of the hand or face. In the case of using RealSense with avatar bodies, it can mean that a character's arm leaps sideways or one eyelid half-closes whilst the other remains open.
My company has been researching and experimenting with this problem for over a year and found that there is little that can be done with constraints, rules or custom scripting to minimize the snapping. Even if you manage to deactivate the TrackingAction at the instant that a snap is about to occur to prevent the object from mis-rotating, the TrackingAction initiates the delayed snap-movement as soon as it is switched on again and re-acquires tracking.
This is because it reads the current position of the hand or face landmark that a particular TrackingAction is set to and then pulls the rotation angle of the object towards that landmark. So if you switch off the TrackingAction when your hand is at the side of your body, move your hand towards the center of your chest and switch the TrackingAction back on again, the object will flip sidewards towards the chest where your hand currently is.
Another phenomenon that we had observed was that if the Virtual World box values of a TrackingAction that is configured for rotation are set to '0' then they are automatically changed to '1' as soon as tracking is acquired.

If you are wondering why we were using '0' for our rotational Virtual World Box values instead of the default '100': it is because having a Virtual World Box with perfectly spherical objects (like the limb joints in our avatar) seems to achieve nothing at all except generate unsightly giant red boxes in the editor. We speculate that this is because a sperical object spins on the spot and so can never touch the sides of the box, and that the Virtual World Box would work best with irregularly shaped objects that can make contact with the Bos's boundaries when rotated and have their movement blocked.
Anyway ... since we had observed that a "snap" in the settings of the TrackingAction when the program is running - such as the loss and re-gaining of tracking - can pull an object away from where you want it to be, we speculated that something similar might be happening with the automatic change of our Virtual World Box value from '0' to '1' at program start-up.
It was possible that the change in VBW values caused a change in the rotational joints at the very start of the program that it could not recover from, making the controls prone to going wrong. We therefore decided that the best way to avoid this start-up snap might be to simply set the VWB values of every single one of our rotational TrackingActions - both hand and face ones' - to the '1' value by default so that they did not have to be altered by the TrackingAction when tracking was acquired.

When we performed testing of the avatar with the new '1' setting, we found that the smoothness of the joint rotations had increased considerably, with much less jolting during movement and easier achieving of more difficult actions such as lifting the avatar arms above its head. It wasn't a perfect cure, since the TrackingAction still has other issues to be dealt with, such as producing unwanted direction changes when the wrist is turned slightly, even if the joint is not set to track the wrist joint. But eliminating the automatic updating of the RWB value had certainly improved the controls of our avatar.

Another way you can precisely customize your Virtual World Box settings is in the 'Center Reference' menu. By default it is set to 'Self.' This means that the TrackingAction automatically generates values that will move the center-point of your Virtual World Box away from the absolute center of your object. Sometimes the values are too tiny to make much of a difference, and sometimes they are as large as '10' or '-10', which can cause a noticable offset in the box's boundaries.
You can avoid this auto-generation of the Center values by choosing the 'Custom' option from the 'Center Reference' menu and then setting all of the Center values manually to '0.' When your program is run, your Virtual World Box will remain perfectly on-center no matter what.

CONCLUSION
Once you understand how the TrackingAction script can change the rotation angles of your object based on factors such as jumping to a landmark's new position after tracking is acquired or how much you are unconsciously turning your hands sidewards when using your hands to control an object, it makes it easier to design counter-measures for these unwanted angle changes to produce smoother animation and more refined control.
Best of luck! If you have questions, feel free to ask them in the comments below.
Link Copied
- Mark as New
- Bookmark
- Subscribe
- Mute
- Subscribe to RSS Feed
- Permalink
- Report Inappropriate Content
Unity supports development on all popular types of mobile.
http://unity3d.com/unity/multiplatform
I believe that you build your mobile project in Unity as normal but go to File > Build Settings and set your project to export as a mobile application instead of computer.
Pricing for Unity on mobile is a bit confusing. The Pro versions of mobile support cost $1500 or $75 a month, but Unity said that they made mobile development free for small independent developers a couple of years ago. It is possible that the situation is like that of the Personal and Pro editions of Unity 5 for computers ... you can use Unity for free but get extra features with the paid Pro version.
Even if you are able to develop a mobile application on Unity, you will still need to purchase a developer licence from Google or Apple to put your app on the Google Play Store or iOS App Store. I think the licence is typically about a $25 one-off fee for Android and $99 a year for iOS.
Android: http://developer.android.com/distribute/googleplay/start.html
iOS: https://developer.apple.com/programs/enroll/
- Mark as New
- Bookmark
- Subscribe
- Mute
- Subscribe to RSS Feed
- Permalink
- Report Inappropriate Content
Why is my model hand in a state of ladder? Not flat? How to solve it? Thank you
- Mark as New
- Bookmark
- Subscribe
- Mute
- Subscribe to RSS Feed
- Permalink
- Report Inappropriate Content
I was not sure what you meant, but I am guessing that if your model hand is not flat then you have a problem with how the pieces of your hand are linked together, if you have built your model hand in Unity.
Your TrackingAction controlled finger joints and the pieces of finger flesh have to be linked together as children in one long unbroken line from the start of the finger to the tip of it. If they are not linked like this then your hand will not be flat, because the start, middle and end sections of the finger will all rotate independently. What should happen if the sections are all child linked together should be that when the start section of the finger rotates, it moves the middle section. And as the middle section rotates, the fingertip section should be rotated.
This makes the fingers bend over smoothly when closing the hand and become straight and flat again when opening the hand.
This old article on my website from last year shows in pictures how to make an arm and hand in Unity and link the pieces together.
http://test.sambiglyon.org/sites/default/files/Arm-Construction-Guide.pdf
If I did not understand the meaning of your problem correctly, please correct me and I will try to help some more. Good luck!
**********
Chinese
我不知道你的意思,但我猜測,如果你的模型手不平坦的,那麼你必須用你的手的部分是如何連接在一起,如果你已經建立模型的手在統一的問題。
您的TrackingAction控制手指關節和手指肉體的片,必須從手指到它的尖端的開始鏈接在一起作為子在一長實線。如果他們沒有這樣的鏈接,然後你的手會不會平坦,因為手指的開始,中間和結尾部分將所有獨立旋轉。應該發生什麼,如果部分是所有子連接在一起的應該是,當手指的開始部分旋轉時,它移動中段。和作為中間部分旋轉時,指尖部分應旋轉。
這使得手指彎腰順手合上手中的時候,變得平直,再次打開手時。
這個老的文章在我的網站從去年的顯示畫面如何在統一的胳膊和手和鏈接拼在一起。
http://test.sambiglyon.org/sites/default/files/Arm-Construction-Guide.pdf
如果我沒有正確理解你的問題的意思,請大家指正,我會盡力幫助更多一些。祝你好運!
- Mark as New
- Bookmark
- Subscribe
- Mute
- Subscribe to RSS Feed
- Permalink
- Report Inappropriate Content
Depending on your let see, I solved my fingers stepped issue, really thank you for, I would like to ask a question, the problem is rotating fingers, my fingers always turn a mess, you give me a Profile for me to learn about it? thank you for your help!
- Mark as New
- Bookmark
- Subscribe
- Mute
- Subscribe to RSS Feed
- Permalink
- Report Inappropriate Content
I used to get broken fingers too. I found that the best thing to do was to use the JT1 joint for all rotational joints in each finger. So:
Set all Index finger joints to Joint Index JT1.
Set all Middle finger joints to Joint Middle JT1.
Set all Ring finger joints to Joint Ring JT1.
Set all Pinky finger joints to Joint Pinky JT1.
There are two reasons for using JT1.
(a) It is one of the easiest finger joints for the camera to see when you are holding your hand up to it. This will make rotation smoother and more reliable.
(b) If you have all joints in a finger set to track the same joint on the real hand then it means that all the joints will rotate by the same amount, so the flesh pieces will be less likely to look broken.
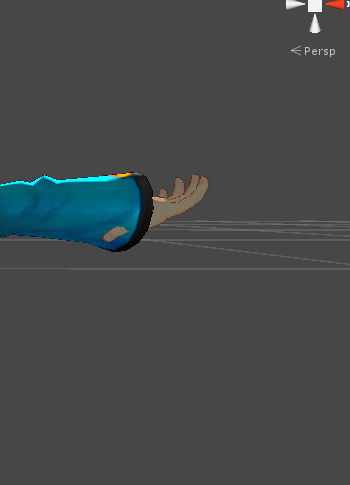
Here is an image of the structure of the middle finger of my avatar, and its TrackingAction settings.

The child linking of my finger pieces are in this order.
Base joint (the knuckle bone behind the finger on the real life hand). The base joint (which is shown by the coloured box on the picture) is actually buried inside the hand, just like the real life knuckle.
Base flesh (the first section of the finger, which does not rotate much)
Joint 1 (the joint in the middle of the finger on the real hand)
Middle finger flesh (the section of flesh just before the fingertip)
Fingertip joint (the bone just before the end of the finger)
Fingertip flesh (the flesh at the end of the finger).
My avatar hand has a claw on the end because it is a squirrel, but your one does not have to have that!
If your child linking of the pieces is correct then in the Hierarchy panel listing of your objects, they should descend diagonally like a set of stairs.
To avoid broken fingers, you can also try constraining every rotational direction except the one that makes the finger flesh rotate up and down. In my TrackingAction constraints, it is the X direction that my fingers rotate up and down in and so I have that axis unlocked. It may be a different axis in your project. Experiment to find out which direction makes the fingers rotate up and down, and lock the other directions in the constraints.
There is one exception to this. If you want the fingers to be able to move sideways too so that they can press together and then move apart again, you will need to have two axis open (for example, X and Y) in the Base joint only. You only need 2 axis open in the Base joint for sideways movement because if your finger pieces are linked together correctly, when the Base joint rotates sideways, it will move the rest of the finger with it.
Edit: I just remembered another piece of advice. You do not need to have a collider field in your rotation joint. This is because the joint will never have to make contact with other objects, because that is what the flesh pieces are for. If your joints have no colliders then the fingers are likely to bend better because they will not be rubbing against the colliders of the flesh pieces and being disrupted..
Chinese
我曾經獲得折斷的手指了。我發現,做的最好的事情是使用JT1聯合在每根手指各轉動關節。所以:
將所有食指關節聯合索引JT1。
將所有中指關節聯合中東JT1。
將所有無名指關節連接環JT1。
將所有的小指關節關節小指JT1。
有兩個理由使用JT1。
(一)這是最簡單的手指關節的攝像頭,當你牽著你的手給它看之一。這將使旋轉平滑和更可靠。
(b)如果你有一個手指設置來跟踪實際手相同關節的所有關節那麼就意味著所有的關節會以相同的量旋轉,所以果肉件將不太可能看起來破碎。
這是我的化身的中指的結構,並且其TrackingAction設置的圖像。
孩子鏈接我的手指件按照這一順序。
底座接頭(在現實生活中的手的手指背後的關節骨)。 (其通過彩色盒上的圖片)的底縫實際上是埋在手裡面,就像現實生活中的關節。
基肉(手指的第一部分,該部分不旋轉多少)
接頭1(在手指上的真實手的中間接頭)
中指肉(肉,就在指尖前的部分)
指尖關節(只手指結束前骨)
指尖的肉(肉在手指的結束)。
我頭像的手對最終爪,因為它是一隻松鼠,但你的一個不必須有!
如果你的孩子聯結件的正確,那麼在你的對象的層次面板上市,他們應該下降對角像一組樓梯。
為了避免破手指,你也可以嘗試限制每個轉動方向,除了一個使手指肉上下轉動。在我TrackingAction的限制,這是X方向,我的手指向上旋轉和上下,所以我有一個軸解鎖。它可能是一個不同的軸在項目中。實驗找出哪個方向使手指上下轉動,並鎖定在限制其他方向。
有一個例外。如果你想在手指能夠側向移動過,讓他們可以按在一起,然後再次分開移動,你將需要有兩個軸打開(例如,X和Y),僅在基地的聯合。你只需要2軸基地關節側向運動開放的,因為如果你的手指件正確連接在一起,當基關節旋轉橫盤整理,將手指的其餘部分移動它。
- Mark as New
- Bookmark
- Subscribe
- Mute
- Subscribe to RSS Feed
- Permalink
- Report Inappropriate Content
- Mark as New
- Bookmark
- Subscribe
- Mute
- Subscribe to RSS Feed
- Permalink
- Report Inappropriate Content
It's not a good idea to give out your email address on a web forum, as internet spy robots can read it and use it to send you junk mail! It's probably better to send me a private message on this forum with the 'Send author a message' link.
If you want to remove your own email address from your comment, you can do this by clicking the Edit link on the comment.
- Mark as New
- Bookmark
- Subscribe
- Mute
- Subscribe to RSS Feed
- Permalink
- Report Inappropriate Content
thank you!!!!!!!!!
- Mark as New
- Bookmark
- Subscribe
- Mute
- Subscribe to RSS Feed
- Permalink
- Report Inappropriate Content
You can send it to my mailbox? So that I contact you, thank you. . . .
- Mark as New
- Bookmark
- Subscribe
- Mute
- Subscribe to RSS Feed
- Permalink
- Report Inappropriate Content
Any private messages that you send me from this forum are sent to my email and I will see them quickly. It is therefore like sending me an email.
Regarding your problems ... when you say that your hands are upturned, do you mean that your fingers are rotating in the wrong direction? I had that problem too. To fix it, you just need to set an "invert" on the direction axis that rotates your fingers so that they rotate in the opposite direction.

Strangely, I have found that some of the finger joints need inverts, whilst some of them do not. The best approach is therefore to apply inverts to one joint at a time instead of all of them. If the finger section rotates the correct way, keep the invert. If it goes the wrong way, remove the invert. Eventually you should hopefully have all of your finger sections rotating in the correct direction.
Another factor that can affect whether the finger joints are rotating in the correct direction is the angle values of the joints in the Transform settings at the very top of your Inspector panel. All of your joints should have the same angles (for example in my joints, the angle of every joint is X = 0, Y = 0, Z = 270).

The 270 is not particularly relevant. It just happens to be the angle that I chose when creating the joints. The angle of the fingers was determined by the angle at which I put the flesh pieces attached to the joints. What is important is that whatever angle values you choose, all of your joints should have the same ones.
If you have made a mistake in the joint angles and have already finished your finger, it can usually be hard to fix, because changing a joint angle can distort the rest of the finger sections that come after that joint (because they are child linked together). There is an easy and quick tip for editing joints without breaking the rest of the finger though.
1. Right click on the object directly below the joint that you want to edit and select Copy. This will take a copy of all the child linked finger parts below that joint.

2. Right-click on that object again and select Delete this time, to cut off all finger objects below the joint.

5. Select the joint object and edit its angles in the Transform section of the Inspector panel.

6. Once you have finished editing, right click on the joint object and select Paste. This will paste the deleted finger sections back onto the hand, with the angles of the flesh and joints unchanged.

Although the finger sections are pasted back on, they are no longer child linked to the joint. To fix this, simply hold the left mouse button down on the object directly below the joint in the Hierarchy object listings panel and then drag it onto the joint and release the left mouse button to drop the section onto the joint and attach it again.

When you check the angles of the pieces you have pasted back on, you may find that they have changed. For example, if your angle was '270' then it might now say -90'. Don't worry - the minus value is just another way of writing it, and it is still the same angle. For example, -90 = 270, and -180 = 0. The important thing is that your finger sections rotate in the correct direction when you run the program!
THE THUMBS
Moving on to talking about the thumbs ... the thumbs are the most difficult section of the hand to model, because they can move in complex ways, in both the up-down and left-right directions.
Because the thumb is shorter than the finger, its physical structure is simpler as the tip of it does not bend over like the fingertips do. I therefore dropped the fingertip rotation joint and just had a base and middle joint.

Although the thumb points in a different direction, the angle values used for the thumb joints was still 0, 0, 270.

The direction of the thumb is primarily set by the direction that the flesh sections are pointing in.
In regard to the TrackingAction settings for the thumb, it can move in any direction - up / down, left / right and diagonally. It therefore made total sense to configure the constraints of the TrackingAction to only constrain the Positions, and have all of the Rotation constraints unticked to unlock them so that the thumb joints are free to rotate in any direction.

If you find that the thumb is rotating in the wrong direction, experiment with applying inverts to one or both of the joints until it is moving correctly. In the case of my hand in particular, the correct invert settings found through trial and error were to have X and Y inverted and Z not inverted.

With these constraint settings, the thumb was able to move just like a real human thumb, raised up in a thumbs-up gesture or drawn into the palm.

- Mark as New
- Bookmark
- Subscribe
- Mute
- Subscribe to RSS Feed
- Permalink
- Report Inappropriate Content
Speaking of extremely fine, sincere thanks to you, I will be your religion to debug, thank you again for, I have a problem directly to the forums.
- Mark as New
- Bookmark
- Subscribe
- Mute
- Subscribe to RSS Feed
- Permalink
- Report Inappropriate Content
Thank you very much, Wang and Ahmed. You're very welcome. :)
- Mark as New
- Bookmark
- Subscribe
- Mute
- Subscribe to RSS Feed
- Permalink
- Report Inappropriate Content
- Mark as New
- Bookmark
- Subscribe
- Mute
- Subscribe to RSS Feed
- Permalink
- Report Inappropriate Content
Yes, the camera sometimes has more difficulty dealing with two handed control than it does with one-handed control. This is because the left and right hands fight about which one should be active. So if one hand is nearer to the camera than the other, the object that is controlled by the nearest hand is moved whilst the object controlled by the other hand stops moving, because the tracking of that hand's movement stops.
There are some ways in which you can make two handed control more stable though.
1.
On the objects that use a TrackingAction with an Index value of 0, place a tick mark in the Continuous box. This box makes tracking of the Index 0 objects more stable, because it tells the camera to focus on tracking the Index 0 hand even if the Index 1 hand appears in the camera's view. Movement of the Index 0 hand will therefore not stall because of the camera getting confused about whether Index 0 or Index 1 should be active.

You should not though tick the Continuous box in the TrackingActions that use Index 1. This is because if you do this, the Index 1 object tends to ignore what the Index 1 hand (the second hand) is doing and instead follows the movements of the Index 0 hand. This causes Index 1 objects to exactly copy the movement of Index 0 objects instead of having their own independent movement.
An example of this in my full body avatar is that if the right arm is lifted up, the other arm lifts up too so that both arms are raised in the air, even though it was only meant that one arm should be raised.
2.
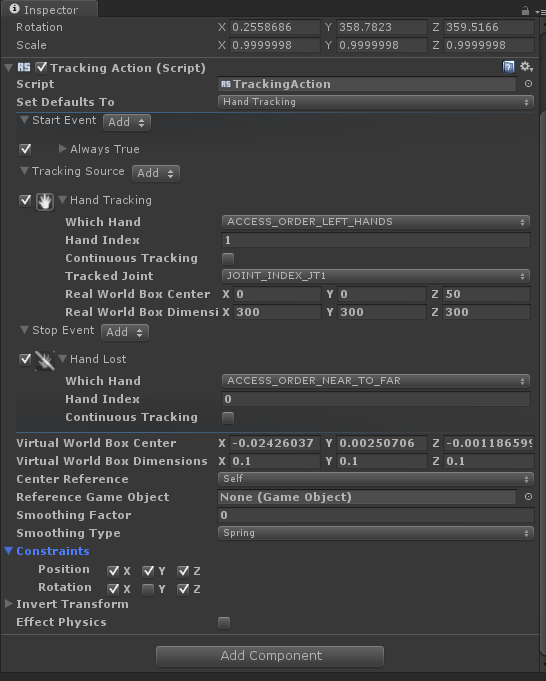
I also recommend setting the Which Hand option to the "Access Order Fixed" option for better two-handed control, as shown in the image above. This should help to make sure that Index 0 objects are controlled only by Index 0 and Index 1 objects are controlled only by Index 1.
If you use the default option, "Access Order Near To Far", then the camera will try to make the hand that is nearest to it the active one instead of both hands being active at the same time.
3.
Another way in which you can make two handed control more stable is to set the Start Event of the Index 0 TrackingActions to 'Always True' and set the Index 1 TrackingActions to have a Start Event of 'Two Hands Detected'. This makes the camera less likely to get confused about which hand should be active.
The reason for this is that if Index 1 (the second hand) is set to Two Hands Detected, the camera knows that it is impossible for the second hand to be active unless both hands are visible. It will therefore control the Index 0 objects with either the left or right hand until it sees the second hand appear. It will then control Index 0 objects with one hand and Index 1 objects with the other hand.
When the second hand is no longer visible to the camera then it will regard the Two Hands Detected condition to be "lost" and revert to moving only the Index 0 objects until the second hand is visible again.
When Two Hands Detected is used, the camera also seems to be more forgiving of one hand being behind the other and is less likely to lose tracking and stall the movement of the Index 1 objects.
4.
Yet another technique for effective two handed control is what I call Air Drumming. When the camera loses tracking of an object, it takes a few seconds before Unity catches up with the loss and stops moving the object. You can therefore maintain continuous tracking of both hands by "drumming the air" as you move your hands.
What I mean by this is that you move your hands forwards and backwards in the air, so that the right hand is in front of the left hand, then the left hand is in front of the right, and then the right is in front again. By doing this, you are continuously swapping which hand is the active one, and so movement does not stall: because of the time delay of a few seconds that it takes before Unity stops moving an object, the drumming is always re-activating tracking of a particular hand before it has time to stall.
****************
Chinese
是的,相機有時有一個處理雙手控制比它與單手控制更加困難。這是因為,左手和右手打左右哪一個應該被激活。因此,如果一方面是更靠近相機比其他,即由最近的手控制的對象被移動而用另一只手控制的對象停止移動,因為手的運動的跟踪停止。
有一些方法,使您可以讓雙手控制更穩定,雖然。
1。
在使用一個TrackingAction為0的指標值的對象,放置一個刻度線在連續箱樑。此框使該指數追踪0對象更加穩定,因為它告訴了攝像頭重點跟踪的指數0手,即使指數1手出現在攝像機的視圖。因為相機的指數0手部動作,所以不再拖延弄不清指數0或1指數是否處於活動狀態。
你不應該,雖然蜱在使用索引1,這是因為如果你這樣做,索引1的對象往往無視指數1手(秒針)在做,而是遵循了運動的TrackingActions連續箱指數0手。這將導致指數1對象,以準確地複製有自己獨立的運動指數的變動0對象,而不是。
這在我全身化身的例子是,如果右臂被抬起,另一臂抬起太使得兩個臂被升高在空氣中,即使它僅僅意味著一個臂應該提高。
2。
我還推薦哪只手選項設置為“訪問順序固定”選項,更好的兩手控制,如上圖所示的圖像中。這將有助於確保指標0對象由索引0和索引1對象僅由指數1只控制了控制。
如果使用默認選項,“訪問順序從近到遠”,然後相機會盡量讓手是最接近它的活躍的地區之一,而不是雙手活躍在同一時間。
3.另一種方式可以讓雙手控制更穩定是設置啟動事件的指數0 TrackingActions為“總是正確的”,並設置指標1 TrackingActions擁有的“兩隻手檢測”一開始事件。這使得相機不容易弄不清楚哪一只手應該是積極的。
這樣做的原因是,如果索引1(秒針)設定為兩隻手檢測,照相機知道,這是不可能的秒針有活性,除非雙手都可見。因此,將控制索引0的對象與左或右手直到它看到秒針出現。然後,它會控制指標0的物體,另一只手指數1對象用另一只手。
當秒針不再是可見的攝像頭那麼它將把兩隻手檢測到的狀況是“迷失”,並恢復到直到秒針再次可見只移動索引0的對象。
當兩隻手檢測時,該相機還似乎是更寬容的一方面是落後於其他和不易失跟踪和失速的索引1的對象的移動。
4。
另一種技術進行有效的雙手控制就是我所說的空氣擊鼓。當攝像機有失跟踪對象,它需要幾秒鐘前統一趕上損失和停止移動的對象。因此,您可以通過“擊鼓空氣”當你移動你的手保持雙手的連續跟踪。
我的意思是,你在空中向前和向後移動你的手,讓右手在左手的前面,然後左手在右前方,然後右邊是在前一次。通過這樣做,則連續地交換哪只手是活動的,因此運動不熄火:由於在幾秒鐘的時間延遲的,它需要前統一停止移動的物體,擊鼓總是重新激活的跟踪一個特定的手之前有時間來搪塞。
- Mark as New
- Bookmark
- Subscribe
- Mute
- Subscribe to RSS Feed
- Permalink
- Report Inappropriate Content
- Mark as New
- Bookmark
- Subscribe
- Mute
- Subscribe to RSS Feed
- Permalink
- Report Inappropriate Content
Your arms look really good! Congratulations! :)
I would check that the TrackingActions of your left hand are all using Index 1 and not Index 0. This is a mistake that I have made myself sometimes. It is easy to overlook when you have a lot of things to think about.
Also make sure that you do NOT have the Continuous box ticked on your Index 1 objects.
***********
你的手臂看起來真的很不錯!恭喜! :)
我會檢查你的左手TrackingActions都使用索引1,而不是指數0。這是我自己做,有時是錯誤的。這是很容易,當你有很多事情要考慮到忽視。
另外,還要確保你沒有連續框打勾索引1的對象。
- Mark as New
- Bookmark
- Subscribe
- Mute
- Subscribe to RSS Feed
- Permalink
- Report Inappropriate Content
- Mark as New
- Bookmark
- Subscribe
- Mute
- Subscribe to RSS Feed
- Permalink
- Report Inappropriate Content
Thank you very much for the TrackingAction images. That helps me a lot. Your settings are almost correct. However, you should do two more things:
1. Remove the 'Hand Lost' setting from the Stop section of both hands. You do not need it, as movement of the hands will stop anyway when your real life hands go outside of the camera's view.
2. I think the main problem is that you are using the settings 'Left Hand' and 'Right Hand' for the Which Hand setting. If you use this arrangement with a two-handed avatar then one hand can indeed affect the other. I tested this with my own avatar and confirmed that this is still the case.
What you should do is change both hands to 'Access Order Fixed'. Also make this change for your avatar's arm joints if they are able to move with TrackingActions.

MY%25G9%25%2Fusr%2Flocal%2Frvm%2Frubies%2Fruby-1.9.3-p551%2Fbin%2Fruby)K.png)
You will notice that in my Real World Box settings, I am using different values from yours (100 for Center and 200, 200, 200). You do not need to copy this into your own TrackingActions if you do not want to. This is an experimental system I am using, as I found that the arm movement seems to stall a lot less if you double the default values to - I guess - double the width of how far the camera will let you move your hands away from its centre before tracking is lost.
You will also see that I am using values of '1, 1, 1' for my Virtual World Box. Again, this is my personal preference and you do not have to use it yourself. I just find that with a value of '1', the arm does not spring backward behind the avatar when the hand is detected. Your arms may work just fine with the '0.1' setting you are using.
If you have changed the Which Hand setting to 'Fixed ID' and the hands are still not moving right, I would check the object child link hierarchy of your arms. The linkage of the two arms should be totally separate. If you have accidentally linked a part of one arm to a part of another arm then when one arm moves, it will make the other arm move with it. It is an easy mistake to make and I have done it myself a number of times.
- Mark as New
- Bookmark
- Subscribe
- Mute
- Subscribe to RSS Feed
- Permalink
- Report Inappropriate Content
I do not understand your reply to the message, you can make a DeMo send me through? Or I put my project to you. I now no way, thank you
- Mark as New
- Bookmark
- Subscribe
- Mute
- Subscribe to RSS Feed
- Permalink
- Report Inappropriate Content
Let us take it one step at a time. First, please try changing your 'Access Order Left Hand' and 'Access Order Right Hand' settings so that both TrackingActions say 'Access Order Fixed''.
讓我們把它一步一步的時間。首先,請嘗試更改您的'AccessOrderLeftHand'和'AccessOrderRightHand“設置,以便TrackingActions說'訪問順序固定'。
- Subscribe to RSS Feed
- Mark Topic as New
- Mark Topic as Read
- Float this Topic for Current User
- Bookmark
- Subscribe
- Printer Friendly Page