- Mark as New
- Bookmark
- Subscribe
- Mute
- Subscribe to RSS Feed
- Permalink
- Report Inappropriate Content
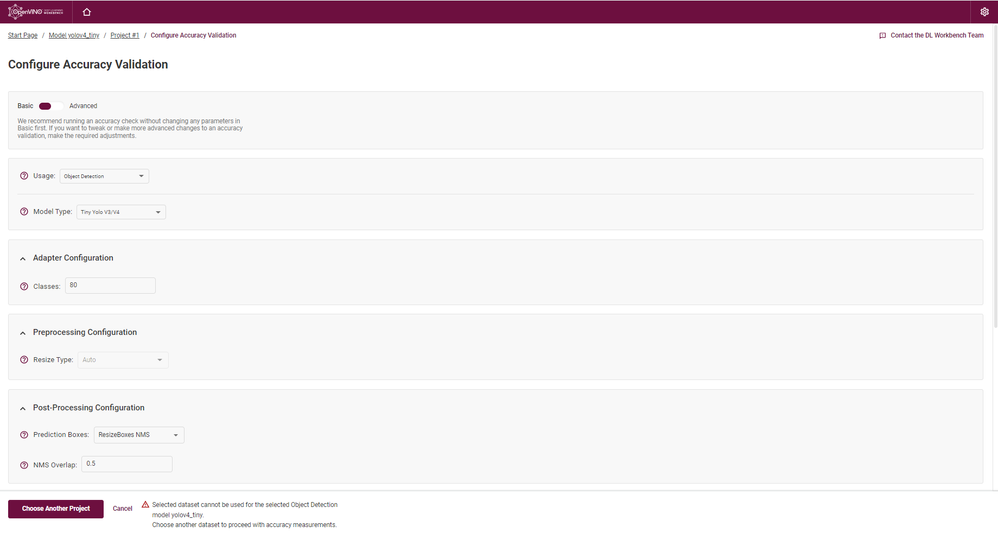
I faced this error when trying to create an accuracy report for both unoptimized and optimized models. The model I am using currently is yolov4_tiny for object detection and the dataset has been uploaded in the COCO format.
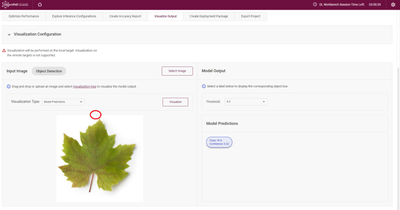
The second problem I faced is that bounding box is very small and the label can't be seen after I visualized the output. I tried visualizing the output on google colab using the same model and both bounding box and label can be seen clearly. I am not sure what is the issue here but some help would be appreciated.
Error : "Selected dataset cannot be used for the selected Object Detection model yolov4_tiny. Choose another dataset to proceed with accuracy measurements."
Link Copied
- Mark as New
- Bookmark
- Subscribe
- Mute
- Subscribe to RSS Feed
- Permalink
- Report Inappropriate Content
Hi et15,
Thank you for reaching out to us.
I've validated this issue from my end using your yolov4-tiny model together with your datasets in OpenVINO™ Deep Learning (DL) Workbench and encountered the following error message when creating Accuracy Report:
For your information, this issue is due to incorrect dataset format. The validated JSON file format for COCO dataset are shown below:
{
"info": <info>,
"images": [<images>],
"licenses": [<licenses>],
"annotations": [<annotations>]
}
Additionally, when a COCO dataset format for Object Detection use case is imported into DL Workbench, it will automatically be identified as "Object Detection" under the "Task" category as shown below:
On another note, I was able to successfully create an accuracy report and visualize output by using yolo-v4-tiny-tf model from Open Model Zoo together with 2017 Val images and 2017 Train/Val annotations COCO dataset which are available in Download COCO Dataset section.
Here are the results for Visualize Output and creating Accuracy Report:
Regards,
Hairul
- Mark as New
- Bookmark
- Subscribe
- Mute
- Subscribe to RSS Feed
- Permalink
- Report Inappropriate Content
Hi Hairul,
Thanks for your prompt reply. I've checked my dataset and it is already in COCO format. However, the task still remains as Inpainting, Style Transfer instead of Object Detection.
I've also referred to this https://community.intel.com/t5/Intel-Distribution-of-OpenVINO/OpenVINO-DL-Workbench-incorrectly-detects-COCO-dataset-as/m-p/1322443#M25507 and checked my annotations but there isn't any discrepancy.
- Mark as New
- Bookmark
- Subscribe
- Mute
- Subscribe to RSS Feed
- Permalink
- Report Inappropriate Content
Are there any specific reasons why my custom yolov4tiny_model cannot be detected as object detection?
For the visualization output, there is a prediction, but when I clicked on the model predictions, only the tiny bounding box(circled in red) appeared.
- Mark as New
- Bookmark
- Subscribe
- Mute
- Subscribe to RSS Feed
- Permalink
- Report Inappropriate Content
Hi et15,
I've validated from my end using your custom yolov4_tiny model and Open Model Zoo's yolo-v4-tiny-tf model in DL Workbench 2022.1. Both models were successfully uploaded and are categorized as "Generic" usage as shown below:
For your information, I wasn't able to produce an output for "Visualize Output" option using your custom yolov4_tiny model in DL Workbench 2022.1 as shown below:
Additionally, I've ran the Object Detection Python Demo in OpenVINO™ Toolkit 2022.1 using your custom yolov4_tiny model and also Open Model Zoo's yolo-v4-tiny-tf model. Here are the results from the demo:
Your custom yolov4_tiny model:
Open Model Zoo's yolo-v4-tiny-tf :
On another note, could you please provide the following information for further investigation from our side:
- The original model repository.
- How did you convert the model into IR format?
- The parameters used for model conversion into IR format.
- The OpenVINO™ Toolkit and OpenVINO™ DL Workbench versions used.
Regards,
Hairul
- Mark as New
- Bookmark
- Subscribe
- Mute
- Subscribe to RSS Feed
- Permalink
- Report Inappropriate Content
Hi Hairul,
This are the information needed :
1) Orginal model repository :
- Mark as New
- Bookmark
- Subscribe
- Mute
- Subscribe to RSS Feed
- Permalink
- Report Inappropriate Content
Hi et15,
Thank you for sharing the information.
I've validated from end by following the steps in Convert YOLOv4 Model to IR using the provided YOLOv4-tiny (weights / config file) and was able to convert the model to IR successfully.
However, the converted IR model will produce incorrect detection as shown below:
To convert a custom yolov4-tiny model into Intermediate Representation (IR) model, you'll need to follow the steps below:
1. Clone the keras-YOLOv3-model-set repository:
git clone https://github.com/david8862/keras-YOLOv3-model-set
2. Convert the custom model weights into Keras .h5 format:
python keras-YOLOv3-model-set\tools\model_converter\convert.py custom-yolov4-tiny\yolov4-tiny-custom.cfg custom-yolov4-tiny\yolov4-tiny-custom_final.weights custom-yolo-v4-tiny.h5 --yolo4_reorder
3. Convert the Keras .h5 model into TensorFlow .pb format:
python keras-YOLOv3-model-set\tools\model_converter\keras_to_tensorflow.py --input_model custom-yolo-v4-tiny.h5 --output_model custom-yolo-v4-tiny.pb
4. Run the Model Optimizer to convert .pb format into IR format:
mo --scale_values image_input[255] --reverse_input_channels --input_model custom-yolo-v4-tiny.pb --input_shape [1,416,416,3]
Here is the result from running Object Detection Python Demo in OpenVINO™ Toolkit 2022.1 using the converted custom yolov4-tiny weights into IR model:
Regards,
Hairul
- Mark as New
- Bookmark
- Subscribe
- Mute
- Subscribe to RSS Feed
- Permalink
- Report Inappropriate Content
Hi Hairul,
Thanks for reaching back to me. Based on the steps you gave above, the model is now able to draw the bounding box. However,
can you also help me validate this issue: community.intel.com/t5/Intel-Distribution-of-OpenVINO/Why-is-my-uploaded-COCO-annotation-dataset-unable-to-use-to/m-p/1402423#M27941
- Mark as New
- Bookmark
- Subscribe
- Mute
- Subscribe to RSS Feed
- Permalink
- Report Inappropriate Content
Hi et15,
For your information, I've generated a custom COCO dataset by using your test_data dataset and edited the instances_val.json file accordingly.
DL Workbench was able to detect the dataset as Object Detection, Instance Segmentation, etc. task as shown below:
I've validated from my end using 13 of your dataset images and was successful in importing the COCO dataset as Object Detection task. I've attached my edited custom COCO dataset here for your reference.
Therefore, you should also be able to successfully import your full dataset as Object Detection task, provided your image details are configured correctly in the instances_val.json file. Please also pay particular attention to the "category_id" and "bbox" entries of your dataset as described in this thread.
On a side note, I've left the "info" and "licenses" entries as empty lists in the instances_val.json file as DL Workbench will still recognize the dataset as COCO dataset format even though it's empty.
Regards,
Hairul
- Mark as New
- Bookmark
- Subscribe
- Mute
- Subscribe to RSS Feed
- Permalink
- Report Inappropriate Content
Hi et15,
This thread will no longer be monitored since we have provided a solution. If you need any additional information from Intel, please submit a new question.
Regards,
Hairul
- Subscribe to RSS Feed
- Mark Topic as New
- Mark Topic as Read
- Float this Topic for Current User
- Bookmark
- Subscribe
- Printer Friendly Page


