- Mark as New
- Bookmark
- Subscribe
- Mute
- Subscribe to RSS Feed
- Permalink
- Report Inappropriate Content
Having issues with 14700k on my gigabyte z790 gaming x Bios F9 (Windows 10 pro), 1000w power supply. When all set to auto cant pass avx and avx2 stress test(XTU). Video editing programs cant finish rendering, games crash little later (all BSOD). I also have kingston fury renegade 2x16Gb running on xmp 2 profile 6800Mt/s. Tried disabling xmp but it didn`t change anything. On high usage cpu hits 100C very easily. I have ag620 deepcool air cooler. I tried all presets on motherboard Optimized, 6GHZ, even disable e cores. Only thing that works better i set p cores to 50 (5000Mhz) and e cores to 38 (3800Mhz), temps cant pass 75C. Now the problem is avx2 stress test sometimes work and sometimes don`t, have also initial bootup 20-30s, setup for memory boot speed in bios is normal. I also disabled turbo boost or any type of boost for cpu and for memory. From another thread i read to test cpu with Intel processor diagnostic tool and i did and it all passed but not in XTU avx2 fails almost instantly. I don`t have any ideas any more i just want to make this stable.
- Mark as New
- Bookmark
- Subscribe
- Mute
- Subscribe to RSS Feed
- Permalink
- Report Inappropriate Content
Hello Peguar,
Thank you for contacting us regarding your Intel® Core™ i7 processor 14700K having instability issues. We apologize for any inconvenience that this might have caused you. We appreciate you conducting troubleshooting on your end. Additionally, we would like to suggest considering the steps below for addressing your concern:
Method 1
- Access BIOS
- Select "ADVANCED MODE"
- In the Tweaker tab
- Locate the CPU Vcore
- Select "Normal" option.
- Select "Dynamic Vcore(DVID)" option.
- Change it from "Auto" to "+0.005V"
- Increase the DVID by +0.005 and reboot OS, until the crash disappears, and the system is running stable.
Method 2
- Access BIOS
- select "Tweaker"
- select "Advanced Voltage Settings"
- select "CPU/VRAM Settings"
- adjust "CPU Vcore Loadline Calibration"
- recommend starting from "Low" to "Medium" until system is stable.
After implemented methods 1 or 2, run XTU test again and if the AVX2 test can pass, run your games and rendering programs and see if the issue persists.
If the issue persists after the suggest steps above, please see below for our next steps of diagnosis.
- Gather Application logs from Windows Event viewer "Windows Logs"
- Press the "Windows key" + "R" and type in "eventvwr.msc", then click “OK” to run the Event Viewer.
- Under "Event Viewer (Local)" > "Windows Logs", select the Application - to collect "Application Logs".
- To Save the event log. Click menu "Action" and select "Save All Events As…".
- Save the log file with your desired file name and location.
- Press the "Windows key" + "R" and type in "eventvwr.msc", then click “OK” to run the Event Viewer.
- Generate Windows dump file to help us with the analysis of your concern using the link: https://learn.microsoft.com/en-us/troubleshoot/windows-client/performance/generate-a-kernel-or-complete-crash-dump
- Follow the "Manually generate a memory dump file" procedure. This command notMyfault.exe /crash will trigger BSOD which is part of generating dump file. Make sure that this data is saved and all closed prior executing this program.
- These are just examples of where the dumped files are normally located. The location might've been changed prior to running the tool from your end.
- Small Memory dump - C:\WINDOWS\Minidump directory.
- These are just examples of where the dumped files are normally located. The location might've been changed prior to running the tool from your end.
- The Kernel and Complete Memory Dump - %SystemRoot%MEMORY. DMP.
- Note: The Kernel and Complete Memory Dump is a huge file(approximately around 2GB). We would suggest considering sharing it with us via Google Drive. It is important for us to gather all the information necessary to provide you a better recommendation in resolving your concern.
- Follow the "Manually generate a memory dump file" procedure. This command notMyfault.exe /crash will trigger BSOD which is part of generating dump file. Make sure that this data is saved and all closed prior executing this program.
Kindly download and use the tools below and send us a screenshot of its results for analysis:
- Intel® Extreme Tuning Utility (Intel® XTU)- You may run the stress test within the app. If the test is showing any thermal throttling or if your system crashes when initiating/during the test. Regardless of the result, please let me know. Use the link below:
https://www.intel.com/content/www/us/en/download/17881/intel-extreme-tuning-utility-intel-xtu.html
- Intel® Processor Diagnostic Tool - This tool will serve as your general Intel Processor health check. Use the link below: https://www.intel.com/content/www/us/en/download/15951/intel-processor-diagnostic-tool.html
Best regards,
John B.
Intel® Customer Support Technician
Link Copied
- Mark as New
- Bookmark
- Subscribe
- Mute
- Subscribe to RSS Feed
- Permalink
- Report Inappropriate Content
Hello Peguar,
Thank you for contacting us regarding your Intel® Core™ i7 processor 14700K having instability issues. We apologize for any inconvenience that this might have caused you. We appreciate you conducting troubleshooting on your end. Additionally, we would like to suggest considering the steps below for addressing your concern:
Method 1
- Access BIOS
- Select "ADVANCED MODE"
- In the Tweaker tab
- Locate the CPU Vcore
- Select "Normal" option.
- Select "Dynamic Vcore(DVID)" option.
- Change it from "Auto" to "+0.005V"
- Increase the DVID by +0.005 and reboot OS, until the crash disappears, and the system is running stable.
Method 2
- Access BIOS
- select "Tweaker"
- select "Advanced Voltage Settings"
- select "CPU/VRAM Settings"
- adjust "CPU Vcore Loadline Calibration"
- recommend starting from "Low" to "Medium" until system is stable.
After implemented methods 1 or 2, run XTU test again and if the AVX2 test can pass, run your games and rendering programs and see if the issue persists.
If the issue persists after the suggest steps above, please see below for our next steps of diagnosis.
- Gather Application logs from Windows Event viewer "Windows Logs"
- Press the "Windows key" + "R" and type in "eventvwr.msc", then click “OK” to run the Event Viewer.
- Under "Event Viewer (Local)" > "Windows Logs", select the Application - to collect "Application Logs".
- To Save the event log. Click menu "Action" and select "Save All Events As…".
- Save the log file with your desired file name and location.
- Press the "Windows key" + "R" and type in "eventvwr.msc", then click “OK” to run the Event Viewer.
- Generate Windows dump file to help us with the analysis of your concern using the link: https://learn.microsoft.com/en-us/troubleshoot/windows-client/performance/generate-a-kernel-or-complete-crash-dump
- Follow the "Manually generate a memory dump file" procedure. This command notMyfault.exe /crash will trigger BSOD which is part of generating dump file. Make sure that this data is saved and all closed prior executing this program.
- These are just examples of where the dumped files are normally located. The location might've been changed prior to running the tool from your end.
- Small Memory dump - C:\WINDOWS\Minidump directory.
- These are just examples of where the dumped files are normally located. The location might've been changed prior to running the tool from your end.
- The Kernel and Complete Memory Dump - %SystemRoot%MEMORY. DMP.
- Note: The Kernel and Complete Memory Dump is a huge file(approximately around 2GB). We would suggest considering sharing it with us via Google Drive. It is important for us to gather all the information necessary to provide you a better recommendation in resolving your concern.
- Follow the "Manually generate a memory dump file" procedure. This command notMyfault.exe /crash will trigger BSOD which is part of generating dump file. Make sure that this data is saved and all closed prior executing this program.
Kindly download and use the tools below and send us a screenshot of its results for analysis:
- Intel® Extreme Tuning Utility (Intel® XTU)- You may run the stress test within the app. If the test is showing any thermal throttling or if your system crashes when initiating/during the test. Regardless of the result, please let me know. Use the link below:
https://www.intel.com/content/www/us/en/download/17881/intel-extreme-tuning-utility-intel-xtu.html
- Intel® Processor Diagnostic Tool - This tool will serve as your general Intel Processor health check. Use the link below: https://www.intel.com/content/www/us/en/download/15951/intel-processor-diagnostic-tool.html
Best regards,
John B.
Intel® Customer Support Technician
- Mark as New
- Bookmark
- Subscribe
- Mute
- Subscribe to RSS Feed
- Permalink
- Report Inappropriate Content
Thank you. It seems that cpu vcore loadline set to medium or in my case normal did the trick.
- Mark as New
- Bookmark
- Subscribe
- Mute
- Subscribe to RSS Feed
- Permalink
- Report Inappropriate Content
Hello dear sir!
I had the exact same problem, and the exact same solution also helped me.
Now, I would like to understand better:
Who's fault is this? Is the processor not good enough, that it needs extra V to be stable? Is it the motherboard that is unable to keep the needed V while at default settings? (my PSU is EVGA 1200w platinum).
Funny that my wife has the same processor and motherboard (PSU is just 850w gold), and it's all stable, with no errors or crashes.
Also, when doing the XTU benchmark, I get only 11200pts (while her PC gets 11700) and in my case, it enters thermal throttling at 240-250W - this makes me think I did a bad job while applying thermal paste (cooler master master gel regular). Maybe this could even be helping to cause the instability problem...
- Mark as New
- Bookmark
- Subscribe
- Mute
- Subscribe to RSS Feed
- Permalink
- Report Inappropriate Content
It depends, what motherboard you have, what memory and power supply. If your cpu throttles it can be temperature. I downclocked mine from 5.5Ghz to 5000Ghz because i seen my cpu easily hit high temps. Now it cant pass 80C. Maybe i can raise to 5.2 but Cinebench goes from 33000 to 35000 which is not huge difference. BIOS version also can contribute to errors. Always put newest BIOS. I also heard that Windows 11 is better than windows 10 because of its better support for E and P cores. And finally, as they say, it could be just bad silicon lottery. For 14700K water cooling is a must if you want to use it in full. I have air cooling Deep Cool ag620 and i am satisfied with temps.
- Mark as New
- Bookmark
- Subscribe
- Mute
- Subscribe to RSS Feed
- Permalink
- Report Inappropriate Content
Hey John,
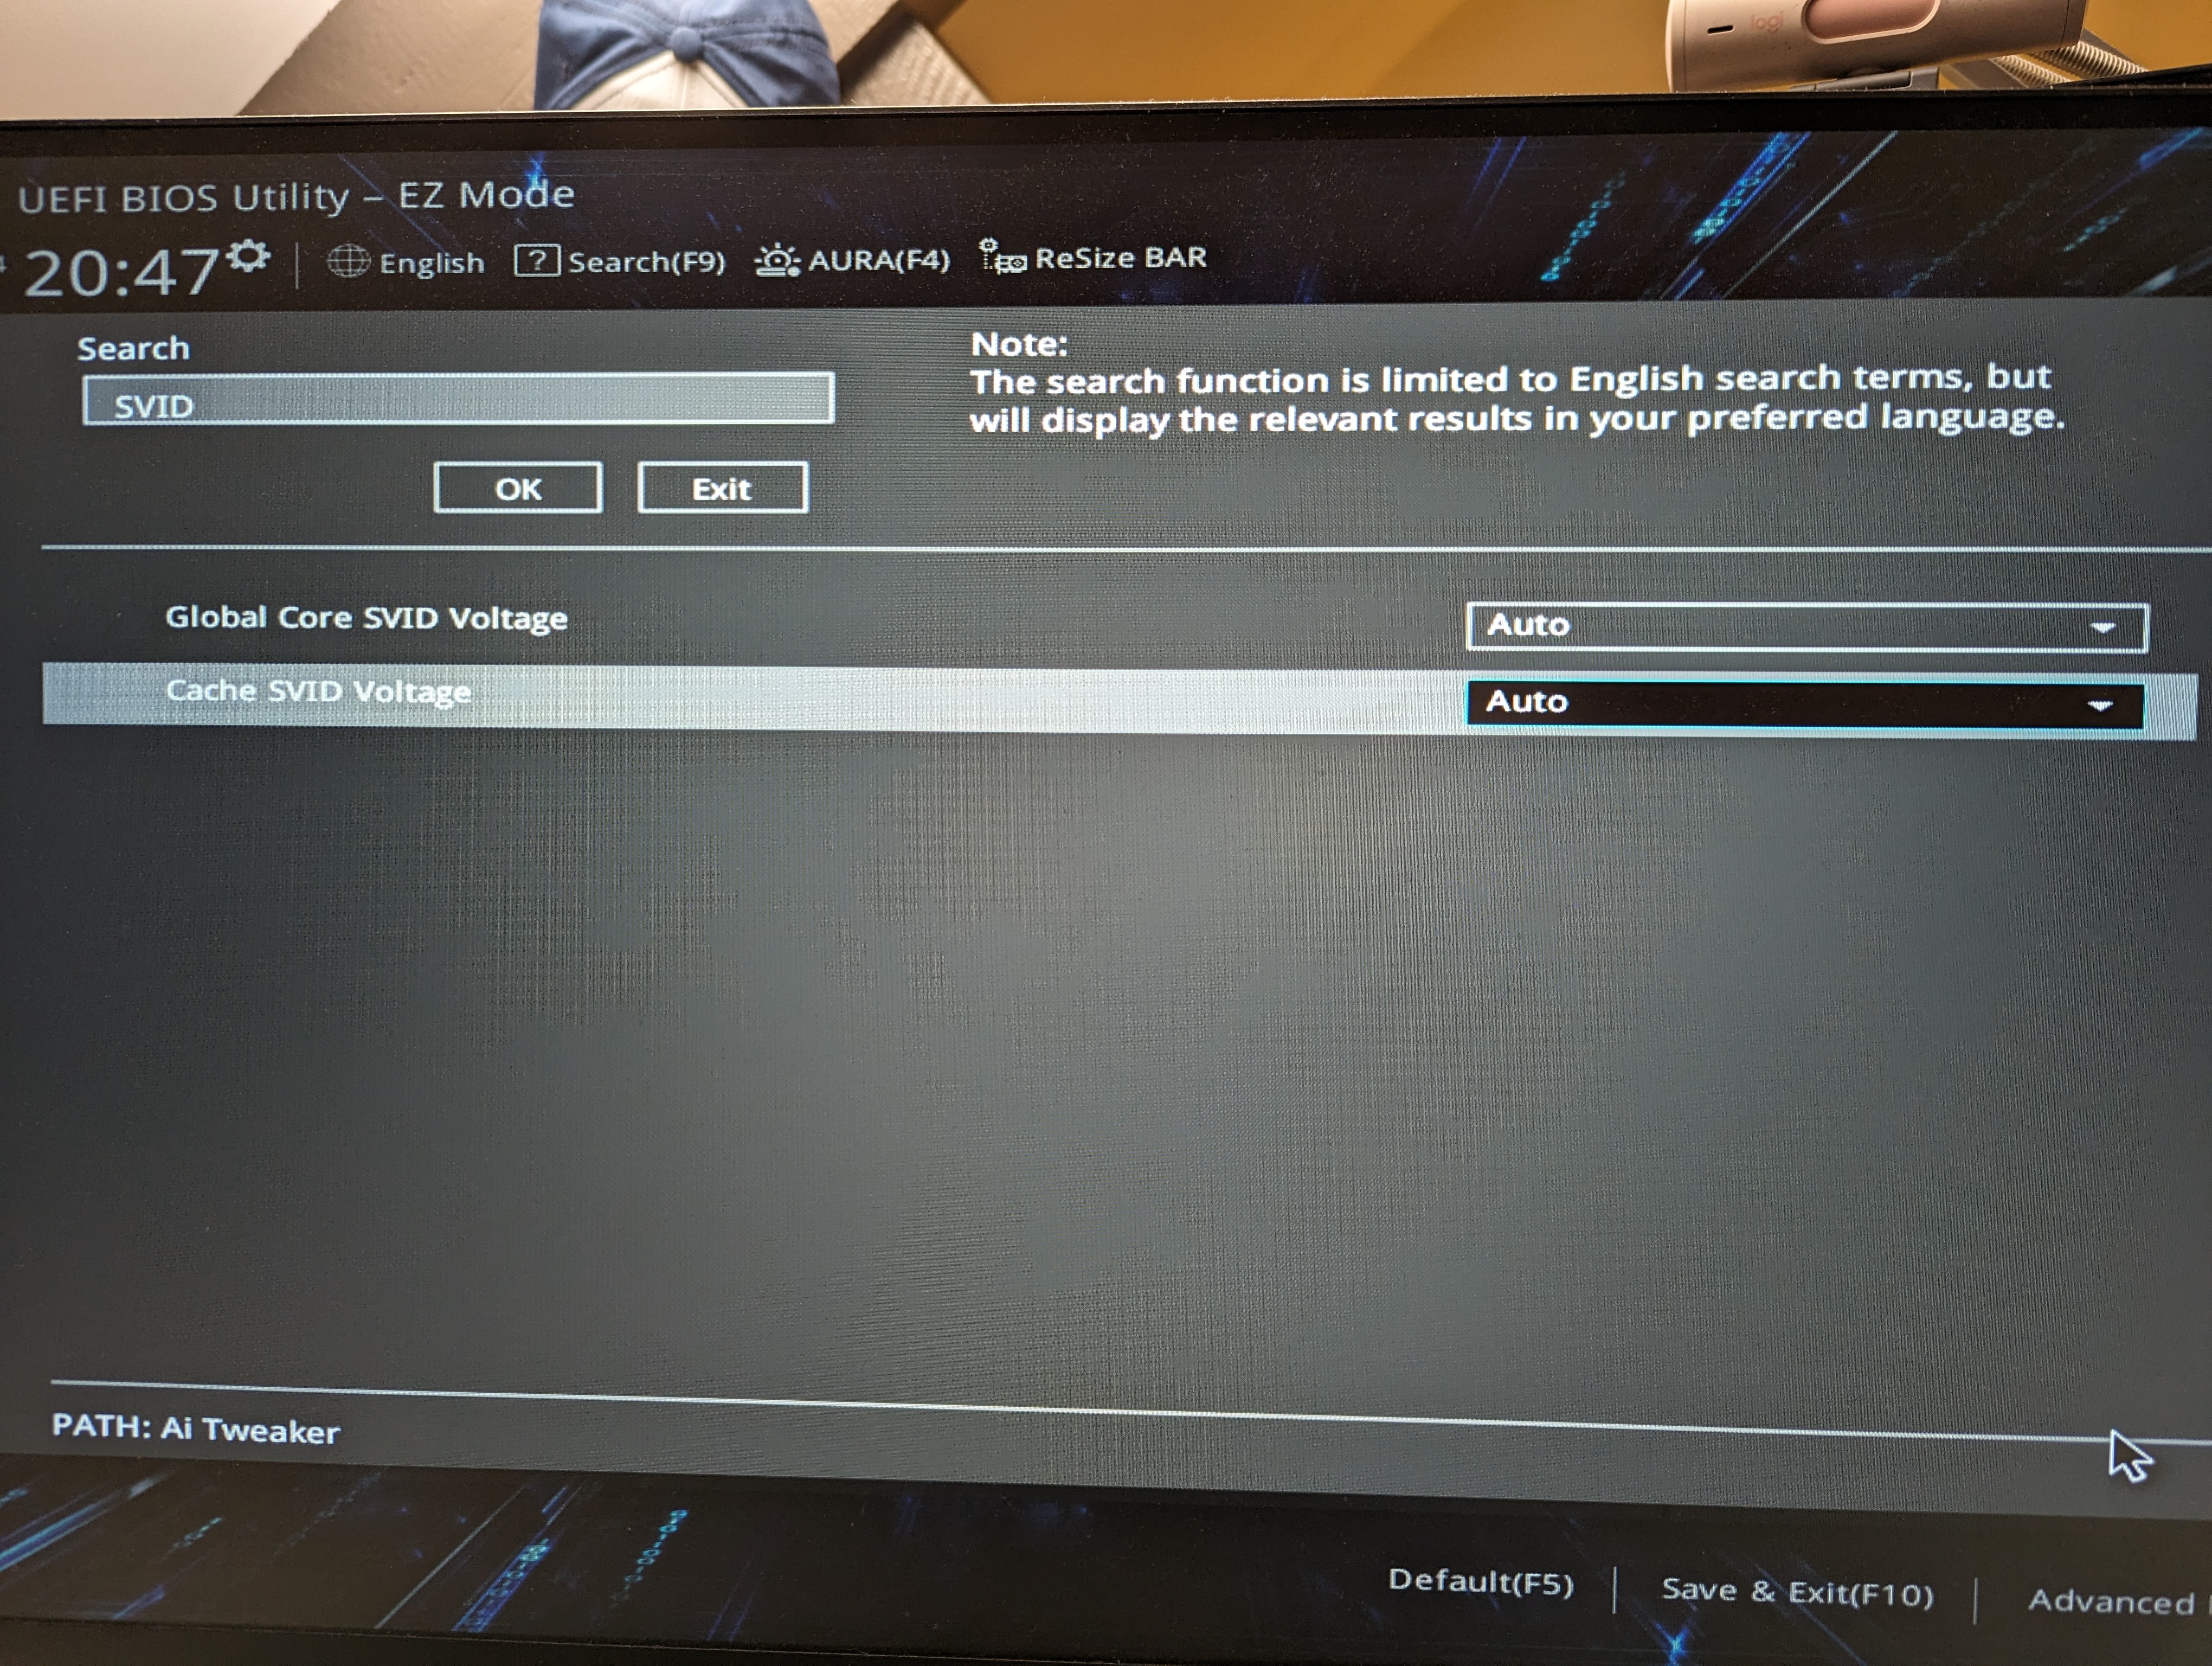
Thank you for the information, i've quite the same issue but with a different motherboard, an ASUS PRIME B760M-A WIFI, and i'm unable to find an equivalent of the settings.
I took photo of the bios (see enclosed)
Thank you very much,
Flo
- Mark as New
- Bookmark
- Subscribe
- Mute
- Subscribe to RSS Feed
- Permalink
- Report Inappropriate Content
My motherboard has Enhanced turbo boost setting, yours must be mce or multi core enhancement so disable that and try also to set load-line calibration LLC (in your case CPU load line calibration) to normal or medium or low, in your case lvl 3 (default), lvl 2 should be low. Test with intel xtu avx and avx2 stress test and if it passes you are good.
- Mark as New
- Bookmark
- Subscribe
- Mute
- Subscribe to RSS Feed
- Permalink
- Report Inappropriate Content
- Mark as New
- Bookmark
- Subscribe
- Mute
- Subscribe to RSS Feed
- Permalink
- Report Inappropriate Content
I just wana know that is my processor Intel i5 13500H 45W is also effected or it's the problem with unlocked processors
- Mark as New
- Bookmark
- Subscribe
- Mute
- Subscribe to RSS Feed
- Permalink
- Report Inappropriate Content
Hi Peguar,
Thank you for the update on this matter.
If you need any additional information, please submit a new question as this thread will no longer be monitored.
Best regards,
Caguicla C.
Intel® Customer Support Technician
- Mark as New
- Bookmark
- Subscribe
- Mute
- Subscribe to RSS Feed
- Permalink
- Report Inappropriate Content
I use same settings. As for the MB manufacturers they need to set safest preset that works and then when someone wants to OC or undervolt they do that under their own responsability. I wasted 2 months figuring out all BIOS options. Now i need to save my preset in case i upgrade BIOS because i changed a lot of options.
- Mark as New
- Bookmark
- Subscribe
- Mute
- Subscribe to RSS Feed
- Permalink
- Report Inappropriate Content
Gigabyte z790 Gaming X
- Mark as New
- Bookmark
- Subscribe
- Mute
- Subscribe to RSS Feed
- Permalink
- Report Inappropriate Content
What cooling do you have? If its air than that is not enough. I also disabled MCE. PL1 and PL2 set at 253, ICCMax at 400(307 sometimes freezes my pc who knows why and i dont like giving bios unlimited ICCMax so 400 is fine). I also reduced P core multiplier to 50x so 5GHz and E core multiplier to 38 or 3800 because when i leave all at auto i hit 100C and after throtling cpu drops at 5.2GHz.So after this setup cpu never throtles I lost 10% speed in cinebench but max temp never passes 80C. My cooling is DeepCool ak620. I would leave CEP on. Everything else related to cpu in bios is AUTO.
- Mark as New
- Bookmark
- Subscribe
- Mute
- Subscribe to RSS Feed
- Permalink
- Report Inappropriate Content
Hola, como esta tengo problemas con el procesador todo lo ejecuto la mas de juegos el juego esta bloqueado de como tengo los de mi Equio.- También les dejo el link de Pastebin donde subo la prueba de procesador que realizo con el software antes mencionado En este hilo --- IPDT64 - Revision: 4.1.9.41--- IPDT64 - Hora de inicio: 22/5/2024 12:37:35 - Pastebin.com
Quiero aclarar que no soy un experto en BIOS ni cambiar voltajes del procesador como estaba leyendo para lo que necesitaría si me pueden orientar sobre el BIOS que uso por MSI es la última versión de M40 para lo que sigue es en Face Beta. -La refrigeración que tengo es líquida 360. No me interesa perder rendimiento, solo que no rompa todos los juegos o tenga un poco más de estabilidad en él. -
Saludos desde Argetina.,-


- Mark as New
- Bookmark
- Subscribe
- Mute
- Subscribe to RSS Feed
- Permalink
- Report Inappropriate Content
Set Power limit PL1 and PL2 to 253. Set core current limit to 400. Set LoadLine calibration to normal or medium. Turn off multi core enhancement or enhanced multi core. Set P core to 50 and e core to 38. Disable energy efficient turbo. You will loose slight performance but you will gain stability.
- Mark as New
- Bookmark
- Subscribe
- Mute
- Subscribe to RSS Feed
- Permalink
- Report Inappropriate Content
Hello Peguar First of all, thank you for your response, excuse my ignorance regarding the subject, but where should I include that parameter in the bios? or in the Intel(R) Extreme Tuning Utility program, if you could help me configure these parameters I would appreciate it. Please, it's been more than 5 months since I've been able to play at all since everything crashes... thank you very much.-
- Mark as New
- Bookmark
- Subscribe
- Mute
- Subscribe to RSS Feed
- Permalink
- Report Inappropriate Content
.png")
- Mark as New
- Bookmark
- Subscribe
- Mute
- Subscribe to RSS Feed
- Permalink
- Report Inappropriate Content
Also in oc/cpu settings for MSI motherboard look for enhanced multi core or similiar and disable. Use settings from screenshot in XTU - advanced tuning, set all active performance cores to 50 and efficient to 38 and apply. Performance pre-core tuning and below dont change anything. Download newest version of XTU if you haven`t already. Use stress test avx2. If you pass you are good to go. If you cant find options in bios look in google or youtube. Good luck.
- Mark as New
- Bookmark
- Subscribe
- Mute
- Subscribe to RSS Feed
- Permalink
- Report Inappropriate Content
Hello Peguar: first of all, thank you very much for your instructions, what I did when you answered me the first time was to look for more information on PL1 and PL2 253w, well, I found an MSi site where it shows some configurations which I took as reference what you told me. Enter the bios and make the changes. Since then, the stability has improved, everything works, the games do not crash, the video card works, everything is perfect, I know that with this I am losing performance in the 14700k processor, which seems illogical to me and should not happen. This would have to be solved or agreed between Intel and the motherboard manufacturers, an end user could not be making configurations of this level. - I wanted to show you how to configure and give me your point of view if this is okay. - What It is not seen in the screenshots, it is when I set what the WaterCooler is for the stock heatsink, it is crazy to tell the bios that I am not using WaterCooler and that I have a stock heatsink, the temperature obviously maintains them for me, well I will leave images and you can tell me Would you say greetings from Argentina and very grateful for what you always responded to me and the help you gave me.-


- Mark as New
- Bookmark
- Subscribe
- Mute
- Subscribe to RSS Feed
- Permalink
- Report Inappropriate Content
- Mark as New
- Bookmark
- Subscribe
- Mute
- Subscribe to RSS Feed
- Permalink
- Report Inappropriate Content
Read this:
Doc (not an Intel employee or contractor)
[If you find any Intel driver you might need, download and save it now.]
- Subscribe to RSS Feed
- Mark Topic as New
- Mark Topic as Read
- Float this Topic for Current User
- Bookmark
- Subscribe
- Printer Friendly Page