- Mark as New
- Bookmark
- Subscribe
- Mute
- Subscribe to RSS Feed
- Permalink
- Report Inappropriate Content
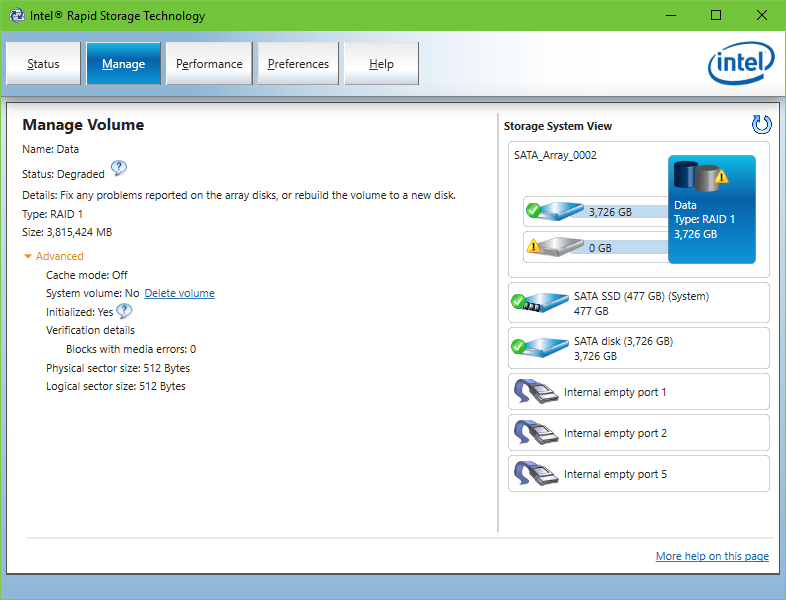
I have a 4TB RAID 1 configured in RST. A few weeks ago, one of the drives failed. RST reported the RAID 1 in Degraded status. I removed the failed drive and have been running in Degraded status for a few weeks. Now I have a new replacement drive, same size and make, slightly newer model. After powering down the system, I attached the new drive to the same port that the failed drive was using and booted the system. RST sees the new drive as a non-member disk, but won't give me the option to rebuild the degraded array to this new disk. Below is a screenshot. Also, attached is the System Report from RST.
Link Copied
- Mark as New
- Bookmark
- Subscribe
- Mute
- Subscribe to RSS Feed
- Permalink
- Report Inappropriate Content
Hello DanH5000,
I understand you are facing some issues with our Intel® Rapid Storage Technology which is not rebuilding your Raid 1. Please accept my apologies for any type of inconvenience this might cause you.
In this case we can try to rebuild this Raid Volume making this disk as spare. Let me share the instructions bellow:
- Open RST.
- In the main screen of the program, in the "Storage System View" section click on the new disk you recently installed (SATA disk (3,726 GB) 3,726 GB).
- Then, left side you might be able to see an option that says "Usage: Available Mark as spare" in blue, click there.
- By making the disk an spare the system should automatically rebuild the Raid Volume you have.
Please let me know which are the results of these steps.
Antony S.
- Mark as New
- Bookmark
- Subscribe
- Mute
- Subscribe to RSS Feed
- Permalink
- Report Inappropriate Content
Thank you Antony for the quick reply. Your suggestion to mark the new drive as a spare seemed like a reasonable suggestion, so I looked for that option. However, when I select the new drive in the RST application, it doesn't offer me any link or button to mark the drive as a spare. Here is a screenshot. Do you have any other suggestions that i might try? Is it possible to mark the drive as a spare using the RST Option ROM? Thank you for your help. - Dan
- Mark as New
- Bookmark
- Subscribe
- Mute
- Subscribe to RSS Feed
- Permalink
- Report Inappropriate Content
Hello DanH5000,
Thank you very much for your response. I really apologize that the troubleshooting steps attached above did not work for your case.
Allow me to share with you that I recreated the issue you are facing at our lab. I will attach a file with the steps taken to recreate this issue and rebuild the Raid 1. Please find the components I used bellow:
- Motherboard: ASUS ROG STRIX H270F: https://www.asus.com/Motherboards/ROG-STRIX-H270F-GAMING/ https://www.asus.com/Motherboards/ROG-STRIX-H270F-GAMING/
- Storage: 3 HDD's of 1TB Model: WD1002FAEX-00Z3A0: https://www.newegg.com/Product/Product.aspx?Item=N82E16822136533 https://www.newegg.com/Product/Product.aspx?Item=N82E16822136533
- Processor: Intel® Core™ i7-7700K Processor: https://ark.intel.com/products/97129/Intel-Core-i7-7700K-Processor-8M-Cache-up-to-4_50-GHz https://ark.intel.com/products/97129/Intel-Core-i7-7700K-Processor-8M-Cache-up-to-4_50-GHz
- OS: Win10 x64
- Downloads for Intel® Rapid Storage Technology (Intel® RST) Version 15.5.0.1051
Furthermore, just for testing purposes, I would like to know if by any chance you have any other HDD for you to plug it into you system just to verify if the RST will give you the option to set that disk as spare. Please do not take any action doing this step since it is just to verify if there is any problem with the new disk you have installed.
Antony S.
- Mark as New
- Bookmark
- Subscribe
- Mute
- Subscribe to RSS Feed
- Permalink
- Report Inappropriate Content
Hi Antony,
Thank you for sending the steps in your PDF file. I can see and understand the steps you described. However, this is not what I'm seeing on my system. Specifically, the RST on my system doesn't offer any option to Rebuild to Another Disk when selecting the volume (or when selecting any of the disks). And there is not an option to mark the disk as a spare, either. Please see the screenshot below. Can you try to recreate the issue in your lab using larger disks than 1TB? I'm using 4TB disks - I believe the larger size of my disks is affecting the RST app. Do you have 4TB disks you can try in your lab? Thanks, Dan
- Mark as New
- Bookmark
- Subscribe
- Mute
- Subscribe to RSS Feed
- Permalink
- Report Inappropriate Content
Hello DanH5000,
Thank you for you quick reply. For me to perform a deeper research please let me know which were the results of the extra step I attached on the post above in addition, may please have the model of your motherboard?
Antony S.
- Mark as New
- Bookmark
- Subscribe
- Mute
- Subscribe to RSS Feed
- Permalink
- Report Inappropriate Content
Hi Antony,
Unfortunately I don't have another spare disk. The one I'm using as the replacement is brand new 4TB Black drive from Western Digital, manufactured in Sept 2017. I opened it from a new box and put it directly into the computer. It shows up fine in Windows Disk Management as expected and also shows up correctly in Device Manager. I believe the new disk is working correctly.
The motherboard is Asus P7P55D-E.
Thanks,
Dan
- Mark as New
- Bookmark
- Subscribe
- Mute
- Subscribe to RSS Feed
- Permalink
- Report Inappropriate Content
Hello DanH5000,
Thank you very much for your patience. I have found that for this Motherboard there is no possibility to rebuild the Raid using the BIOS or the ROM options.
In this scenario, I will highly recommend you to double check with the manufacturer of your motherboard if there is any other step they might have for this case or if there is any compatibility issue with the HDD you are using.
If there is no extra step and there is no compatibility issue, I will recommend to back up all the information you have on the old disk you have and delete and create the volume once again.
Please accept my apologies for any inconvenience.
Antony S.
- Mark as New
- Bookmark
- Subscribe
- Mute
- Subscribe to RSS Feed
- Permalink
- Report Inappropriate Content
Hi Antony,
Based on our conversation, I explored some other options to fix the issue. I'm pleased to say I've been able to rebuild the RAID 1 array with the new disk. Here's what I did in case others find it useful.
When going into the Option ROM, it wasn't showing the correct size of the 4TB disks. Even prior to this issue, it has never showed the correct size for the 4TB disks. It showed them as something like 1.3TB or 1.8TB or something, I can't remember. But the size shown was much smaller than the actual disk size. I believe this is because the Option ROM version is quite old compared to the disks which are only a few years old. The Option ROM has been unable to correctly manage disks larger than about 1TB. I believe this is why RST refused to allow me to mark the new disk as a spare.
I have a newer motherboard which I made available for testing. The model is Asrock Z87 Extreme6/ac. So I pulled both disks for the RAID 1 array from the computer and installed them on this newer Asrock motherboard. I booted into the Option ROM on the Asrock with Ctrl+I. The Option ROM on this newer motherboard has version 12.5.0.1815. This version was able to correctly show both disks at their correct capacity. It also immediately recognized that the RAID 1 array was running in Degraded mode. A message popped up in the Option ROM asking if I wanted to use the new 4TB disk to rebuild the degraded array. I selected the new disk and the Option ROM correctly marked the RAID 1 array with status "Rebuild". A message also displayed informing me that the rebuild process would begin after booting into the operating system (Windows 10).
At this point, I powered down the Asrock system and did not boot into the operating system. Instead, I moved both disks back to the original computer (Asus P7P55D-E) and attached them to their original SATA ports. Upon booting the original computer into Windows again, the Intel RST application correctly showed the status of the RAID 1 array with both disks attached and status "Rebuilding". This was a happy moment. It took about 16 hours for the rebuild process to complete. During this time, the RST application continued to show a third disk as part of the RAID 1 array, this third disk being the faulty disk that failed. The strange part about this is the serial number shown for this disk was incorrect - it looked like the serial number and other metadata for this failed disk got corrupted as the drive started failing. You can see this from the System Info logs I attached earlier. This may have contributed to RST being unable to attach the new disk to the array. I'm not sure.
I was worried I might have to clear the metadata from both disks to get rid of the corrupt metadata from the failed disk, even after the rebuild process completed. And then I'd have to rebuild the entire array from scratch. However, I was pleasantly surprised when the after the rebuild process completed, the metadata for the faulty drive was also cleared from the array somehow.
So now I'm back to a healthy RAID 1 array, with the original healthy disk and the new replacement disk both in sync and healthy as part of the rebuilt RAID 1 array. And RST is no longer showing anything about the failed disk.
Bottom line - I think newer versions of RST are required to properly manage disks larger than 2TB. I was fortunate to have a newer motherboard with a newer version of the RST Option ROM which allowed me to set the array status to "Rebuild" mode and then rebuild it in the operating system.
Thanks again for your help in solving my issue. I've very happy to get this going and not have to worry about spending more time on it this weekend!
Thanks,
Dan
- Mark as New
- Bookmark
- Subscribe
- Mute
- Subscribe to RSS Feed
- Permalink
- Report Inappropriate Content
Hello, DanH5000
It is really good to hear that your system is up and running now. It was my pleasure to help you regarding this issue with your array.
In addition, allow me to share with you the latest version of the Intel® Rapid Storage Technology (Intel® RST). Please find the download link bellow:
https://downloadcenter.intel.com/download/27400/Intel-Rapid-Storage-Technology-Intel-RST-?product=55005 https://downloadcenter.intel.com/download/27400/Intel-Rapid-Storage-Technology-Intel-RST-?product=55005
Antony S.
- Subscribe to RSS Feed
- Mark Topic as New
- Mark Topic as Read
- Float this Topic for Current User
- Bookmark
- Subscribe
- Printer Friendly Page