- Mark as New
- Bookmark
- Subscribe
- Mute
- Subscribe to RSS Feed
- Permalink
- Report Inappropriate Content
Hi there
we're using the HP VR Backpack Gen 2 which has the AC-9260 wireless adapter.
as we use them for virtual reality applications with a free roam characteristic we noticed that during the roaming process (so basically all 5 minutes) we have high ping spikes ~40-100ms for around 2-3 seconds. See picture 1: software used is pingplotter
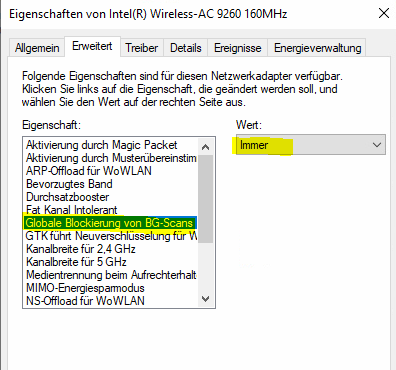
after some research we have found that the global bg scan blocking should be set to "Always" (in german "immer") to disable to bg scans. but even with the setting changed we still have the same 5 minutes ping spikes.
would be glad if someone has a solution for this. for the clients this is like a horrible moment when everything starts lagging while moving
Link Copied
- Mark as New
- Bookmark
- Subscribe
- Mute
- Subscribe to RSS Feed
- Permalink
- Report Inappropriate Content
Hello @PDLA
Thank you for posting on the Intel® communities.
In order to check this further, could you please provide the following information?
1- Is the Intel® Wireless-AC 9260 the original wireless adapter that came pre-installed in your systems or did you install/integrate it on the devices?
2- How many systems are affected by this behavior?
3- Did the wireless connection work fine before at any time? Or is the issue happening since the very first day that you have these systems?
4- If this worked fine before, do you remember if this issue happened after a new Windows update or Wireless/Bluetooth driver update?
5- Have you tested with different drivers including both HP* customized drivers and Intel® generic drivers? Please provide details.
6- What is the manufacturer and model of Access Point, and the SW version?
If this is regarding an Enterprise environment, please provide the following (if applicable):
- WLAN Controller manufacturer, model, and SW version:
- RADIUS Server Make/Version:
7- Run the Intel® System Support Utility (Intel® SSU) to gather more details about the system.
- Download the Intel® SSU and save the application on your computer
- Open the application, check the "Everything" checkbox, and click "Scan" to see the system and device information. The Intel® SSU defaults to the "Summary View" on the output screen following the scan. Click the menu where it says "Summary" to change to "Detailed View".
- To save your scan, click Next and click Save.
- Once you have saved the file (.txt file), please attach it to your reply.
- To upload and attach a file, use the "Drag and drop here or browse files to attach" option below the response textbox.
Best regards,
Andrew G.
Intel Customer Support Technician
- Mark as New
- Bookmark
- Subscribe
- Mute
- Subscribe to RSS Feed
- Permalink
- Report Inappropriate Content
Hello PDLA
We are checking this thread and we would like to know if you need further assistance. Please do not hesitate to contact us back if you have additional inquiries.
Best regards,
Andrew G.
Intel Customer Support Technician
- Mark as New
- Bookmark
- Subscribe
- Mute
- Subscribe to RSS Feed
- Permalink
- Report Inappropriate Content
Hello PDLA
We have not heard back from you so we will proceed to close this thread now. If you need any additional information, please submit a new question as this thread will no longer be monitored.
Best regards,
Andrew G.
Intel Customer Support Technician
- Subscribe to RSS Feed
- Mark Topic as New
- Mark Topic as Read
- Float this Topic for Current User
- Bookmark
- Subscribe
- Printer Friendly Page

